background image

24

MENU OPERATION 

Press 

▼/▲

 button to select Signal Type, then press 

/

 button to select the type you want to set.

There are two selections: Air and Cable.

Signal Type

AUTO


CHANNEL


SEARCH-Air

Now


Searching...


Please Wait...

Analog


Channels


Found

:       

0

Digital


Channels


Found

:        

0

92

%

Press 

▼/▲

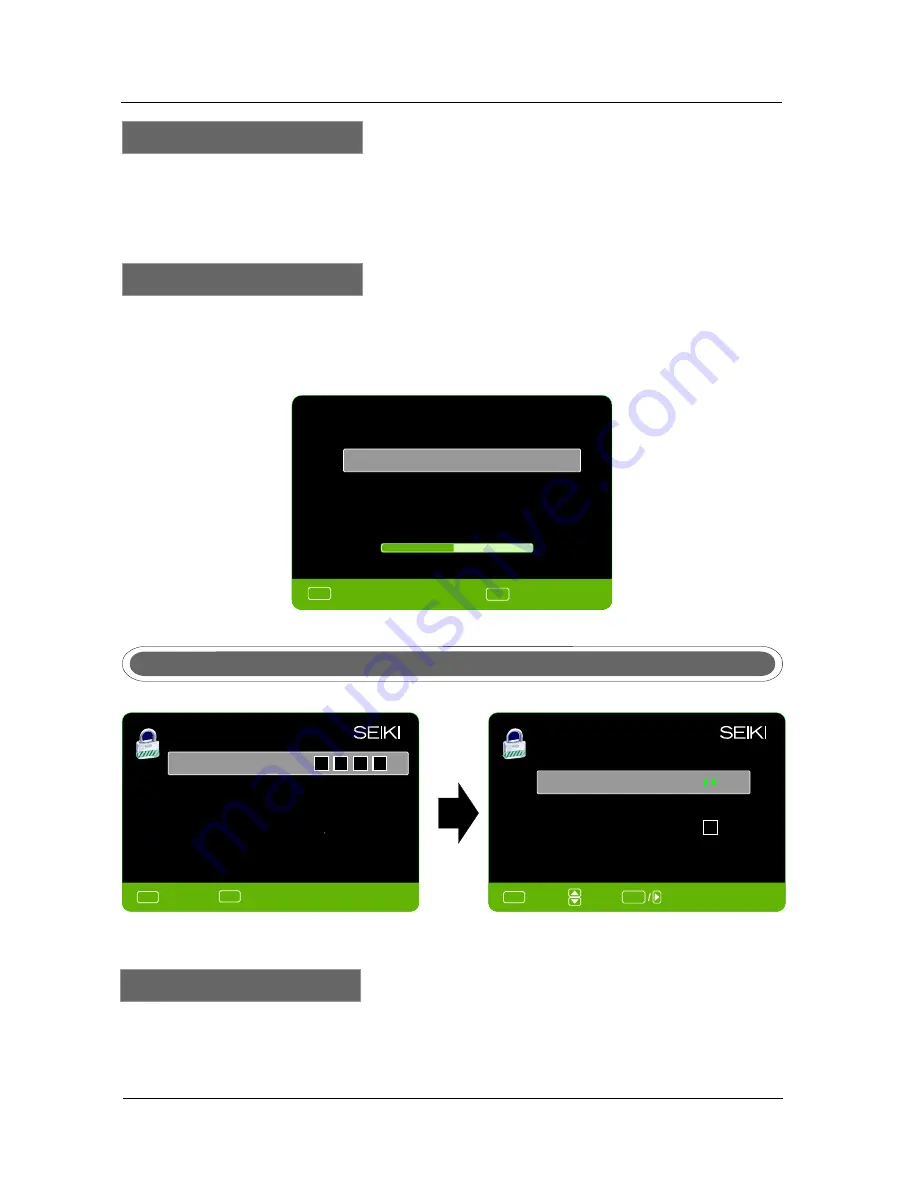
 button to select Auto Channel Search, then press ENTER button to search channel.

A Channel Search Menu will appear as below.

Auto


Channel


Search

V-CHIP

Change


Password

Keypad


Lock

Input


password


to


enter

,

default


password


is‘‘0000’’.

Source


Lock

PARENTAL


MENU

Lock Parental Control

Change


Password

Keypad


Lock

Source


Lock

Press

 ▼/▲

 button to select V-CHIP, then press ENTER button to adjust. A 

s

ub 

m

enu 

w

ill appear 

as below.

V

-

CHIP

PARENTAL


CONTROL

V-CHIP

PARENTAL


CONTROL

MENU

:

Skip

ENTER

:

Stop


Auto


Channel


Search

MENU

:

Return

0

~

9

:

Enter password

MENU

:

Return

Return

Lock Parental Control

ENTER

:

Go


to


Next


Menu

:

Move

Summary of Contents for SE324FB

Page 1: ...SE324FB LCD Television ...

Page 2: ......

Page 3: ...nstructions Remote control setup 14 12 17 24 28 30 Select Input Source Setup Menu Basic Operation Picture Menu Sound Menu Channel Menu Lock Menu 22 Other Menu Picture Menu in PC Source 31 20 17 18 3 1 5 6 7 4 8 10 9 I M P O R TA N T INFORMATION SPECIFICATIONS 2 PREFACE TROUBLESHOOTING SAFETY PRECAUTIONS FRONT BACK CONNECTIONS OF LCD TV REMOTE CONTROL TV INSTALLATION DRAWINGS IN THE CARTON MENU OPE...

Page 4: ... this device may not cause harmful interference and 2 this device must accept any interference received including interference that may cause undesired operation Reorient or relocate the receiving antenna Increase the separation between the equipment and receiver Connect the equipment into an outlet on a circuit different from that to which the receiver is connected Warning Changes or modification...

Page 5: ...re or electric shock do not expose this apparatus to rain or moisture 17 Mains plug or appliance coupler is used as the disconnect device shall be readily operable WARNING The battery battery or batteries or battery pack shall not be exposed to excessive heat such as sunshine fire or the like 5 Do not use near water 6 Clean only with dry cloth 7 Do not block any ventilation openings Install in acc...

Page 6: ...g to the model TV 3 SAFETY PRECAUTIONS Power cord and cables must be properly placed and protected to prevent people from stepping on them and causing the TV to fall Minimum distances 10cm 20cm 10cm 5cm Put the TV on a stable surface Do not place any material on the TV Do not block or cover the ventilation openings on the TV If you have a wall mount check that it is steady Do not use the TV with f...

Page 7: ...ent or liquid to clean the TV Only clean the TV with a soft and dry cloth In case of troubleshooting do not use spare parts other than those suggested by the manufacturer Using inadequate spare parts can lead to electric shocks short circuits fire or other incidents Unplug the TV during lightning storms or when unused for long periods of time ...

Page 8: ...ital Channels Found 0 25 MENU Skip OK Stop Auto Channel Search 6 4 IN THE CARTON Remote Control 1 5V 1 5V AAA Batteries LCD TV SET USER S MANUAL IN THE CARTON Quick Connect Guide Warranty Card 4 1 7 3 6 9 2 5 8 0 ASPECT A S MODE SLEEP MTS CH LIST CC B C D MENU SOURCE EXIT DISPLAY CH VOL FAV ADD ERASE POWER MUTE P MOD E OK ENTER V CHIP AUTO HDMI COMP VGA TV ...

Page 9: ...CR 9 L OUT R OUT Connect to Audio Amplifier device 5 HDMI1 HDMI2 HDMI3 HDMI High Definition Multimedia Interface provides an uncompressed all digital audio video interface between this TV and any HDMI equipped A V equipment HDMI supports enhanced or high definition video plus digital audio 7 YPbPr AUDIO L R Connect the YPbPr Audio output jack of DVD or VCR 2 Cable Antenna RF input that connects to...

Page 10: ...rovide service for correct installation and connection After installation insert the 75 ohm antenna plug into the antenna jack as shown Antenna Connection 75 OHM ANTENNA PLUG POWER PLUG OF ANTENNA AMPLIFIER OUTDOOR ANTENNA AMPLIFIER VHF ANTENNA UHF ANTENNA INDOOR ANTENNA AMPLIFIER Connect the power cord correctly as shown Press the Power of your LCD TV to turn on the LCD TV The power indicator on ...

Page 11: ... is blue Pr is red Audio left is white and Audio right is red Select component input source using the SOURCE button on the remote control Connect the VIDEO and AUDIO output jack of the DVD or VCR to the VIDEO jacks on the set using the RCA cable Match the jack colors Video is yellow Audio left is white and Audio right is red Select the AV input source using the SOURCE button on the remote control ...

Page 12: ...VGA PC the PC to the PC AUDIO jack on the set Select the RGB input source with using the SOURCE button on the remote control COAXIAL Connection COAX Cable COAX COAX the audio amplifier back Audio amplifier TV Back VGA Cable Audio Cable AUDIO RGB PC OUTPUT TV Back Connect to Audio Amplifier device to the Coaxial output jack on the TV ...

Page 13: ...A approved wall mounting bracket NOT SUPPLIED Remove the screws holding the base to the base bracket and lift the base away do not remove the base mounting brackets Mount the VESA bracket using 4 x M5x12 isometric threaded screws not supplied Do not use screws longer than 20mm damage will occur to the internal parts Caution Your new TV is heavy please consult with a professional wallmount installe...

Page 14: ...rd Wide Wide Zoom Zoom etc THUMBSTICK OK Allows you to navigate the on screen menus and adjust the system settings to your preference LIST Press to display the TV program list MTS Choose Mono stereo or sap for analog TV input Choose English French or Spanish for DTV input P MODE Press repeatedly to cycle through the available video picture modes S MODE Press to cycle through the different sound se...

Page 15: ...rough channels CC Press to display the closed caption V CHIP Press to enter the V CHIP menu FAV Press to display the favorite list in TV mode ADD ERASE Add or Erase favorite channels TV Switch to TV source If you deviate the television remote sensors the remote control may fail or work abnormally If not using the remote for a long period of time please remove the batteries The picture of remote co...

Page 16: ...up correctly with compartment markings 3 Replace the battery cover To prevent battery leakage which may result in bodily injury or damage to the remote 1 Install all batteries correctly and as marked on the remote control 2 Do not mix alkaline standard carbon zinc or rechargeable ni cad ni mh etc Batteries Remove batteries when the remote is not used for a long period of time ...

Page 17: ...n your remote control or TV keypad to select the Language of screen menu and message Use the left and right arrows on your remote control or TV keypad to select your local time zone Select the language you want Select Time Zone Move Change Setting MENU Return French Spanish Move MENU Return Press to Enter Power On Mode Retail Mode Home Mode Power On Mode Home Mode optimizes the standard video sett...

Page 18: ...MENU Return Press to Enter Use the Up or Down key arrows on your remote control or TV keypad to select the channel scan type Cable Antenna Back AUTO CHANNEL SEARCH Cable 25 0 25 MENU Skip Stop Auto Channel Search MENU Skip Stop Auto Channel Search Scanning Channel Program Scanning Channel Program ENTER ENTER ENTER Page Select Press to Enter ENTER Move MENU Return Press to Enter ENTER Select your C...

Page 19: ...ON Press MENU button to display the MAIN MENU Press button to select the MENU you would like to choose Press ENTER button to enter the sub menu Press button to select the option and then press ENTER to adjust the value in the sub menu You can press MENU button to go back to the main menu or EXIT button to close the MENU SOUND CHANNEL PARENTAL SETUP OTHERS PICTURE Source Select TV AV YPbPr HDMI1 HD...

Page 20: ...ttons to select Picture Mode then press buttons to adjust Only in the User mode the detail options as following can be adjusted Available picture mode Dynamic Standard Movie User Picture Mode Picture Settings Color Temperature Normal Advanced Picture Settings Screen Size PC Settings PICTURE PICTURE MENU Wide Brightness Contrast Press button to select Brightness then press button to adjust Brightne...

Page 21: ...ct Screen Size then press button to adjust Available Screen Size Standard Wide Wide Zoom Zoom Press ENTER when the Color Temperature item is highlighted Then press button to adjust Available color temperature Normal Warm Cool Color Temperature Warm Color Temperature ADVANCED PICTURE SETTINGS Film Mode Noise Reduction MPEG Noise Reduction Off Off Advanced Picture Settings Low MENU Return Move Chang...

Page 22: ... Noise Reduction Off Low Medium High Off Film Mode Off MPEG Noise Reduction MPEG Noise Reduction Off Press button to select the item MPEG Noise Reduction then press button to adjust Reduces the mosaic effect in MPEG compressed video Useful for DVDs Blu ray and Digital TV channels 1 Press ENTER when the Sound Settings item is highlighted Then you will go to the sub menu as following 2 Press to sele...

Page 23: ... button to select the item Bass then press button to adjust Press button to select the item Treble then press button to adjust Press button to select the item Balance then press button to adjust Surround Mode Surround Mode Press button to select the item Surround Mode then press ENTER button to adjust Provides a virtual surround sound experience made possible using just two front speakers Bass 0 T...

Page 24: ...ize the volume across all programs and commercials AVL AVL Digital Audio Output Press button to select the item Digital Audio Output then press button to select the desired digital audio output Available digital audio output PCM Raw Off EQUALIZER SETTINGS 100 250 500 1K 2K 4K Equalizer Settings Equalizer Settings Press button to select the item Mode then press button to select the desired mode Ava...

Page 25: ...ton to select Channel List then press ENTER button to scan the Channel List If you select the option Channel List On the channel label will display in the list Channel List Press button to select Manual Channel Settings then press ENTER button to set the value in the sub menu CHANNEL SETTINGS Channel Settings A4 A11 A14 A63 Channel Skip Favorite Label MENU Return Cursor Page Select MENU Return Mov...

Page 26: ...earch channel A Channel Search Menu will appear as below Auto Channel Search V CHIP Change Password Keypad Lock Input password to enter default password is 0000 Source Lock PARENTAL MENU Lock Parental Control Change Password Keypad Lock Source Lock Press button to select V CHIP then press ENTER button to adjust A sub menu will appear as below V CHIP PARENTAL CONTROL V CHIP PARENTAL CONTROL MENU Sk...

Page 27: ...u will appear as below US V CHIP MOVIE RATING G PG PG 13 R NC 17 X Press button to select Movie Rating then press ENTER button to adjust A sub menu will appear as below Movie Rating Press button to select Rating then press ENTER button to lock MENU ENTER Return Move Go to Next Menu MENU Return Move MENU Return Move Lock Unlock USA Movie Rating US V Chip Canada V Chip ENTER ...

Page 28: ...utton to lock French Rating Press button to select CANADA V CHIP then press ENTER button to adjust A sub menu will appear as below ENGLISH RATING C C8 G PG 14 18 CANADA V CHIP FRENCH RATING G 8ans 13ans 16ans 18ans The operation of CANADA V CHIP is the same as the operation of US V CHIP MENU Return Move Lock Unlock ENTER MENU Return Move Lock Unlock MENU Return Move Lock Unlock MENU Return Move CA...

Page 29: ... will be in gray Press button to select Clear Downloadable Data then press OK button to set the rating Note The above two operation only valid when playing the downloadable data stream The operations are the same as US V CHIP Press button to select Change Password then press ENTER button to adjust the value A Sub Menu Will appear as below If the password is changed all of the passwords in the menu...

Page 30: ...ER button to enter the sub menu Press button to select Source then press ENTER button to set the Source Lock You can t enter the locked source if you set the Source lock Source Lock HDMI1 PC MENU Return Move On Off MENU Return Move Go to Next Menu MENU Return Move Page On Off SOURCE LOCK Page1 1 TV CLOSED CAPTION Analog Caption Type CC1 Caption Display Off Closed Caption Menu Language English Keyp...

Page 31: ... Cyan CC Size CC Font Press but ton to select CC Size then press but ton to set Avai labl e Size Defaul t Small Standar d Lar ge Press but ton to sel ect then press but ton to sel ect the Font Avai labl e type Defaul t Style0 7 Caption Display Analog Caption Type Digital Caption Type Digital CC Preset Digital CC Style Press button to select Caption Display then press button to select ON or OFF Pre...

Page 32: ...orresponding to the setup time OTHERS No Signal Power Off No Operation Power Off All Reset OTHERS MENU Enter Daylight Saving Time Press button to select then press ENTER button to set Daylight Saving Time CLOCK Auto Clock Setup Time 2009 10 21 20 00 00 Day Of Week Wed Daylight Saving Time Press button to select the Clock then press ENTER to edit Clock Press button to select Blue Background then pr...

Page 33: ...re the same as that for TV source 2 SOUND menu and description are the same as that for TV But the settings for Analog Sound and Digital Sound are invalid in these sources 3 LOCK menu and description are the same as that for TV V source 4 SETUP menu and description are the same as that for TV source But the setting for Closed Caption is invalid in source HDMI 5 OTHER menu and description are the s...

Page 34: ...ged the settings you can exit from the menu by pressing MENU EXIT Press button to select Picture Mode then press button to adjust Available picture mode Dynamic Standard Movie User Press button to select Brightness then press button to adjust Picture Settings Color 50 Sharpness 50 Color Sharpness Press button to select Color then press button to adjust Press button to select Sharpness then press b...

Page 35: ...on to select Screen Size then press button to adjust Available Screen Size Standard Wide Dot By Dot 1 Press ENTER when the PC Settings item is highlighted Then you will go the sub menu as following 2 Press to select the desired menu item Press ENTER to proceed if necessary 3 Press to adjust the item to the desired level 4 When you have changed the settings you can exit from the menu by pressing ME...

Page 36: ...ust Press button to select Clock then press button to adjust Press button to select Phase then press button to adjust Press button to select Reset then press OK button to reset the options above 1 SOUND menu and description are the same as that for TV but the settings for Analog Sound and Digital Sound are invalid in PC source 2 LOCK menu and descriptions are the same as that for TV source 3 SETUP...

Page 37: ...35 9 Troubleshooting TROUBLESHOOTING ...

Page 38: ...36 TROUBLESHOOTING ...

Page 39: ...37 TROUBLESHOOTING ...

Page 40: ...CART OUT AC 110 120V 60Hz SCART IN Power Consumption Input Power 95W USB IPOD COAXIAL OUT VGA PC AUDIO IN DVD Dimensions This manual is only for your reference any change to the design and specification will not be advised COMMON INTERFACE DVD Video Output Format YES YES YES YES YES YES W Stand LxWxH inches W O Stand LxWxH inches Wall mount Wall mount Screw size Weight W Stand Net lbs Gross lbs 19...

Page 41: ......

Reviews: