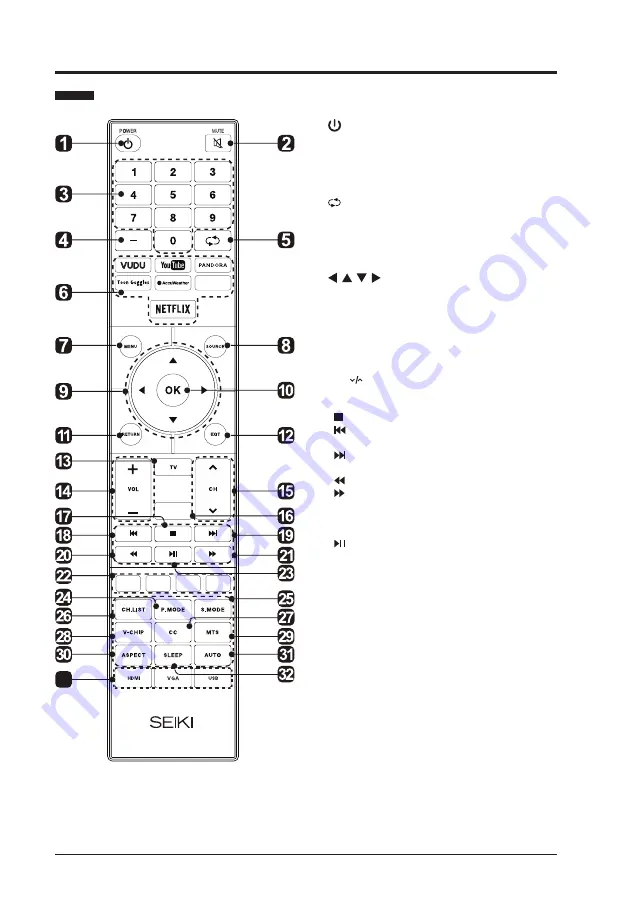
Seiki ELSFC5017 Manual Download Page 8

      8

PREPARATION

 Remote Control

Audio Cable

(sold separately)

INFO

33

1. :

Switch the TV between On and Standby 

mode.

2.MUTE:

Mute and restore TV sound.

3.0~9:

Select a program.(ATV/DTV mode)

4.—:

Enter multiple program channel numbers 

such as 2-1.

5. :

Return to the previous viewing channel.

6.APP:

Press to select the desired APP.

7.MENU:

Display the main menu.

8.SOURCE:

Select among the different input 

signal sources:TV/AV/Component/HDMI1/

HDMI2/HDMI3/VGA.

9.

:Allows you to navigate the on- 

screen display menus and adjust the system 

settings to your preference.

10.OK:

Confirm the selection.

11.RETURN:

Return to previous menu.

12.EXIT:

Exit the on screen display menu.

13.TV:

Press to turn to TV mode.

14.VOL+/-:

Adjust the volume.

15.CH :

Select the channel.

16.INFO:

Dispaly the present screen information 

such as the current channel and input source.

17.

:Stop the playback.

18.

:Skip to the beginning of the previous 

chapter/track/photo.

19.

:Skip to the beginning of the next chapter/ 

track/photo.

20.

:Reverse playback rapidly.

21.

:Advance playback rapidly.

22.COLORED BUTTONS:

Press to access 

directly to the corresponding function in APP 

service.

23. :

Start playback or pause.

24.P.MODE:

Select picture mode:Dynamic/

Movie/Energy saving/User/Standard.

25.S.MODE:

Select sound mode:Standard/Music/

Movie/User.

26.CH.LIST:

Display program list.

27.CC:

Closed Caption selection:ON/OFF/CC On 

Mute.

28.V-CHIP:

Set up parental control.

29.MTS:

Switch among different audio 

channels:STEREO/MONO/SAP.

30.ASPECT:

Select the aspect ratio 

settings:Standard/Wide/Wide zoom/Zoom/Just 

scan (HDMI).

31.AUTO:

Press to adjust the picture 

automatically in VGA source.

32.SLEEP:

Set the TV sleep timer: 

OFF/5/10.../180 / 240 min.

33.HDMI/VGA/USB:

HDMI/VGA/USB Hot key.

Summary of Contents for ELSFC5017

Page 1: ...emote Control 8 Connecting External Devices 9 Customizing TV Settings 10 Initial Setup 10 Navigating the Setup Settings 11 Streaming 12 Media 13 Viewing Photos 13 Listening to Music 14 Source 14 Setup...

Page 2: ...ed of as unsorted waste and must be collecte dseparately As a consumer you are responsible for ensuring that this product is disposed of properly This product meets ENERGY STAR guidelines for energy e...

Page 3: ...ilure to insert batteries in the correct polarity as indicated in the battery compartment may shorten the life of the batteries or cause batteries to leak Do not mix old and new batteries Do not mix A...

Page 4: ...002 KBB SEIKI User Manual PREPARATION What s Included Remote Control with Batteries 845 058 03B04 TV Set Quick Start Guide 002 LEH SEIKI Quick Start Guide TV Stand 154 001 YM42 154 002 YM42 Four Scre...

Page 5: ...rent input signal sources 3 MENU Display the OSD on screen display menu 4 CH Press to select a channel 5 VOL Press to adjust the volume 6 POWER Indicator Illuminate blue when the TV is turned on Illum...

Page 6: ...utput device 6 VGA Input Connect to a computer or other devices with a VGA interface 2 HDMI 1 HDMI 3 HDMI 10 7 PC AUDIO Input Connect to a computer audio output 8 DTV TV Input Connect to the antenna 7...

Page 7: ...2 Untighten the 4 pcs screws holding the stand assembly and remove them 3 Attach the wall mount bracket to the TV using the mounting holes on the back of the TV Mount this TV according to the instruc...

Page 8: ...screen information such as the current channel and input source 17 Stop the playback 18 Skip to the beginning of the previous chapter track photo 19 Skip to the beginning of the next chapter track ph...

Page 9: ...onsole Blu ray Player Recorder VCR Satellite Receiver Satellite Antenna Cable OR HDMI Device Computer Digital Audio System VGACable sold separately 3 5mmAudioCable sold separately Headphones Audio Cab...

Page 10: ...the picture will be darker This mode meets the requirements of ENERGY STAR qualification Retail Mode Select Retail Mode if you would like your picture to be brighter At times this mode may use more en...

Page 11: ...t be found this frame will be displayed automatically Navigating the Setup Settings Press the MENU button to display the main menu Use buttons to select SETUP menu and then press buttons to navigate a...

Page 12: ...fers effortless and endless music enjoyment and discovery Just start with the name of one of your favorite artists songs genres or composers and Pandora will do the rest It s easy to create personaliz...

Page 13: ...TINGS MEDIA NOTE Portable storage devices USB disk or Hard disk should be inserted Press the MENU button on the main unit or on the remote control and then press buttons to select the MEDIA and then p...

Page 14: ...ported MP3 SOURCE Press the MENU button on the main unit or on the remote control and press buttons to select the SOURCE menu Then press buttons to select different input sources among TV AV Componet...

Page 15: ...to enter Press buttons to select the following setting options and then press buttons to adjust each option s setting Menu Language Select menu language English French or Spanish The default on screen...

Page 16: ...and then press OK button to enter Press buttons to select the following audio options and then press buttons to adjust each option s setting AUDIO Sound Mode Allow the selection of an audio enhanceme...

Page 17: ...picture mode directly Blue Screen Allow the blue background to turn On Off during weak or no signal conditions Brightness Increase or decrease the amount of white in the picture For User mode Contrast...

Page 18: ...Scan feature to scan your available cable channels It will perform the auto scan if the Air antenna is selected Favorite Set the selected channel as favorite channels Show Hide Show Hide the selected...

Page 19: ...K button to enter Press buttons to select the following network options and then press buttons to adjust each option s setting NETWORK Auto Upgrade After the TV connects to network the system will aut...

Page 20: ...do not turn off the power during the upgrading Below occasions are possible while your internet is connected to enjoy your OTT services 1 Please check your internet signal strength while internet is...

Page 21: ...ord for confirmation System Lock Select to turn On Off system lock The following options USA Canada RRT Setting and Reset RRT will only be accessible when you turn the system lock on USA TV TV RATING...

Page 22: ...and submenus examples below Things to Consider before Setting up Parental Control Determine which rating you consider acceptable to the viewer For example if you choose TV PG more restrictive ratings...

Page 23: ...d to Older Children Considered suitable for children over 7 may contain fantasy violence scenes TV G General Audience Considered suitable for all audience children may watch unattended TV PG Parental...

Page 24: ...power supply maybe interrupted Check if the sleep timer is set Check whether the Auto Standby is activated The video function does not work No picture No Sound Check whether the TV is switched on Try...

Page 25: ...g in the LOCK menu then enter the following master password 8899 The master password clears your previous password and allows you to enter a new password There is a problem in PC mode The signal is ou...

Page 26: ...e pursuant to Part 15 of the FCC Rules These limits are designed to provide reasonable protection against harmful interference in a residential installation This equipment generates uses and can radia...

Page 27: ...or failure caused by or attributable to abuse misuse failure to follow instructions improper installation or maintenance alteration accident or excess voltage or current b improper or incorrectly per...

Page 28: ...rnative contact information YouTube You can browse the following website for more help https productforums google com forum categories youtube smart tvs VUDU You can call the following telephone for m...

Reviews: