background image

20

[en]

Hardware Installation Guide

Mounting the Fiber Adapter

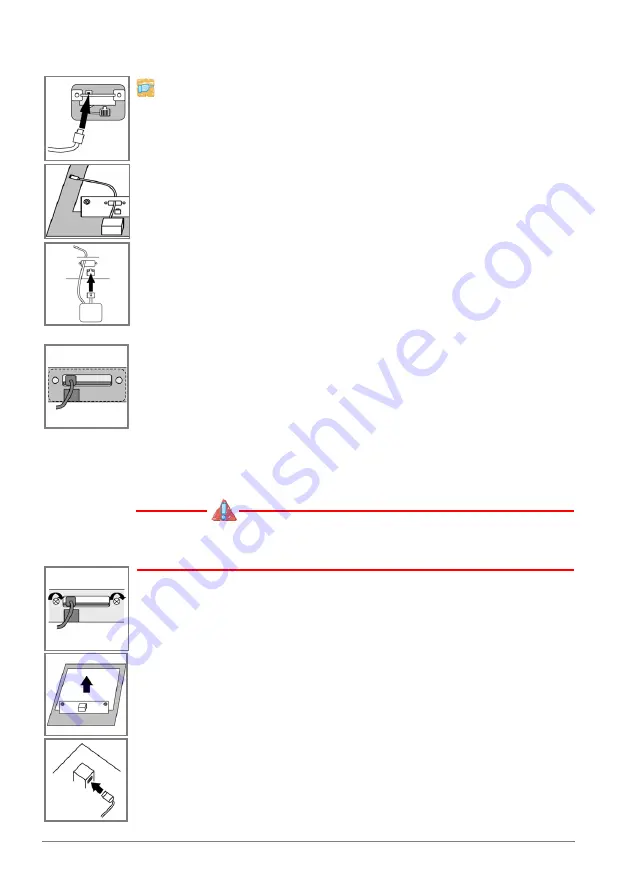
Proceed as follows:

1.

Connect the included USB cable (mini-B connector) to the 
Fiber Adapter.

2.

Put the unconnected end of the USB cable (connector A) from 
the outside through the hole in the panel and place it next to 
the printer mainboard.

3.

Connect the RJ-45 network cable of the Fiber Adapter to the 
RJ-45 network connector of the printer.

(To make things easier, you can gently pull the RJ-45 network cable of 
the Fiber Adapter out of the Fiber Adapter. After connecting the cable, 
put it back into the housing of the Fiber Adapter.)

4.

Place the Fiber Adapter from the outside above the cut-out on 
the printer mainboard, as shown in the following:

-  The part of the circuit board that protrudes from the Fiber 

Adapter and the USB port (mini-B) slightly stick out of the 
cut-out and the circuit board of the printer mainboard.

-  The holes of the Fiber Adapter and the holes next to the 

cut-out are congruent.

Make sure that the RJ-45 network cable of the Fiber 
Adapter does not get wedged.

5.

Attach the Fiber Adapter to the printer mainboard using the 
screws included in the package.

6.

Remove the cardboard that you have placed on the circuit 
board and housing of the printer mainboard.

7.

Connect the free end of the USB cable (connector A) to the 
next available USB port on the circuit board of the printer 
mainboard.

Summary of Contents for FC126

Page 1: ...ontrols and Technical Data Mounting the Fiber Adapter Notifications Please note the table of contents on page 3 Should you have any further questions please contact our support hotline Überblick de Dieser Hardware Installation Guide beinhaltet eine kurze Beschreibung der Installation des FC126 Sie erhalten die folgenden Informationen Sicherheitsvorschriften Lieferumfang Bedienelemente und technisc...

Page 2: ...2 Hardware Installation Guide Date of Manufacture The serial number includes the date of manufacture The serial number can be found on the type plate ...

Page 3: ...egulations 4 Scope of Supply 14 Controls and Technical Data 15 Mounting the Fiber Adapter 17 Notifications 30 Inhaltsverzeichnis Sicherheitsvorschriften 4 Lieferumfang 22 Bedienelemente und technische Daten 23 Einbau des Fiber Adapters 25 Notifizierungen 30 ...

Page 4: ...autions to avoid damage to the device board e g electrostatic discharges etc Deutsch de Beachten Sie vor Inbetriebnahme Ihres Gerätes folgende Sicherheitsvorschriften Lesen Sie die Dokumentation und stellen Sie sicher dass Ihr System den aufgeführten Anforderungen entspricht Das Gerät darf nur von qualifiziertem Fachpersonal angeschlossen und mit dem Netzwerk verbunden werden Das Gerät darf nicht ...

Page 5: ...ion du périphérique suite à des décharges électrostatiques Español es Tenga en cuenta antes de poner en funcionamiento su dispositivo las siguientes precauciones Lea la documentación y compruebe que su sistema reune los requisitos necesarios Únicamente expertos tienen permiso de conectar el dispositivo a la red Evite el contacto con la humedad o con el líquido El dispositivo sólo debe ser conectad...

Page 6: ...os seguintes avisos de segurança Leia a documentação e certifique se de que o seu sistema corresponde aos requisitos indicados O dispositivo só pode ser ligado à rede por um técnico especializado e qualificado O dispositivo não pode entrar em contacto com humidade ou líquidos O dispositivo apenas deve ser ligado e operado se estiver em perfeitas condições Coloque os cabos de forma a evitar que as ...

Page 7: ...lder de angivne krav Apparatet må kun tilsluttes og forbindes til netværket af kvalificeret fagpersonale Produktet må ikke komme i kontakt med fugt eller væske Apparatet skal være fuldstændig intakt og uden skader når den tilsluttes og under anvendelse Dette er et laserprodukt i klasse 1 Hvis der ikke er tilsluttet et kabel til SC el ST stikket er der stor sandsynlighed for udstråling af usynlige ...

Page 8: ...een in onbeschadigde toestand worden aangesloten en bedreven Kabels dienen zo te worden gelegd dat niemand er op stapt of er over kan struikelen Dit is een klasse 1 laserproduct Wanneer een kabel op een SC resp ST stekker is aangesloten wordt eventueel onzichtbare laserstraling uitgezonden Kijk niet in de laserstraal en stelt u zich niet aan de laserstraling bloot Plaats de meegeleverde beschermka...

Page 9: ... smie byt zapojené a prevádzkované len v nepoškodenom stave Všetky vodièe umiestnite tak aby nikto na ne nemohol šliapnut alebo o ne zakopnút Ide o laserový výrobok triedy 1 Ked nie je do SC príp ST zástrčky pripojený žiadny kábel je možné že vyžaruje neviditeľný laserový lúč Nevystavujte sa laserovému lúču a nepozerajte sa do vnútra Na SC príp ST zástrčku nasadte ochranné kryty dodané spolu s výr...

Page 10: ...spluatāciju lūdzam iepazīties ar sekojošiem drošības noteikumiem Iepazīstieties ar dokumentāciju un pārliecinieties ka Jūsu sistēma atbilst minētajām prasībām Iekārtu pieslēgt un pievienot tīklam drīkst tikai kvalificēts speciālists Iekārta nedrīkst nonākt saskarē ar mitrumu vai šķidrumu Iekārtu drīkst pieslēgt un ekspluatēt tikai nebojātā stāvoklī Visus kabeļus novietojiet tā lai neviens nevarētu...

Page 11: ... i łączony z siecią wyłącznie przez wykwalifikowany personel specjalistyczny Urządzenie nie może mieć kontaktu z wilgocią lub cieczami Urządzenie może być podłączane i eksploatowane tylko w nieuszkodzonym stanie Wszystkie kable należy układać w taki sposób aby nie można było na nie wejść lub potknąć się na nich Jest to produkt laserowy klasy 1 Jeżeli do wtyku SC względnie ST nie jest podłączony ka...

Page 12: ...alan lézer kisugárzás Ne tegye ki magát a lézer kisugárzásnak és ne pillantson bele Dúgja rá a szállított védősapkát az SC ill ST dugóra amennyiben ezt nem használja Kérjük hogy a kicsomagolás előtt gondoskodjon az elektrosztatikus kisülések megelozésérol Malti mt Qabel ma tibda bil proćedura inizjali ta thaddim ta l apparat tieghek jekk joghgbok hu nota tar regolamenti ta sigurtŕ li gejjin Aqra d...

Page 13: ...и от електростатични разряди Românã ro Înainte de punerea în funcţiune a aparatului dumneavoastră aveţi în vedere următoarele prescripţii de siguranţă Citiţi documentaţia şi asiguraţi vă că sistemul dumneavoastră corespunde cerinţelor enumerate Conectarea şi legarea în reţea a aparatului sunt permise numai personalului de specialitate calificat Aparatul nu are voie să vină în contract cu umiditate...

Page 14: ...e package content before getting started Fiber Adapter FC126 Hardware Installation Guide The Hardware Installation Guide provides a brief description of the installation of the FC126 This document USB cable USB 2 0 connector A on mini B connector Two screws M3 x 5 mm ...

Page 15: ... 100BaseFX Fast Ethernet IEEE 802 3 SC type MMF 50 125 µm 62 5 125 µm Current input 290 mA 5 V Operating environment Ambient temperature 5 40 C Relative humidity 20 80 Dimensions Width 52 mm Height 31 mm Depth 59 mm Weight 133 g 5a 4 6 5b 1 Activity LED orange 2 Network connector SC female 3 Link LED green 4 Printer port RJ 45 male 5a Hole 5b Hole 6 USB connection type mini B 1 3 2 4 ...

Page 16: ...on about its status LED Action Color Description Activity blinks at irregular intervals orange Indicates the exchange of network data packets Link permanently on permanently off green There is a connection to the optical fiber network There is no connection to the optical fiber network ...

Page 17: ...l Do not connect the Fiber Adapter to other printers The Fiber Adapter is to be mounted from the outside over a pre punched and removable cut out in the printer panel The connection to the printer is established via an internal RJ 45 cable Power is supplied via the USB cable by means of an internal USB port of the printer Before mounting the device take all necessary precautions to avoid electrost...

Page 18: ...er mainboard can cause injuries Proceed as follows 1 Loosen the knurled screws of the printer mainboard The printer mainboard can be recognized by the RJ 45 network connector and the other printer interfaces The knurled screws cannot be completely removed 2 Pull the printer mainboard out of its slot by means of the knurled screws Only hold the printer mainboard at its panel to avoid damages to the...

Page 19: ...to the RJ 45 network connector on the printer mainboard The protective film consists of pre punched parts that can be removed individually After removing the protective film a pre punched metallic cut out can be seen above the RJ 45 network connector 3 Remove the pre punched metallic cut out above the RJ 45 network connector on the printer mainboard To do this insert a flat screwdriver into the el...

Page 20: ...r Adapter 4 Place the Fiber Adapter from the outside above the cut out on the printer mainboard as shown in the following The part of the circuit board that protrudes from the Fiber Adapter and the USB port mini B slightly stick out of the cut out and the circuit board of the printer mainboard The holes of the Fiber Adapter and the holes next to the cut out are congruent Make sure that the RJ 45 n...

Page 21: ...board Connecting the Fiber Adapter Proceed as follows 1 Remove the protective cap of the SC connector Do not throw away the protective cap Put the protective cap on the SC connector if it is not in use 2 Connect the fiber optic cable of your network SC connector to the network connector SC female of the Fiber Adapter 3 Connect the power cord to the printer Establish the power supply 4 Turn the pri...

Page 22: ...t auf Vollständigkeit bevor Sie die Installation beginnen Fiber Adapter FC126 Hardware Installation Guide Der Hardware Installation Guide beinhaltet eine kurze Beschreibung der Installation des FC126 Dieses Dokument USB Kabel USB 2 0 A Stecker auf Mini B Stecker Zwei Schrauben M3 x 5 mm ...

Page 23: ...sch 100BaseFX Fast Ethernet IEEE 802 3 SC Typ MMF 50 125 µm 62 5 125 µm Stromaufnahme 290 mA bei 5 V Betriebsumgebung Umgebungstemperatur 5 40 C Relative Luftfeuchtigkeit 20 80 Abmessungen Breite 52 mm Höhe 31 mm Tiefe 59 mm Gewicht 133 g 5a 4 6 5b 1 Activity LED orange 2 Netzwerkanschluss SC Buchse 3 Link LED grün 4 Druckeranschluss RJ 45 Stecker 5a Bohrung 5b Bohrung 6 USB Anschluss Typ Mini B 1...

Page 24: ...kann der Zustand des FC126 ermittelt werden LED Aktion Farbe Beschreibung Activity unregelmäßiges Blinken orange Signalisiert den Austausch von Netzwerk Datenpaketen Link Dauer An Dauer Aus grün Eine Verbindung zum Glasfaser Netzwerk ist vorhanden Es besteht keine Verbindung zum Glasfaser Netzwerk ...

Page 25: ...en Fiber Adapter nicht an andere Drucker an Der Fiber Adapter wird außen über einen in der Druckerblende vorgestanzten und herauszubrechenden Ausschnitt montiert Die Verbindung zum Drucker wird über ein internes RJ 45 Kabel hergestellt Die Stromversorgung erfolgt via USB Kabel über einen internen USB Port des Druckers Treffen Sie vor dem Einbau geeignete Maßnahmen um elektrostatische Entladungen z...

Page 26: ... führen Gehen Sie wie folgt vor 1 Lösen Sie die Rändelschrauben des Druckermainboards Das Druckermainboard ist am RJ 45 Netzwerkanschluss und den weiteren Druckerschnittstellen erkennbar Die Rändelschrauben lassen sich nicht vollständig herauslösen 2 Ziehen Sie das Druckermainboard an den Rändelschrauben aus seinem Steckplatz heraus Fassen Sie das Druckermainboard nur an seiner Blende an damit Sie...

Page 27: ...5 Netzwerkanschlusses am Druckermainboard ab Die Blendenfolie besteht aus vorgestanzten Teilstücken die sich einzeln entfernen lassen Nach der Folienentfernung ist oberhalb des RJ 45 Netzwerkanschlusses ein vorgestanzter Metallausschnitt erkennbar 3 Entfernen Sie den vorgestanzten Metallausschnitt oberhalb des RJ 45 Netzwerkanschlusses am Druckermainboard Führen Sie dazu einen Schlitzschraubendreh...

Page 28: ...k in das Fiber Adapter Gehäuse 4 Platzieren Sie den Fiber Adapter wie folgt von außen über den Ausschnitt am Druckermainboard Der aus dem Fiber Adapter hervortretende Platinenteil und der USB Anschluss Mini B ragen etwas durch den Auschnitt hindurch und über die Platine des Druckermainboards Die Bohrungen des Fiber Adapters und die Bohrungen neben dem Ausschnitt liegen deckungsgleich übereinander ...

Page 29: ... Fiber Adapter anschließen Gehen Sie wie folgt vor 1 Entfernen Sie die Schutzkappe des SC Steckers Bewahren Sie die Schutzkappe gut auf Stecken Sie die Schutzkappe auf den SC Stecker wenn Sie ihn nicht verwenden 2 Verbinden Sie das Glasfaserkabel Ihres Netzwerks SC Stecker mit dem Netzwerkanschluss SC Buchse des Fiber Adapters 3 Schließen Sie das Netzkabel an den Drucker an Stromzufuhr herstellen ...

Page 30: ...ware Installation Guide Notifcations The latest version of the EC declaration of conformity can be downloaded from the homepage of SEH Computertechnik GmbH http www seh technology com services ce notification ...

Page 31: ...Hardware Installation Guide 31 ...

Page 32: ...net Resources Support Contacts and Information Sales Contacts and Information Downloads http www seh technology com support http www seh technology com sales http www seh technology com services downloads html 2015 SEH Computertechnik GmbH All trademarks registered trademarks logos and product names are property of their respective owners This product uses Open Source Software For further informat...

Reviews: