background image

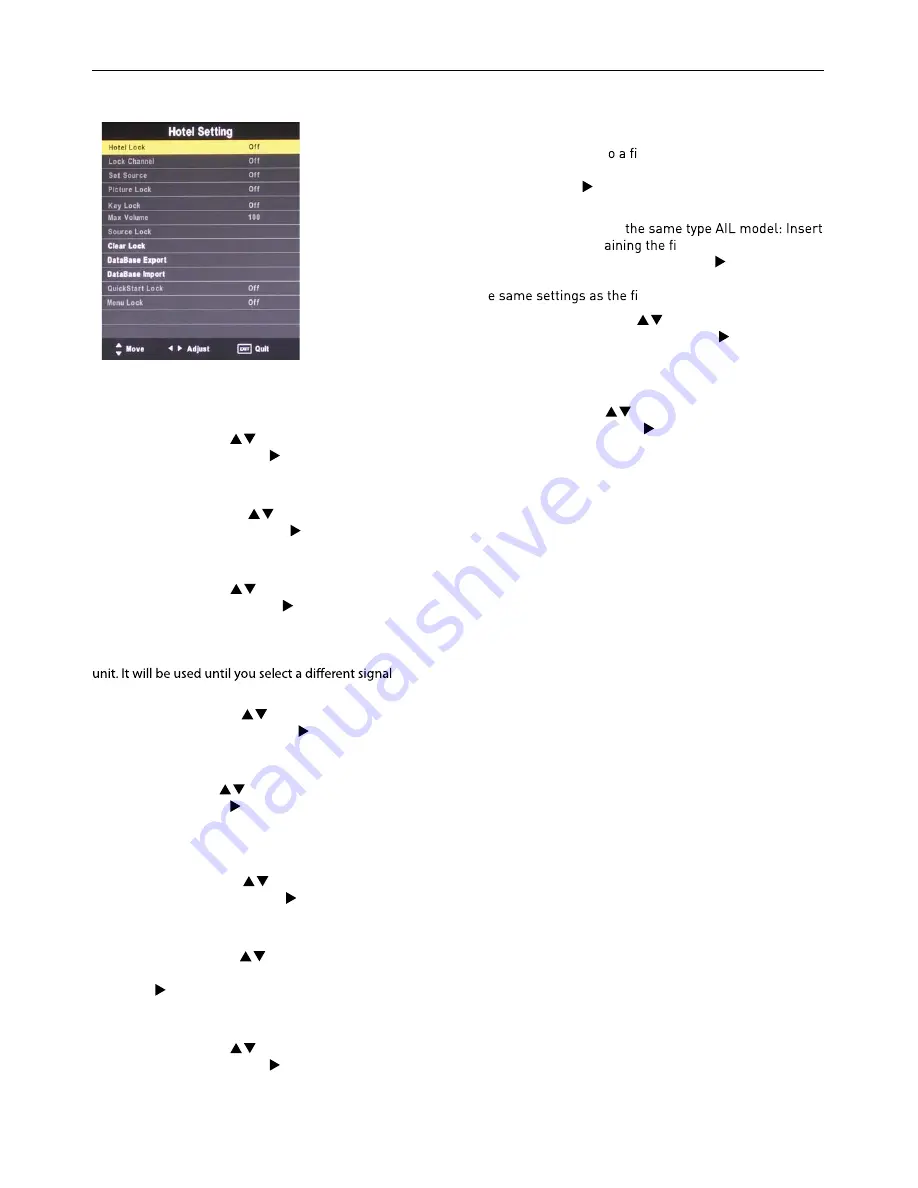
Hotel mode

Restricts access to tuning menus, limitation of maximum 
volume setting. Locks picture and signal menus.

Hotel Lock:

 Press the 

 buttons to select the “Hotel

Lock“ option and then press

to choose between the op-

tions ON or OFF. After selecting ON, the following options 
except the “Clear Lock“ option are available.

Lock Channel:

 Press the 

 buttons to select the “Lock 

Channel“ option and then press

to choose between the 

options ON or OFF. After selecting ON, the TV settings op-
tions will not appear in main menu any more.

Set Source:

 Press the 

 buttons to select the “Set 

Source“ option and then press

to choose a signal 

source or OFF. This function lets you set the signal source
(DVB/Cable/Satellite/ATV/SCART/AV/YPBPR/PC/DVD/
HDMI/USB) to be used when powering on the 

source or disable this function (OFF). 

Picture Lock:

 Press the 

 buttons to select the “Pic-

ture Lock“ option and then press

to choose between

the options ON or OFF. After selecting ON, the Picture
menu options will not appear in main menu any more.

Key Lock: 

Press the 

 buttons to select the “Key Lock“ 

option and then press

to choose between the options 

ON or OFF. After selecting ON, the front panel buttons
TV/AV/ Menu/CH+/CH-/VOL+/VOL of the device will be 
locked.

Max.Volume:

 Press the 

 buttons to select the “Max. 

Volume“ option and then press

to set the desired

volume. Then the output volume will never exceed the set 
maximumvalue.

Source Lock:

 Press the 

 buttons to select the “Source

Lock“ option and then press OK to enable the menu. 
Press the   button to toggle between ON and OFF. All 
signal sources labelled ON will not be available any more
in the signal source selection menu.

Clear Lock:

 Press the 

 buttons to select the “Clear

Lock“ option and then press

to enable it. All hotel set-

tings will remain disabled until you enable the Hotel Lock 
again.

Database export and import:

 Allows Picture, Sound, Op-

tions, Lock and Hotel menus to be copied from one set to
other sets, to make a group of sets all set up the same.

To export the settings t

le on a USB memory: Connect 

a USB memory stick to the USB1 port. Select “Database
export“. Press the   button. When export is completed
successfully “Export Success“ is displayed.

To import the settings on 


the memory stickcont

le in USB1 of the new

TV. Select “Database import“. Press the   button. When 
complete the TV will turn off. When turned on again it will 
hav

rst TV.

QuickStart Lock:

 Press the 

 buttons to select the 

“QuickStart Lock“ option and then press

to choose 

between the options ON or OFF. After selecting ON, the 
QUICK START button on the remotecontrol will be dis-
abled.

Menu Lock:

 Press the 

 buttons to select the “Menu 

Lock“ option and then press

to choose between the op-

tions ON or OFF. After selecting ON, all submenus except
the “Lock“ menu will not appear in main menu any mor

Summary of Contents for LED 2612 QD

Page 1: ...66cm 26 LED TV 66cm 26 LED 2612 QD...

Page 2: ...BS DVBS2 source Shortcut to DVBC source Timeshift Play or pause Press to enter Timeshift the image paused and it start record from the paused position Stop playing or stop recording Fast reverse and F...

Page 3: ...wn Select Page in Hold mode Left Right Hold main page and select sub pages using Red Green soft OK Hold page and Expand TOP Bottom Full Use TXT for Update NUMBER BUTTONS Press 0 9 to select a teletext...

Page 4: ...WARNING DO NOT LEAVE BATTERIES IN THE REMOTE CONTROL FOR EXTENDED PERIODS AS THEY CAN LEAK OR CORRODE CAUSING DAMAGE TO THE REMOTE CON TROL CHECK THEM PERIODICALLY AND REPLACE THEM AS REQUIRED WARNIN...

Page 5: ...nnector pins When using the VGA cable Switch on the TV Switch on the PC Select PC VGA as input source When using the HDMI cable Select HDMI as input source VGA cable HDMI to DVI cable Audio cable HDMI...

Page 6: ...Select Scart source You can now see the playback picture from the video recorder Note To connect the video recorder using other cables refer to the video recorder instruction manual Scart cable Video...

Page 7: ......

Page 8: ......

Page 9: ...install any other satellites use the full satellite installation menu the Conditional Access Module CAM and Smart Card in order to view the pay TV programmes and additional services Contact your Pay P...

Page 10: ......

Page 11: ...ymbol ks s using the buttons QAM Type Select the QAM Type using the buttons ATV analogue cable TV Manual Tuning You can manually tune ATV channels in the TV SETTINGS menu Storage to Press the buttons...

Page 12: ...selected channel supports this function If there is more information about a programme press the and buttons to scroll able number of characters is limited Favourite Lists ton to add it to the list of...

Page 13: ...advanced Dish set up for multiple satellites using DiSEqC switches and DiSEqC positioner follows This should only be attempted by experience users The Dish set up main menu page displays the main int...

Page 14: ...c c A ne s t t te Transponder List st sho r rs or the se ect t te Edit Transponder menu Press GREEN button to enter Tr No s r Nr c ted Frequency Set the do requency Symbol ks s te Polarity t v c Dele...

Page 15: ...talled 22KHzSatellite signal switch Press to select Auto On Off Auto Automatically issued 22 KHz pulse signal to control switching On Off Manual control switch Tone burst Double Single Switch Require...

Page 16: ...Limit Abolish the current limit set Move Auto East or west of Automatic Control continued to turn the polar axis to the desired position Move Continue Manual control of the east or the west continued...

Page 17: ...elected LNB Satellite settings at the time of manufac ture This will be the quickest search Channel Type FTA Free to Air or ALL Free to Air and Pay Channels Service Type DTV DVB TV or Radio DVB Radio...

Page 18: ...onomy mode First Time Installation This option allows you to reset the tv to the default factory setting Once activated the TV will go to standby mode C oc C Setup uto Stand n Clock Manually set the c...

Page 19: ...rd Enter the current password New Password Enter the new password ew Password Enter the new password You can use the Channel Lock to lock selected channels Press the buttons to select the desired chan...

Page 20: ...d then press to set the desired volume Then the output volume will never exceed the set maximumvalue Source Lock Press the buttons to select the Source Lock option and then press OK to enable the menu...

Page 21: ...PHOTO MUSIC MOVIE TEXT USB device list MAIN MENU PHOTO MUSIC MOVIE TEXT Navigation options Information of the USB device 3 Press button to sel les on the USB device PHOTO MUSIC MOVIE TEXT to view or p...

Page 22: ...Screen Saver Press the BLUE button to enter the Screen Saver mode press any button to exit 3 Movie Wat Press buttons to select the option on the menu and press OK button to activate Repeat Select the...

Page 23: ...duled recordings out of this list with the RED button Schedule List Press the A button on the remote control to display the recorder schedule list Note Delete any scheduled recordings out of this list...

Page 24: ...exit the navigation menu by pressing the EXIT button While you are recording you can press the play button and watch what has already been recorded When you press the Pause Play button the picture wi...

Page 25: ......

Page 26: ......

Page 27: ......

Page 28: ......

Page 29: ...If the battery or accumulator contains more than the values of lead Pb mercury Hg and or cadmium Cd in the Bat tery Directive 2006 66 EC then the chemicals Hg Cd Pb symbols for lead Pb mercury Hg and...

Page 30: ...ellite signal 3 The 2 step Quick Start menu will appear on your screen Pictures below 4 Select the tuning process This process will find all available channels and store them Language Country and serv...

Page 31: ...ding Fast reverse and Fast forward Previous next chapter in USB mode or play the Previous next scene of the recorded programs jump by 30 seconds VOL VOL Press to increase decrease the sound level CH C...

Page 32: ...provide you with an Instruction manual per Post LED 2612 QD 26 280 3000 27 39 0 5 7 9 658 x 54 5x 429 mm 658 x 204 8 x 489 4 mm Vesa Wall mounting size Screw size 100 x 100mm M4 x 10 8 8 A LED 1920 1...

Page 33: ...Missing channels or other issues...

Page 34: ......

Reviews: