background image


ST-HDC2PTZFM

·

Quick Start Guide


12 

should pay attention to the routing and reinforcement of the cables. 


When deploying the wire, please do not over tighten the wires or leave the wire loose. 

*The wiring of the speed dome camera should be performed by professionals.   

1.3.2


Installing the Bracket 

Before you start: 

Wall mounting is applicable for indoor/outdoor solid wall construction. The following are the 
mandatory conditions for wall mounting: 


The wall must be thick enough to install the expansion screws. 


Please make sure that the wall is strong enough to withstand more than 8 times the weight of 
the dome and the mount. 

Steps: 

1.


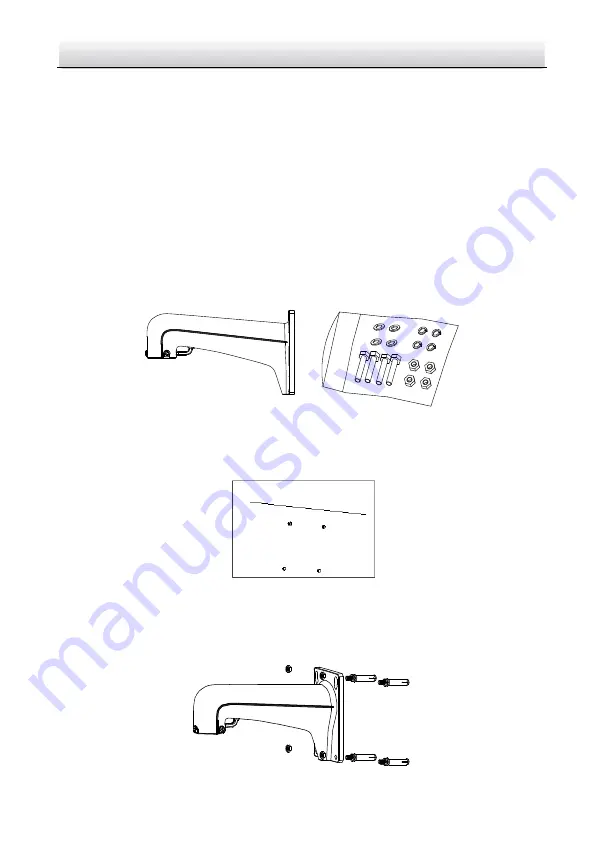
Check whether the type  of  the bracket and the number of accessories are right, as shown in 
the figure below. 


Figure 1-12


Wall Mount Bracket, Nuts and Flat Washers 

2.


Drill  4  screw  holes  in  the  wall  according  to  the  holes  of  the  mount,  and  then  insert  M8 
expansion screws (not supplied) into the mounting holes. 


Figure 1-13


Drill Mounting Holes 

3.


Attach the wall mount to the wall by aligning the 4 screw holes of the mount with expansion 
screws on the wall. 

4.


Secure the wall mount with 4 hex nuts and washers. 


Figure 1-14


Secure the Mount 

Summary of Contents for HD-COAXINATORTVI ST-HDC2PTZFM

Page 1: ...ST HDC2PTZFM QUICK START GUIDE www ŶĂĐĞďƌĂŶĚƐ com www securitytronix com ...

Page 2: ...cludes instructions for using and managing the product Pictures charts images and all other information hereinafter are for description and explanation only The information contained in this Manual is subject to change without notice due to firmware updates or other reasons Please use this user manual under the guidance of professionals 03261060707 ...

Page 3: ...undesired operation EU Conformity Statement This product and if applicable the supplied accessories too are marked with CE and comply therefore with the applicable harmonized European standards listed under the Low Voltage Directive 2006 95 EC the EMC Directive 2004 108 EC the RoHS Directive 2011 65 EU 2012 19 EU WEEE directive Products marked with this symbol cannot be disposed of as unsorted mun...

Page 4: ...the device shall be firmly fixed If smoke odors or noise rise from the device turn off the power at once and unplug the power cable and contact support for further assistance If the product does not work properly please contact your dealer or the nearest service center Never attempt to disassemble the speed dome yourself We shall not assume any responsibility for problems caused by unauthorized re...

Page 5: ...ode the surface coating of the dome cover Please use a soft and dry cloth when cleaning inside and outside surfaces of the dome cover do not use alkaline detergents Please keep all wrappers after unpacking them for future use In case of any failure you will need to return the speed dome to the factory with original packaging to prevent to damage to the camera while in transit For further assistanc...

Page 6: ...2 In door Mounting Applications 14 2 1 5 inch Speed Dome In ceiling Mounting Applications 14 2 2 5 inch Speed Dome Ceiling Mounting Applications 16 2 2 1 Removing the Mounting Bracket 16 2 2 2 Wiring 17 2 2 3 Ceiling Mounting 18 2 3 Mini Speed Dome In ceiling Mounting Applications 20 2 4 Mini Speed Dome Ceiling Mounting Applications 22 2 4 1 Wiring 22 2 4 2 Ceiling Mounting 22 3 Application and Op...

Page 7: ...in following figure The cables are distinguished by different colors The labels attached on the cables are for identification The cables may vary according to different camera models Please refer to the actual device R E D A C 2 4 V Y E L L O W G R E E N B L A C K A C 2 4 V YE LL OW R 48 5 O R AN GE R 4 85 VI E O D Alarm HD TVI Video Output Power Supply VI E O D CVBS Video Output RS485 Figure 1 1 ...

Page 8: ...used to set the baudrate The default dome address is 0 The default baudrate is 2400 1 2 3 4 5 6 7 8 1 2 DIP Switch Figure 1 2 DIP Switch Settings for 5 inch Outdoor Speed Dome 1 2 3 4 5 6 7 8 1 2 DIP Switch Figure 1 3 DIP Switch Settings for 5 inch Indoor Speed Dome Figure 1 4 Enlarged View of DIP Switch Address Settings The SW1 switches from 1 to 5 are used for setting the address of speed dome Y...

Page 9: ... Protocol of the Dome Switch No Protocol 6 7 Self adaptive OFF OFF PELCO_D ON OFF MAN_BOSCH OFF ON MAN_AD ON ON TVI Mode Settings The number 8 of SW1 switches is for setting the TVI mode of the speed dome You can refer to Table 1 4 for details of TVI mode settings Table 1 4 Set the TVI Mode Switch No TVI Mode 8 V2 0 OFF V1 0 ON Baudrate Settings The number 1 and 2 SW2 switches are used for setting...

Page 10: ...e address baudrate protocol etc with value ON 1 and OFF 0 The switch label of the 5 inch IR speed dome is on the back of the SWITCH cover as shown in Figure 1 5 The DIP switch of mini IR speed dome is shown in Figure 1 6 DIP Switch Screws Switch Cover Figure 1 5 Position of DIP Switch for 5 inch IR Speed Dome DIP Switch Location of Mini IR Speed Dome Screws DIP Switch Figure 1 6 DIP Switch of Mini...

Page 11: ...e TVI mode for the speed dome 10 Set the terminal resistor for the speed dome The DIP switch is designed according to binary system When the switch is ON it stands for the number 1 When the switch is OFF it stands for the number 0 Example The switches from No 1 to 5 are used to set the speed dome address No 1 is the lowest digit and No 5 is the highest Turning on all these 5 switches stands for th...

Page 12: ... ON 19200 ON ON Protocol List For convenient settings refer to the following list to set the protocol for the speed dome Table 1 9 Protocol Protocol 8 Self adaptive OFF MAN_AD ON TVI Mode Table 1 10 TVI Mode TVI Mode 9 V2 0 OFF V1 0 ON The speed dome is self adaptive to private protocol when the No 8 and 9 switches are both OFF Terminal Resistor Table 1 11 Terminal Resistor Terminal Matching Resis...

Page 13: ...Speed Dome ON 1 2 3 4 5 6 7 8 SW2 ON 1 2 3 4 5 6 7 8 SW1 Figure 1 9 Enlarged View of DIP Switch The default dome address is 0 the default baudrate is 2400 and the default value of the 120Ω terminator is OFF Address Settings The SW1 switches are used for setting the address of speed dome You can refer to Table 1 12 for details of setting the speed dome address to a specific number Table 1 12 Set th...

Page 14: ...600 ON ON 19200 OFF OFF Protocol Settings For convenient settings refer to the following list to set the protocol for the speed dome Table 1 14 Set the Protocol of the Dome DIP Switch SW2 Protocol Settings Protocol 3 4 5 Self adaptive OFF OFF OFF PELCO_P ON OFF OFF PELCO_D OFF ON OFF HIKVISION ON ON OFF KALATE OFF OFF ON VICON ON OFF ON MAN_BOSCH OFF ON ON MAN_AD ON ON ON TVI Mode Settings The No ...

Page 15: ...oof 1 2 4 Mini Speed Dome Settings DIP Switch Location of Mini HDC TVI Speed Dome DIP Switch Figure 1 10 DIP Switch of Mini HDC TVI Speed Dome Setting DIP Switch 1 7 5 6 4 3 2 8 9 10 ON DIP 1 2 ON Figure 1 11 Enlarged View of DIP Switch Table 1 17 Switch Functions Switch No Function 1 to 5 SW1 Set the address for the speed dome 6 7 SW1 Set the baudrate for the speed dome 8 9 SW1 Set the protocol f...

Page 16: ...ess will be 31 Address List For convenient settings refer to the following list to set the address for the speed domes Table 1 18 Dome Address Switch No Dome Address 1 2 3 4 5 0 OFF OFF OFF OFF OFF 1 ON OFF OFF OFF OFF 2 OFF ON OFF OFF OFF 3 ON ON OFF OFF OFF 31 ON ON ON ON ON Baudrate List For convenient settings refer to the following list to set the baudrate for the speed dome The baudrate will...

Page 17: ...ring and Installation There are several ways to install the speed dome The wall mounting is taken as an example below 1 3 1 Wiring Surveying of the installation environment and wire planning is highly recommended before actual deployment of the wire is implemented in order to provide a safe and steady power supply and a reasonable wiring route Get familiar with the installation environment before ...

Page 18: ...ll the expansion screws Please make sure that the wall is strong enough to withstand more than 8 times the weight of the dome and the mount Steps 1 Check whether the type of the bracket and the number of accessories are right as shown in the figure below Figure 1 12 Wall Mount Bracket Nuts and Flat Washers 2 Drill 4 screw holes in the wall according to the holes of the mount and then insert M8 exp...

Page 19: ...witch is shown below Address 0 Baudrate 2400 Terminal Resistor OFF Please refer to the Section 1 2 DIP Switch Settings for DIP switch settings 1 3 4 Installing the Speed Dome The sketches of installing the speed dome are for reference only Steps 1 Hang the safety rope to the speed dome and then hook to the mount as shown in Figure 1 15 left 2 Route the cables of the speed dome through the wall mou...

Page 20: ...an 250mm The thickness of the ceiling must range between 5 and 40mm The ceiling must be strong enough to withstand more than 4 times the weight of the dome and its accessories Steps 1 Rotate the lower dome counterclockwise to separate it from the back box as shown in Figure 2 1 2 Remove the protective lens cover foam and sticker from the dome drive 3 Set the address and baudrate for the HDC TVI sp...

Page 21: ... power off after checking the speed dome 7 Install the speed dome 1 Loosen the two lock screws on both sides of the back box and make the locks in internal position as shown in the following figure Lock Lock Figure 2 3 Locks and Lock Screws 2 Push the back box into the mounting hole in the ceiling 3 Tighten the lock screws with the screwdriver and the locks will automatically rotate outwards to se...

Page 22: ...n you install the speed dome Notch Arrow Label Figure 2 5 Install the Trim Ring 2 2 5 inch Speed Dome Ceiling Mounting Applications Before you start The ceiling mounting is applicable for indoor outdoor solid ceiling construction The following are the mandatory conditions for ceiling mounting The thickness of the ceiling must range between 5 and 40mm The ceiling must be strong enough to withstand ...

Page 23: ...e the in ceiling mounting bracket 3 Screw 4 bolts onto the back box by a Phillips screwdriver Figure 2 8 Install the bolts 2 2 2 Wiring The cables of dome can be routed either from the top or the side of the back box For the cables routed from the top of the back box it is required to drill a cable hole in the ceiling ...

Page 24: ... rotate clockwise to secure it 5 Use the mounting base as a template to mark four screw holes onto the ceiling 6 If you route cables from the top of the back box mark the cable hole on the ceiling and drill a hole Figure 2 10 Mark the Screw Positions 7 Secure the mounting base to the ceiling with set screws If the speed dome is installed to a wooden wall use the self tapping screws to secure the m...

Page 25: ...the mounting base 3 Push the speed dome upwards and then forwards in the direction of arrow When the speed dome is placed in position the spring will automatically snap into the lock clip firmly Refer to the following figure Line up Push Forwards Push Upwards Spring Lock Clip Figure 2 12 Attach the Back Box to the Mounting Base Please remove the protective film on the lower dome after the installa...

Page 26: ...n the ceiling 1 Attach the drill template to the ceiling where you need to install the speed dome 2 Cut a hole and drill screw holes according to the drill template 2mm of the diameter of the circle is tolerable Ф129 Ф11 Figure 2 13 Drill Holes 2 Disassemble the speed dome 1 Loosen three screws as shown in the following figure 2 Remove the lower dome 3 Loosen three screws and remove the back box 4...

Page 27: ...to the mounting hole on the ceiling 6 Rotate the bolts again The toggle will automatically rotate down to secure the dome to the ceiling Ceiling Toggle Figure 2 16 Install the Dome to the Ceiling 7 Secure the lower dome to the back box with three screws as shown in Figure 2 17 Screws Figure 2 17 Install the Lower Dome 8 Route the cables through the ceiling for the speed dome Please refer to the se...

Page 28: ...d either from the top or the side of the back box as shown in Figure 2 18 For the cables routed from the top of the back box it is required to drill a cable hole in the ceiling Figure 2 18 Cabling for Ceiling Mounting 2 4 2 Ceiling Mounting Steps 1 Drill Screw holes in the ceiling 1 Attach the drill template to the ceiling where you need to install the speed dome 2 Drill screw holes and a cable ho...

Page 29: ... supplied Ceiling Figure 2 21 Install Ceiling Mount 5 Align the hook of the ceiling with unlock label on the speed dome 6 Push the speed dome to the ceiling mount and rotate clockwise to secure it Align Unlock Label Figure 2 22 Install Speed Dome For cement ceiling mounting you need to use expansion screws to fix the mount The mounting hole of the expansion pipe on the wall should align with the m...

Page 30: ...cessary The HDC TVI video output can only be connected to specific HD TVI DVR 3 2 Basic Operations Make sure the speed dome is connected properly and the following basic operations are functioning Panning and tilting Click the direction buttons to control the pan and tilt movement of the speed dome Zooming Click the ZOOM and ZOOM buttons to control the zoom Focusing Click the FOCUS and FOCUS butto...

Page 31: ... the detailed instruction on setting the speed dome 3 2 1 Configuring Patrol You can set the patrol function by the DVR and OSD menu as well as the one touch patrol can be configured Configuring Patrol by DVR Steps 1 Enter the PTZ Control interface Menu Camera PTZ Figure 3 3 PTZ Settings 2 Select patrol No in the drop down list of patrol 3 Click the Set button to add key points for the patrol ...

Page 32: ...the OK button to save the key point to the patrol You can delete all the key points by clicking the Clear button for the selected patrol or click the Clear All button to delete all the key points for all patrols Configuring Patrol by OSD Menu Steps 1 Call the preset 95 to enter the main menu and move the cursor to enter patrol configuration submenu MAIN MENU DOME SETTINGS PATROLS PATROLS PATROL NO...

Page 33: ... seconds selectable is the time that the speed dome stays on a certain preset the patrol speed level 1 40 selectable is the scanning speed the speed dome switching between the presets 4 Follow the above steps to define the other presets for the selected patrol You can configure up to 32 presets in sequence for a patrol Press IRIS to save the new settings or press IRIS to cancel and return to the p...

Page 34: ...le click the corresponding button to activate the park action Park Quick Patrol The dome starts patrol from the predefined preset 1 to preset 32 in order after the park time The undefined preset will be skipped Park Patrol 1 The dome starts move according to the predefined patrol 1 path after the park time Park Preset 1 The dome moves to the predefined preset 1 location after the park time The par...

Page 35: ... DOME SPEED 6 BACK EXIT Figure 3 8 PTZ Configuration 2 Move the cursor to the PARK TIME and set the value in the range from 5 to 720 seconds 3 Move the cursor to the PARK ACT and the action can be set as preset 1 8 pattern 1 5 patrol 1 10 pan scan tilt scan random scan frame scan panoramic scan day mode night mode patrol d or none ...

Page 36: ...trol Exceptions Question The speed dome cannot do PTZ control but can do zoom control Answer For the 5 inch speed dome you need to remove the protective sticker and foam of the camera module by opening the bubble correctly install the speed dome again and then wire up For IR speed dome please remove the protective sticker and then wire up Question Neither zoom control nor PTZ control is available ...

Page 37: ...the image is washed out when the IR light is turned on at night Answer Please check whether there are obstructions near the lens e g wall leaf spider webs cables etc which will cause the over exposure due to the IR light reflection Clear the obstructions if necessary Question The speed dome cannot focus when working in indoor conditions Answer Please restore the device to the default to exclude in...

Page 38: ...ltering of the hardware war invasion act of foreign enemies hostilities regardless of whether war is declared civil war rebellion revolution insurrection military or usurped power or confiscation terrorist activities nationalization government sanction blockage embargo labor dispute strike lockout or interruption or failure of electricity air conditioning or humidity control internet network or te...

Reviews: