background image

SECO-LARM

 ELECTROMAGNETIC LOCK 


SECO-LARM U.S.A., Inc.                                                                                  


5                                                                                       


7.

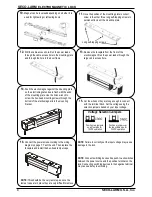
 Put a rubber washer between the two metal washers, 

and place them over the armature screw between 
the armature plate and the door. This allows the 

plate to pivot around the screw to compensate for 
door misalignment. 


9

.

 After determining the correct location, install two screws through the mounting plate. Do not tighten. Adjust the 

mounting plate into the correct position. Double-check the position by holding the magnet there. Once satisfied 
with the position, tighten the two screws. See the diagrams below. 

8.

 Tighten the armature screw enough so that the 

armature plate can withstand a break-in attempt, but 
loose enough so that the armature plate can pivot 

slightly. Make sure the anti-spin guide pins are in the 
two guide pin holes. 


Mounting Plate 

Armature Plate 

90  


The rubber washer will be 

sandwiched between the 

two metal washers. 

Armature 

screw 

Long self-tapping screws 

Guide pins 


6.

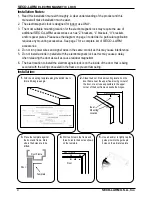
  Depending on the type of door being protected, drill holes according to the diagrams below: 


Hollow Metal Door 

Solid Core Door 

Reinforced Door 

1/4” (6.8mm) for M8x1.25 thread 

Drill a 5/16” (8mm) dia. hole through the 
armature-plate side of the door for the 

armature screw. Then drill a 5/8” (16mm) 
dia. hole for sexnut screw on the 

opposite side of the door. 

Drill an 5/16” (8mm) dia. hole on the 

door for the armature screw, and drill a 
1/2” (12.7mm) dia. and 1” (25mm) deep 

hole for the sexnut screw. 

Drill a 1/4” (6.8mm) 
dia. and 1” (25mm) 

deep hole, tap for 
M8x1.25 thread. 

Tip:  

Use a thread-locking compound 


on the armature screw to ensure 


a long-lasting installation.


Metal 

washers 

5/8” (16mm) 

5/16” (8mm) 

1/2” (12 .7mm) 

5/16” (8mm) 

Summary of Contents for E-941SA-300RQ

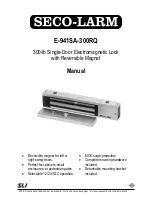
Page 1: ...cts 300 lb Single Door Electromagnetic Lock with Reversible Magnet E 941SA 300RQ Manual Reversible magnet for left or right swing doors Perfect for cabinets small enclosures or pedestrian gates Select...

Page 2: ...rdware for typical installations L brackets Z brackets and U brackets are available for easy mounting Selectable 12 24 VDC Detachable faceplate Parts List 1 x Mounting plate 1 x Electromagnet 1 x Arma...

Page 3: ...ounting screws NOTE When mounting the electromagnet it may be necessary to use a Z bracket 1 or 2 L brackets a U bracket and or plate spacers depending on the location and the type of door and frame U...

Page 4: ...ditional SECO LARM accessories such as Z brackets L brackets U brackets and or spacer plates Please see the diagram on page 3 to decide if a particular application requires any mounting accessories Se...

Page 5: ...htly Make sure the anti spin guide pins are in the two guide pin holes Mounting Plate Armature Plate 90 The rubber washer will be sandwiched between the two metal washers Armature screw Long self tapp...

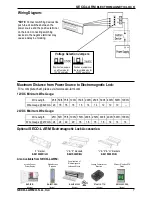
Page 6: ...Position a jumper over the two middle pins for 24VDC operation Position two jumpers on all four pins for 12VDC operation Voltage Selection Jumpers NOTE This should be the very last step as once the t...

Page 7: ...ssories Also Available from SECO LARM Wired or Wireless RTE Plates NOTE Connect switching devices like push to exit switches between the power source and the positive terminal on the lock Connecting s...

Page 8: ...M is also not responsible for misprints or typographical errors Copyright 2010 SECO LARM U S A Inc All rights reserved This material may not be reproduced or copied in whole or in part without the wri...

Reviews: