Secabo C120III Operating Instructions Manual Download Page 11


10 

5.6


Inserting the Blade Holder 


First turn the clamping screw for the blade holder on the cutting head until it 
is open wide enough. 


Then insert the blade holder from the top and press down against the stop in 
the hole on the right side and retighten the clamping screw 


5.7


Inserting cutting vinyl 


Always insert the material to be printed into the unit from the rear. 


Pull  the  vinyl  up  to  the  cutting  bar  in  order  to  correctly  set  the  zero  point. 
Details  on  setting  the  zero  point  are  given  under  Point  6.3  in  these 
instructions. 


If  you  use  a  roll  of  vinyl  instead  of  vinyl  sheets,  the  vinyl  can  be  rolled  off 
cleanly with the aid of the roll holder supplied. 


When  inserting,  ensure  that  the  vinyl  is  inserted  straight  to  prevent  it  from 
distorting  during  transport.  When  the  vinyl  is  inserted  at  an  angle  of  only  a 
few millimeters, this can lead to the vinyl running highly off center during long 
plotting jobs. 


You  can  insert  the  vinyl  into  the  plotter  at  any  desired  point  as  long  as  the 
pressure  rollers  are  located  in  the  areas  of  the  yellow  arrows  on  the  cross-
member. 

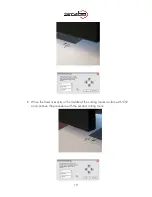
Mount the pinch rollers by switching the locking lever. Make sure the pinch rollers 

are located on the edges of the vinyl (about 2cm inward) to ensure the vinyl is 

tracking correctly and a maximum cutting area is ensured 

.


Blade holder 

Knurled screw 

Summary of Contents for C120III

Page 1: ...roduction with your vinyl cutter without problems Reproduction of these operating instructions in any form requires written approval of Secabo GmbH We reserve all rights to change technical data and p...

Page 2: ...ia Serial Interface 8 5 3 1 Be sure to check 8 5 4 Starting Up Appliance 9 5 5 Installing and Adjusting the Blade 9 5 6 Inserting the Blade Holder 10 5 7 Inserting cutting vinyl 10 5 8 Cutting Test 11...

Page 3: ...Any disposal of the wool must be contained in a closed bag Ensure that liquids and metal objects do not get into the inside of the plotter Ensure that the wall socket used is grounded and protected wi...

Page 4: ...k please check whether the following items are all present Item Quantity Power cable 1 Serial connection cable 1 USB connection cable 1 Bladeholder 1 Penholder 1 45 drag knife 3 Pens 2 Secabo FlexiSta...

Page 5: ...4 3 Layout of Stand Up Base The stand up base for your Secabo vinyl cutter can be assembled simply using the parts supplied as shown in the exploded drawing above...

Page 6: ...5 4 Unit Description 4 1 Unit Parts and Their Function 4 2 Side Views USB port serial port Power supply fuse switch Blade Holder Grid rollers Control panel Cutting head with LAPOS Laser...

Page 7: ...utton blade test c LCD display d Arrow keys for control of cutting head and for pulling in vinyl e Zero point button f Pause button to interrupt plotting operation g Repeat button for repeating a job...

Page 8: ...tion program and select the desired language again Read the software license agreement and accept Set the check marks for the features Flexi Production Manager Samples and click Continue The copy oper...

Page 9: ...ntrol vinyl cutters only over the COM1 or COM2 interface 5 3 Connection via Serial Interface No special installation is required when you connect your Secabo vinyl cutter to the hardware side serial i...

Page 10: ...he cutting head initially moves to the right 5 5 Installing and Adjusting the Blade Take one of the cutting blades supplied and place it in the blade holder so that the sharp side extends at the front...

Page 11: ...instead of vinyl sheets the vinyl can be rolled off cleanly with the aid of the roll holder supplied When inserting ensure that the vinyl is inserted straight to prevent it from distorting during tran...

Page 12: ...e contact pressure with this cutting test The material inserted should be cut cleanly and straight during the cutting test the backing material should not be damaged If the backing material has been c...

Page 13: ...be offline 6 2 Moving the Cutting Head In the offline mode the cutting head can be moved to the right and left by pressing the arrow keys and the vinyl can be moved forwards and backwards The correspo...

Page 14: ...ase pressure Reduce pressure The cutting speed and contact pressure cannot be changed while a plotting job is in progress 6 5 Repeat Function After conclusion of a job it can be repeated without havin...

Page 15: ...r to the mechanical parts The X and Y scaling of the data can be changed by changing the Xp and Yp values If for example an object entered with a length of 100 cm on the computer is cut on the vinyl c...

Page 16: ...an do the first contour cut you have to calibrate LAPOS once in connection with the FlexiStarter This procedure is only to be repeated if you want to use your FlexiStarter on a new PC For calibrating...

Page 17: ...With small prints two marks are enough as they can be read in faster With larger printed sheets 4 marks should be used to reach a higher accuracy Please confirm your entry by clicking the green check...

Page 18: ...a printer of your choice Please be careful that the print is not scaled by the printer driver Please place the print in the cutting plotter if using paper its best on a plotting pad so that the set m...

Page 19: ...s now going to be activated on your Secabo cutting plotter With help of the arrow keys lead this to the centre of the right cutting mark No 1 Please note that you must push one of the arrow keys withi...

Page 20: ...19 When the laser is exactly in the middle of the cutting marks confirm with Ok and continue the procedure with the second cutting mark...

Page 21: ...both directions as shown in the following picture Now you just have to enter the calculated offset in the corresponding menu in the FlexiStarter so that the contours are always cut correctly For this...

Page 22: ...of LAPOS After the successful calibration you can use LAPOS by pursuing the steps in chapter 7 1 though without measuring and entering the offset values again Instead of the above used rectangle you c...

Page 23: ...following notes to prevent unnecessary wear to your blades and achieve the maximum possible service life Always avoid cutting into the backing material on the vinyl The wear to the blades is increase...

Page 24: ...ighted 4 line LCD display Plotter languages HP GL DMPL Memory Unit has 1MB internal memory Max speed 600mm s Max medium thickness 1mm Contact pressure 50g 500g Mechanical resolution 0 025mm Repetition...

Page 25: ...er CD into your CD drive Select the source of the driver to be installed CD drive and perform the update Then restart the PC to apply all settings Vinyl cutter terminates job with Pause on display and...

Page 26: ...ssible causes Blade adjustment and or contact pressure incorrect and should be checked Curves are not cut properlay P P P Possible causes ossible causes ossible causes ossible causes The curve quality...

Page 27: ...he provisions of the following EC Directives and Harmonized Standards EG Richtlinien EC Directives 2006 95 EG Niederspannungsrichtlinie 2006 95 EC Low Volatge Directive 98 37 EG Maschinenrichtlinie 20...

Reviews: