background image

NAV (navigation system)

97

Operating

RADIO, CD/MP3

TEL (telephone)

NAV, INFO

SETUP

Memory Menu

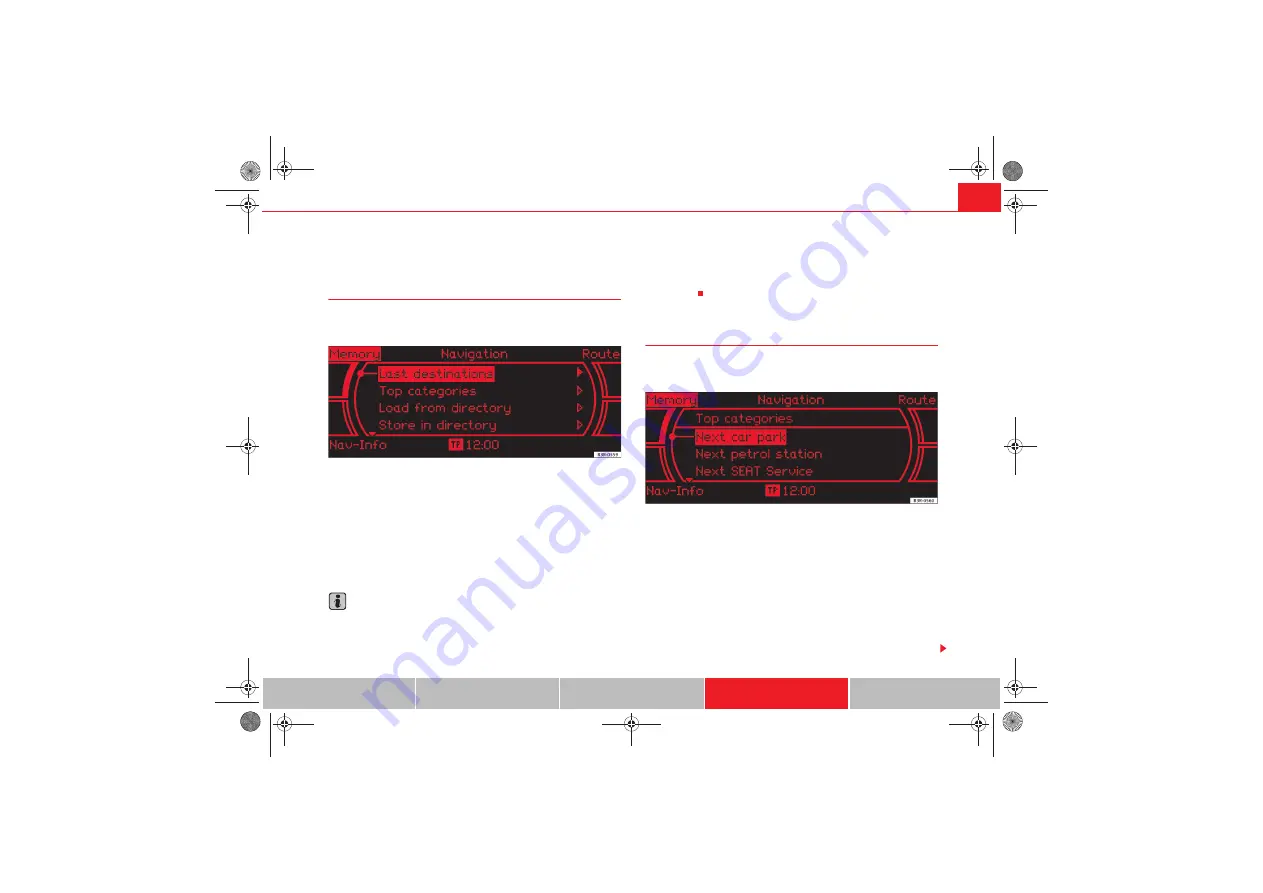
Last destinations

The last destinations are stored automatically and can be 
loaded directly as a new destination.

Fig. 105  Navigation: Select last destinations

– Press  the 

Memory

 control button in the navigation menu.

– Select 

Last destinations


fig. 105

. You will see a list of the most 

recently entered destinations. This list is updated automatically.

– Select the desired station from the list of radio stations.

– Press the control button for 

Start

.

Note

There are sometimes destination entries in the list that cannot be 

displayed completely because they are too long (too many characters). If you 
select one of these entries using the control knob, a second window will open 

up after a few seconds. This screen will show more information about the 
selected entry.

You can delete the list of last destinations in the Setup Navigation menu 

page 108.

Top categories

This function makes selecting destinations that you often use 
easier.

Fig. 106  Navigation: Top categories

– Press  the 

Memory

 control button in the navigation menu.

– Select 

Top categories


fig. 105

. You will see a list of useful 

special destination categories.

– Select a category (e.g. 

Next car park

).

– Select a destination from the list.

– Select 

Set as destination

. The data will be uploaded to the desti-

nation entry menu automatically.

Media System 1.0_EN.book  Seite 97  Donnerstag, 10. September 2009  1:52 13

Summary of Contents for SOUND SYSTEM 1.0

Page 1: ...SEAT MEDIA SYSTEM 1 0 OWNER S MANUAL Inglés 3R0012006AA 07 09 GT9 3R0012006AA Portada Media System 1 0 qxd Maquetación 1 6 8 09 12 17 Página 3 ...

Page 2: ...rce CD main menu CD changer Manual Menu Setup CD Sound settings Basic sound settings GALA Volume setting of other functions TEL telephone Mobile phone system Introduction Installation Using the telephone Main telephone menu Memory menu Telephone setup menu Speech dialogue system NAV INFO NAV navigation system General safety precautions Introduction Main navigation menu Memory Menu Route menu Nav I...

Page 3: ...Media System 1 0_EN book Seite 2 Donnerstag 10 September 2009 1 52 13 ...

Page 4: ... they appear An alphabetical index is included at the end of the Owner s Manual All references to positions such as left right front or rear are given as seen facing in the direction of travel Optional equipment The section is continued on the following page This shows the end of the section Registered trademarks are marked with The absence of this symbol does not warrant unrestricted use of a ter...

Page 5: ...view will help you to quickly familiarise yourself with the controls and displays ON OFF button Switching on and off Adjusting volume Mute function Fig 1 Navigation system control panel A 1 5 11 12 Media System 1 0_EN book Seite 4 Donnerstag 10 September 2009 1 52 13 ...

Page 6: ...switch off What happens when it is switched on When the system is switched on the start screen appears Then the last selected main function is switched on automatically The last selected audio video source is automatically switched on What happens when it is switched off When the equipment is switched off the display darkens and the audio source is silenced Settings made are stored Switching on an...

Page 7: ... with its numerous extra features also provides a wealth of in car entertainment and a great deal of information about traffic and road conditions Carry out your settings in the navigation system only when the vehicle page 115 is stationary If you operate the navigation system while driving you should always be aware of the current traffic situation and if necessary give your full concentration to...

Page 8: ...cloth and an LCD cleaner to clean the navigation system display Cleaning the control panel First clean the control panel with a brush to remove dust Then wipe the controls with a clean soft and slightly damp cloth Caution Treat the display with care Pushing on it with your fingers or touching it with sharp objects can cause dents or scratches Media System 1 0_EN book Seite 7 Donnerstag 10 Septembe...

Page 9: ...he control buttons fig 4 to call up the submenus for the corresponding main function page 10 The submenus for the current main function are shown in the corners of the display The four corners of the display correspond to the four control buttons that are positioned around the rotary push button 4 Press the button fig 4 page 10 to cancel an entry that has not yet been confirmed or to return to the...

Page 10: ...ated button button button button button button Rotary pushbutton You can scroll and select options in the display by turning and pressing the rotary pushbutton Turn Turn the rotary pushbutton fig 6 to select an item in one of the menus Turn the rotary pushbutton clockwise or anti clockwise to move the cursor up or down Press Press the rotary pushbutton fig 6 to confirm your selection or the data e...

Page 11: ...us in each main func tion The activated control button and the corresponding corner of the display will light up for better orientation Return button Press the button fig 9 to go back one level in the sequence of menus Any options selected but not yet confirmed with the rotary pushbutton will be cancelled The button can be used in all menus Fig 7 Navigationsystem Control buttons Fig 8 Navigationsy...

Page 12: ...thin the first ten seconds of a track to go back to the previous track If you press the button after ten seconds you will go back to the beginning of that track To activate the fast reverse function press and hold the button Adjusting volume Volume can be adjusted by turning the ON OFF knob fig 11 The volume setting will be stored automatically If the volume is too low when the radio is turned on ...

Page 13: ...pressed briefly or turned When the navigation system is switched on the volume is automatically set to the factory default value Note If you activate the mute function during a traffic announcement or a naviga tion cue the current announcement will be cancelled Home function Press the corresponding function button within a main function the system will automatically jump to the main menu of that m...

Page 14: ...ublevels that were opened This excludes the Setup menus The log data are erased when the system moves into standby mode An example You are currently in radio mode and have selected the Manual menu You switch to the navigation menu by pressing the button If you then press the button you will return to the menu selected before leaving radio mode In this case the Manual menu of the radio is shown in ...

Page 15: ...us modes and the phone book fig 14 Scroll and press the left thumbwheel to select a function from one of the menus The telephone voice control system page 75 is enabled by pressing the talk button Press the talk button again to deactivate the telephone speech control system Scroll the right thumbwheel up down to raise lower the volume as desired When you adjust the volume for one audio mode this w...

Page 16: ...ot been assigned or the selected station is currently not within the reception range CD MP3 Mode Selecting CD MP3 mode Press the button page 14 fig 14 until a CD or MP3 track appears on the dash panel display Next previous track Use the left thumbwheel page 14 fig 14 to scroll up down Fast forward Press and hold the left thumbwheel to start the fast forward page 14 fig 14 Release the left thumbwhe...

Page 17: ... the left thumbwheel downwards to scroll down the list of stored names from A to Z Scroll the left thumbwheel upwards to scroll up the list of stored names from Z to A If you flick the left thumbwheel you can jump to the next letter of the alphabet Note The information shown on the dash panel display depends on the type of mobile phone used Please wait The SIM card memory is being scanned SIM CARD...

Page 18: ...following describes the different sections of the display shown in the illustrations fig 16 and fig 17 Track The heading indicates which main function you are currently using e g Radio fig 16 Use the function selector buttons to switch between main func tions page 8 Corners of the display These functions depend on the menu you are currently in and are operated using the control buttons The control...

Page 19: ... header The name of the mobile network service provider as it appears in the display may be different from the name that appears in the phone display Subtitle The subtitle shows detailed information about the selected menu option such as Phone book page 17 fig 17 Submenu display centre In the centre of the display the available options in the particular menu are listed or notes are displayed Statu...

Page 20: ...ed by vertical bars The more shaded bars displayed the greater the signal Under certain circumstances the symbols SIM or PIN can appear in place of the signal strength bars If SIM is displayed you must insert your SIM card into the slot to be able to use the phone If PIN is displayed you must enter the PIN code page 62 for the SIM card being used Bluetooth Symbol The Bluetooth symbol appears on th...

Page 21: ...y pushbutton Selection boxes Use the selection box to choose between the various options for a function Fig 22 Display Selection box Use the rotary pushbutton to select an option with a selection box Press the rotary pushbutton to open the selection box fig 22 Turn the rotary pushbutton to select an option Press the rotary pushbutton to confirm your selection Use the selection box to choose betwee...

Page 22: ...option in a menu will be indicated by a filled box highlighted fig 23 After a few seconds the text display will switch from the filled box format to the text frame format fig 24 Working with the alphanumeric keyboard Summary Fig 25 Display Entering numbers with the speller Fig 26 Display Entering letters with the speller Cursor Entry field A 1 A 2 Media System 1 0_EN book Seite 21 Donnerstag 10 Se...

Page 23: ...haracter Press the rotary pushbutton to confirm each selection Use the rotary pushbutton to select OK with the cursor and confirm the entry Deleting characters Use the rotary pushbutton and the cursor to select DEL Briefly press the rotary pushbutton the character to the left of the cursor will be deleted or Press the rotary pushbutton for longer all characters are deleted In some cases such as in...

Page 24: ...portant functions in CD or radio mode Fig 28 Display Function symbols example in CD mode Press the appropriate function selector button e g Press the control button with the Control function Turn the rotary pushbutton to select one of the function symbols fig 28 Confirm the selection by pressing the rotary pushbutton CD MP3 A 1 Media System 1 0_EN book Seite 23 Donnerstag 10 September 2009 1 52 13...

Page 25: ...isation by the rightful owners These restrictions do not apply if you are the rightful owner of these rights e g in the case of your own compositions or recordings or if the rightful owner has given you permission to use these rights Note You can obtain navigation CDs from your dealer Your dealer will also be able to provide information on updates which are available for the CDs Please observe the...

Page 26: ...ve the notes for handling CDs page 25 Ejecting CDs Press the eject button fig 30 to eject the CD Note Please observe the notes for handling CDs page 25 General notes on handling CDs Use of laser equipment Laser devices are categorised according to DIN IEC 76 CO 6 VDE 0837 into four safety classes The laser devices used on your vehicle are classified as safety class 1 Lasers used in devices that fa...

Page 27: ... with a soft lint free cloth Wipe the disc in a straight line from the centre outwards If necessary stubborn stains can be removed with a commercially available CD cleaner or with isopropyl alcohol Please never use petrol paint thinner or record cleaner as these can damage the CDs Error messages The following may be the reason for a read error on the display Note In the case of extreme hot or cold...

Page 28: ...ion stored on the iPod such as artist track album and genre or the name of a playlist does not appear on the navigation system display Caution Very high or very low temperatures a common occurrence in a vehicle s inte rior can cause damage to the iPod and or impair its performance Please do not leave your iPod in the vehicle in case of extreme tempera tures Note Please refer to the iPod operating ...

Page 29: ...e bay until you hear it engage The iPod will switch on automatically and the battery will be charged If the navigation system does not detect the iPod after you insert it please reset the iPod refer to the iPod operating instruc tions To start the iPod press the button page 46 The iPod is switched off automatically when you switch off the navigation system or the ignition Note To ensure optimum so...

Page 30: ...ed at track 1 The track numbers are counted up sequentially in the navigation system display when you play tracks in shuffle mode MIX We recommend you do not use the Name CD function as all the playl ists will then be allocated the same name USB Interface Introduction You can connect a memory stick or an MP3 player to the vehicle s on board navigation system via the USB port The USB port is locate...

Page 31: ...ayer is switched off automatically when you switch off the naviga tion system or the ignition The USB port stores the position of the last track you were playing If you do not alter the contents of your memory device the music will be continued at the point where you stopped playing MP3 players and USB sticks which are not explicitly approved must have CERTIFIED USBTM or CERTIFIED HIGH SPEED USBTM...

Page 32: ...lay a maximum of six folders however The folders are allocated first in numerical order and then in alphabetical order as CD 1 to CD 6 Folders that do not contain music files are automatically ignored You can create any number of subfolders If there are no folders on your memory device the navigation system will allocate all the music files it finds to CD 1 Track numbers appear with a maximum of t...

Page 33: ...he portable player to a 3 5 mm jack plug and plug the extension cable into the Aux in socket Before you remove the memory device switch the audio source for the navigation system back to radio Start the portable player by switching the audio source to AUX IN mode page 45 After the player has been detected successfully the display will show External audio source is active You can select the audio f...

Page 34: ...e radio function menu appears on the display Press one of the control buttons page 10 to fig 33 to move to the appropriate submenus The following submenus are available in the radio function RADIO RADIO A 1 A 4 Control button functions fig 33 Radio submenus Memory Stored station list Band FM MW LW Sound page 53 Balance Fader Treble Bass DSP Volume settings Tuning Tune down Tune up Seek down Seek u...

Page 35: ...tion Selecting frequency band The frequency band selection determines which radio stations are received Fig 34 Radio Frequency band Press the Band control button in the radio menu Select the desired frequency band by turning the rotary push button Press the control knob to confirm your selection The following frequency bands are available Radio setup menu Press the button while in the Radio functi...

Page 36: ...n to display the complete station list or memory list again Note You can select radio stations page 36 on the instrument panel display using the multi function steering wheel FM station list The FM station list is dynamic updated automatically Fig 35 Radio FM station list Press the function button page 8 Using the rotary pushbutton select the desired radio station from the FM radio station list If...

Page 37: ... still be displayed but there will be interference in the signal In this case it is advis able to update the station list Note If you do not use the navigation system for a while the display of the station list or memory list will be minimised The minimised display only shows the radio station you are currently listening to Turn the rotary pushbutton to display the complete station list or memory ...

Page 38: ...e the rotary pushbutton to select a radio station from the memory list Press and hold the rotary pushbutton until the display shows Move station name Turn the rotary pushbutton to move the station to the desired position Press the rotary pushbutton to store the station in the desired position In addition to the lists of available stations page 35 you can store up to 50 of your favourite stations i...

Page 39: ...nu Turn the rotary pushbutton to select tune up fig 38 or tune down in the display Press the rotary pushbutton to set the desired station frequency Briefly pressing the control knob will change the frequency in small steps If you press and hold the rotary pushbutton the frequency setting will change faster When you release the control knob the frequency adjustment stops With the manual tuning opti...

Page 40: ...ction fig 40 Press the rotary pushbutton to begin SCAN Press the rotary pushbutton again to stop SCAN The receivable stations are played for a few seconds To stop the scan function and play the current radio station press the rotary pushbutton a second time Storing stations Fig 41 Radio Store station Fig 42 Radio displaying the memory list Press the Tuning control button in the radio menu Using th...

Page 41: ...Delete memory list page 43 Individual radio stations stored in the memory list can be overwritten Radio setups Opening and closing the radio setup menu Fig 43 Main radio setup menu In a Radio mode press the button to open the main setup menu for the radio function fig 43 Press the button again to close the main setup menu The following settings are possible in radio setup Traffic programme page 41...

Page 42: ...raffic programme is on reports will automatically cut in even when you are listening to the radio MW LW or a CD or while you are using the naviga tion system The TP Traffic Programme symbol on the display indicates the following statuses SETUP TP symbol Meaning TP symbol lit highlighted Traffic programme function switched on page 40 fig 43 Traffic news stations can be received and traffic announce...

Page 43: ... g telephone numbers or advertising alternately with the name of the station This information must be suppressed to store these stations by their name To do so briefly press the rotary pushbutton on the minimised display Station list A Z The stations in the list can be sorted alphabetically Fig 46 Radio Setup Station list A Z In radio mode press the button To sort the stations in alphabetical orde...

Page 44: ...transmitters on different frequencies If the Alt frequency function is switched on on the radio navigation system searches for the strongest frequency signal and tunes into it Note If you switch station the alternative frequency on is enabled automatically Deleting stored stations Fig 48 Radio Setup Deleting memory list In radio mode press the button Select Delete memory list Confirm the message D...

Page 45: ...e continued If the traffic programme function is activated the audio playback will be inter rupted for traffic news announcements All following traffic announcements will cut in even after cancelling a running announcement Selecting CD MP3 Press the button to activate the CD functions in the navigation system Fig 49 Display The CD main menu Press the page 8 function selector button The CD main men...

Page 46: ...e following options are available CD AUX Various submenus are available depending on the equipment selected Note Sound settings can be adjusted individually for each piece of equipment page 53 The audio source selected is shown in the title line of the display Control button functions page 44 fig 49 CD submenus Changer CD 1 to CD 6 CD changer CD internal CD drive Sound page 53 Balance Fader Treble...

Page 47: ... the CD main menu will show the structure of directories on the MP3 CD To repeat the tracks in one of the directories use the rotary pushbutton to activate the function Repeat this directory Note If your vehicle has the corresponding equipment you can select CD tracks on the instrument cluster display page 47 Starting a CD from the dash panel display using the multi function steering wheel Pausing...

Page 48: ...mbwheel on the multi function steering wheel page 14 pressed down CD changer Select folder from USB or iPod Fig 51 CD Selecting folder from USB or iPod The USB or iPod functions as a CD changer Only the first five folders stored on the device are displayed irrespective of the total number stored These are named as CD 1 CD 5 The sixth folder CD 6 displays all the audio tracks stored on the device S...

Page 49: ...winds for as long as you hold the rotary push button down Advancing and rewinding are also possible using the forward rewind buttons page 11 Next previous CD track Fig 53 CD Next track Press the Manual control button in the CD menu Using the rotary pushbutton select Next or Previous fig 53 Press the rotary pushbutton Note A CD track can also be selected using the forward rewind buttons page 11 Med...

Page 50: ...e track currently being played will continue to play Naming an audio CD Fig 55 CD Name a CD Press the Manual control button in the CD menu By rotating and pressing the rotary pushbutton select Name fig 554 Select CD name Enter the name required using the alphanumeric keyboard Note The system stores the name assigned to a CD in its memory even if the CD is ejected and then re inserted in another po...

Page 51: ...565 Select the name to be deleted Delete all stored CD names Fig 57 CD Deleting all stored CD names Press the Manual control button in the CD menu Select Name Select Delete all CDs fig 576 Select yes to delete all names from the list 5 Valid for audio CDs 6 Valid for audio CDs Media System 1 0_EN book Seite 50 Donnerstag 10 September 2009 1 52 13 ...

Page 52: ... now appears at the top of the screen CD mix must be set separately for audio CDs and MP3 CDs MP3 CD info Fig 59 CD Info Press the Manual control button in the CD menu Select Info by turning the rotary pushbutton 7 The following information is displayed for each track on MP3 CDs Artist Album Track File If there is no ID3 tag only the file name will be shown 7 Valid for MP3 CDs Media System 1 0_EN ...

Page 53: ...ated The ID3 tag information is displayed in the main CD menu MP3 track display deactivated the file name will be displayed in the main CD menu The sound and tuning settings and the brightness of the display can be altered using the control buttons page 118 Note We recommend that you enter these settings when the vehicle is stationary Please note page 6 Notes on road safety SETUP Media System 1 0_...

Page 54: ...y pressing the rotary pushbutton The following sound settings are available Balance left right volume relationship Fader front rear sound relationship Treble Bass GALA Volume settings of other functions The sound setting for treble and bass apply to the operating mode currently active The balance and fader settings are independent for the operating mode For example if you change the bass setting w...

Page 55: ...udio or SETUP menus press the control button for Sound Select Volume Select Navigation volume or Traffic reports Rotate and press the control knob to set the desired volume When you adjust the volume for the voice guidance hints a test announce ment is made automatically Use the Lower sound option to set the extent to which the volume of the active audio source is lowered during spoken navi gation...

Page 56: ...s too high when the radio is turned on it will be reduced auto matically to a level set by the factory If the volume is too low when the radio is turned on it will be increased automatically to a level set by the factory Media System 1 0_EN book Seite 55 Donnerstag 10 September 2009 1 52 13 ...

Page 57: ...Media System 1 0_EN book Seite 56 Donnerstag 10 September 2009 1 52 13 ...

Page 58: ...pacemaker Do not carry a mobile phone in your breast pocket directly over the pacemaker when the phone is switched on If you suspect interference switch the mobile phone off immedi ately Please direct your full attention to the road at all times As the driver you bear the responsibility for road safety Therefore you should only use the functions in a manner that allows you to maintain control of t...

Page 59: ...est where applicable Slide the lock on the mobile phone adapter fig 65 into the guide tab of the mounting unit Push the bottom part of the mobile phone adapter down to make it engage Removing the mobile phone adapter Open the central armrest where applicable If the mobile phone is in the adapter take it out page 59 Carefully pull the rear section of the adapter upwards out of the retainer Caution ...

Page 60: ... phone is properly engaged In the event of an accident a mobile phone that is not securely fitted could be flung out of the adapter unit and injure the driver or passengers Caution The mobile phone could possibly be damaged if it is not properly inserted in the adapter and falls out when driving Note The use of mobile phones in the vehicle can generate electromagnetic fields Therefore you should a...

Page 61: ...he on board mobile phone system within about 30 seconds 9 Wait until your mobile phone indicates that it has bonded The Bluetooth symbol fig 68 should appear Maximum four mobile phones You can link up to four mobile phones to the mobile phone adapter However it is only possible to activate one connection at a time If you bond a fifth mobile phone to the mobile phone interface the system will delet...

Page 62: ...valid for the use of mobiles using Bluetooth technology The external aerial directs the electromagnetic fields to the exterior which reduces the field strength in the vehicle interior If retrofitting an external aerial please ensure that it is installed correctly For more information on how to bond your mobile phone please refer to the mobile phone operating instructions Using the telephone Introd...

Page 63: ... following The telephone used must be compatible with the mobile phone adapter and it must support the telephone functions described The mobile network service provider must support the telephone func tions described Note For technical reasons mobile phones may be temporarily affected by interference Please refer to the instructions for your mobile phone for more information The range of the hands...

Page 64: ...ard will automatically be blocked if you enter the PIN code incor rectly 3 times10 The SIM card can be unblocked with the PUK personal unblocking key Note When you enter the PIN code the digits appear as in the display The PIN symbol may not always be shown in the display depends on type of mobile phone Depending on your type of mobile phone you may need to enter the PIN code at the phone In this ...

Page 65: ...pushbutton select the number you wish to store The number will be included in the keyboard To start dialling the number select OK in the alphanumeric keyboard or Press the Dial control button If your vehicle is equipped with a speech control system you can dial numbers using voice commands page 79 or record names name tags for the speech control phone book page 76 In addition you can redial the la...

Page 66: ...n the adapter while receiving an incoming call or talking on the phone all of the information may not appear immediately on the display In this case the hands free system is not available Note The audio source is muted automatically when you make or receive tele phone calls The Mute symbol page 12 fig 13 will then appear in the status line The display of a name or phone number on the display depen...

Page 67: ...e phone adapter Switching the microphone on and off Fig 75 Telephone Switching microphone on off Fig 76 Telephone Microphone off Switching the microphone off Press the Options control button any time during a call Select Microphone off fig 75 The microphone is switched off and the caller cannot hear you Switching the microphone on Press the Options control button any time during a call Media Syste...

Page 68: ...he incoming call Rejecting an incoming call When you receive a second incoming call use the rotary push button to select Ignore or Press the control button for Ignore or Keep the left thumbwheel on the multi function steering wheel page 14 pressed down The incoming call will then be rejected When you receive a second incoming call the display will indicate this and you will hear a tone The tone wi...

Page 69: ... dialled Fig 79 Telephone Numbers dialled Press the Memory control button in a telephone menu Select No dialled to display the last numbers dialled Select the number required using the control knob The number will be included in the keyboard Press the Dial control button The Numbers dialled list stores the last ten11 names or numbers you have dialled This is independent to whether the call to that...

Page 70: ... numbers before you have stored a number for your mailbox the system will automati cally direct you to the number entry screen You can also store edit or delete your mailbox number in the Setup Tele phone menu page 74 Note If you are abroad do not forget to dial the necessary country codes This function must be selected and set up beforehand through your mobile phone network For more information c...

Page 71: ...take several minutes If your vehicle is equipped with the speech control system page 75 you cannot record any spoken names in the phone book for the speech control system while phone book entries are being loaded from the mobile phone Displaying the phone book entries The phone book entries are displayed in alphabetical order together with a category symbol page 69 fig 81 e g SIM card private busi...

Page 72: ...he keyboard Press the Dial control button The last ten13 names or numbers of the calls you have answered are stored in the Calls received list Depending on your mobile phone type the telephone number and name of the most recently received call will appear either in the first position or last position in the list Functions of the telephone on the dash panel display 13 The total number of phone numb...

Page 73: ... follows P Private phone number W Work phone number M Mobile phone number Scroll the left thumbwheel downwards to scroll down the list of stored names from A to Z Scroll the left thumbwheel upwards to scroll up the list of stored names from Z to A If you flick the left thumbwheel you can jump to the next letter of the alphabet Note The information shown on the dash panel display depends on the typ...

Page 74: ...tton in a telephone menu Select Telephone setup Select the desired setting Factory settings When changing the settings back to the default settings make sure there is no ongoing telephone call no mobile phone is connected via Bluetooth and the mobile phone is not inserted in the mobile phone adapter Reverting to the default settings deletes all stored phone books for the mobile phones page 69 all ...

Page 75: ...one setup Enter the voice mailbox number Storing the voice mailbox number Press the button in a telephone menu Select Voice mailbox No Press the rotary pushbutton to enter the voice mailbox number using the speller fig 88 Select OK in the alphanumeric keyboard to store the new mailbox number Editing the voice mailbox number Press the button in a telephone menu Select Voice mailbox No Press the con...

Page 76: ...ng your mobile phone The speech control system recognises commands and digits spoken by different people The speech control system allows you to do the following Create an acoustic phone book for the speech control system page 76 Enter and dial a telephone number page 79 Traffic reports are not announced during a running dialogue The dialogue will be ended immediately when an incoming phone call i...

Page 77: ...ch control system page 81 Playing the phone book through the speech control system page 82 Once you have saved name tags in the phone book for the speech control system you can select them via the speech control system Entering data You should choose spoken names that can be identified clearly by the speech control system Numbers from ZERO to NINE are recognised when you enter a telephone number T...

Page 78: ...e Activating the hands free system speech control system Press the talk button on the multi function steering wheel fig 89 or Press the talk button on the mobile phone adapter fig 90 A signal tone will indicate that the speech control system is ready SPEAK will appear on the instrument panel display Say the desired command page 78 Switching off the speech control system Say the command CANCEL or P...

Page 79: ...l system SELECT NAME page 81 A 2 Dial a selected telephone number DIAL page 79 redial the last number dialled REDIAL page 79 Store a name tag in the speech control system for a phone book entry shown in the instru ment panel display STORE page 80 store a spoken name and tele phone number in the phone book for the speech control system STORE page 81 End a dialogue CANCEL Repeat a specified name or ...

Page 80: ...l system Dialling a number A telephone number can be specified to the system and then dialled Switch on the speech control system page 77 Say the command DIAL NUMBER The speech control system will ask you to enter a telephone number Say the digits of the telephone number individually or in groups After each block of digits you specify separated by a brief pause the system will repeat the digits Sa...

Page 81: ...left thumbwheel fig 91 to select a phone book entry Press the talk button page 77 fig 89 on the multi function steering wheel You will hear a tone Say the command STORE When requested by the speech control system please say the name tag under which you wish to store the phone book entry Repeat the name when the speech control system gives you the cue The name tag for the selected phone book entry ...

Page 82: ...you specify separated by a brief pause the system will repeat the digits Say STORE when you have completed the number entry The recorded name spoken name tag with corresponding phone number will be stored in the phone book for the speech control system Name tags which you store in the phone book for the speech control system using the STORE NAME command are not shown in the dash panel display Note...

Page 83: ...the entry is being read Deleting the phone book You can delete the entire phone book or just single recorded entries name tag Important The speech control system must be switched on page 77 Deleting the entire phone book for the speech control system Switch on the speech control system page 77 Say the command DELETE PHONE BOOK Say YES when the speech control system gives you the cue When the speec...

Page 84: ...the speech control system gives you the cue The recorded name which was read out will be deleted You can continue to delete names from the phone book by pressing the talk button as long as the entries are being read out Media System 1 0_EN book Seite 83 Donnerstag 10 September 2009 1 52 13 ...

Page 85: ...Media System 1 0_EN book Seite 84 Donnerstag 10 September 2009 1 52 13 ...

Page 86: ... acoustic signals from outside such as police and fire brigade sirens Failure to do so may cause an accident Introduction Introduction The navigation system makes time consuming map reading superfluous During route guidance you receive information on the dash panel display page 86 fig 93 regarding vehicle position turn off information direction and distance to turn off and estimated arrival time A...

Page 87: ... as route modification are greyed out and cannot be selected The navigation system improves the route during the trip The route initially calculated may differ to the route actually taken The navigation instructions can be given in 9 languages English German Spanish French Italian Portuguese Dutch Swedish and Czech The language can be selected using the menu language function in the setup menu pag...

Page 88: ...hey are being announced using the on off button page 11 on the navigation control console or the right thumbwheel on the multi function steering wheel page 14 If the vehicle is in a location that cannot be read by the navigation system e g car park or garage a voice message will inform you of such The arrow in the dash panel display faces in the direction of the entered destination In neighbouring...

Page 89: ...dio stations are being received and whether the dynamic navigation function is switched on or off page 112 Estimated time of arrival at destination or stopover Motorway major road and street names displayed accord ing to the vehicle location A turn off arrow ahead of these names indicates the road onto which you should turn off Total miles to destination or stopover Directional arrow Bar graph cou...

Page 90: ...navigation system The navigation functions can be selected with the func tion button Fig 96 Display Main navigation system menu Press the function button page 8 The main navigation menu fig 96 the route plan page 102 fig 113 or the previous active navigation function menu will appear on the display Press one of the control buttons page 10 to page 106 fig 120 to move to the appropriate submenus The...

Page 91: ...de page 91 Route plan page 92 Post code page 94 Special destination page 94 Position page 95 Last destinations page 97 Top categories page 97 Directory page 99 Load route page 99 Note There are sometimes destination entries in the list that cannot be displayed completely because they are too long too many characters If you select one of these entries using the control knob a second window will ope...

Page 92: ...s your last destinations and displays possible matches in the speller entry space You can also select one of these destinations by pressing and holding the rotary pushbutton to copy the desti nation into the destination input menu page 90 fig 97 You can switch from the speller for letters to the speller for numbers to be able to enter special characters e g dash apostrophe or full stop for a town ...

Page 93: ...enter up to six inter mediate destinations and a final destination Fig 99 Navigation system Route planned Fig 100 Navigation Positioning the route plan destinations Press the function button page 8 Also press the corresponding Route function button and confirm the Active route mode route with stopovers function to change to route plan mode fig 99 Select Add new destination Select a country from th...

Page 94: ...n more precisely by entering a street name After entering a street name you can also define your destination more specifically by entering an Intersection or House No number Selecting Special destination in town You can select a special destination in the specified city For example you can navigate directly to tourist attractions or public facilities e g hospital cinema recreation areas If you wou...

Page 95: ...stination in greater detail Enter stopover s if desired page 92 Press the control button for Start to begin the route guidance A soon as a number appears on the right in the entry field e g 23 page 91 fig 98 you can select the option List in the speller to select a town from the list The number indicates how many towns are included in the list Note Options that are not available due to your preset...

Page 96: ... destination and is useful when for example trying to find a car park or hotel at or near your final destination Nationwide This special destination is not connected with any previously selected desti nation This refers to the country in question This function can be used for guidance to the nearest service area or airport Note Options that are not available due to your preset criteria cannot be s...

Page 97: ...nce will be adapted if possible page 103 The previously entered data and settings remain unchanged even when you cancel the route guidance Top destinations This function makes selecting destinations that you often use easier Fig 104 Navigation Example of top destinations In the single destination mode entries in the directory that have been selected as top destinations page 98 will be listed direc...

Page 98: ...mpletely because they are too long too many characters If you select one of these entries using the control knob a second window will open up after a few seconds This screen will show more information about the selected entry You can delete the list of last destinations in the Setup Navigation menu page 108 Top categories This function makes selecting destinations that you often use easier Fig 106...

Page 99: ... no top destination is found in the category selected the navigation system has no top destination in the vicinity stored for this category or it is not avail able in the navigation CD Storing a destination in the directory The current destination can be stored in the directory Fig 107 Navigation Store current destination Fig 108 Navigation Directory Enter a single destination page 91 Press the Me...

Page 100: ...09 Navigation Load an entry from directory Press the Memory control button in the navigation menu Select Load from directory page 97 fig 105 Select a destination from the list or Select Find entry Enter the entry to be found using the speller page 21 or select it from the list A loaded entry can be edited and restored in the directory by selecting the Memory function Loading a route Routes that ha...

Page 101: ...e entered will be saved with the final destination and stopovers and can be loaded again as a new destination page 99 You can change the route plan at any time page 101 Up to five routes can be stored in the memory If the route memory becomes full you will be notified of this by a message on the display You must then delete existing routes to be able to store new routes Note You can store a route ...

Page 102: ...al destination the last stopover will automatically be set as the new final destination Drive to now During your journey you can drive back to a destination or stop over starting from your current position Storing current position You can store the current position of the vehicle to call up later as a destination Press the Memory control button in the navigation menu Select Store current position ...

Page 103: ...t until you change it If you have selected Active route mode route with stopovers for example the route will be made in stopovers until the Active route mode route with stopovers function is disabled Route with stopovers enabled Select this option to navigate in stopovers to your destination You can also select a special destination as a stopover page 94 Any stopover entered can be deleted or edit...

Page 104: ...oute list will be greyed out Route criteria Route calculation depends on the route criteria selected Fig 115 Navigation Route criteria Press the Route control button in the navigation menu Select Route criteria page 102 fig 112 Select the desired route criteria fig 115 The route criteria can be edited during route guidance and the system will react by re calculating it Dynamic navigation Select on...

Page 105: ...he detour is longer than the estimated time required for remaining on the route with the traffic jam Avoid sections of the route Fig 116 Navigation Avoid sections of the route This function is available once you start travelling on a calculated route Press the Route control button in the navigation menu Select Avoid route from here fig 116 Select the length of section to be avoided by turning the ...

Page 106: ... menu The destination estimated time of arrival and distance to destination will be displayed Turn the rotary pushbutton Other available details will be displayed or Select Play voice guidance cue to repeat the last navigation instruction The following data is provided City Estimated time of arrival Calculated duration of trip Distance to destination Location of your vehicle Geographic location of...

Page 107: ...NAV start location page 109 The sound and system settings and the brightness of the display can be altered using the control buttons page 115 Note We recommend that you enter these settings when the vehicle is stationary Please note page 6 Notes on road safety Spoken navigation directions Fig 120 Navigation Setup Voice information Press the page 8 function button in the navigation menu Select the ...

Page 108: ... navigation menu Select the option required in Time display Demo mode The demo mode is used to calculate the route Fig 122 Navigation Setup Demo mode Press the function button in the navigation menu Enable Demo mode on Demo mode provides special assistance if planning the route from another location Simply enter the location manually page 109 and then select the navigation destination Once navigat...

Page 109: ...o delete all stored destinations Delete routes Fig 124 Navigation Setup Delete routes Press the page 8 function button in the navigation menu Select Delete routes Select Delete individually and use the rotary pushbutton to select the destinations you wish to delete from the list or Select Delete all and confirm Delete all with Yes to delete all stored routes Compass The compass can be seen on the ...

Page 110: ... the navigation menu Select Manual location page 107 fig 122 Enter the address from which you wish the route guidance to start Select Set as location You can manually enter the starting location of the vehicle for example to calculate future navigation routes starting from a location other than the current location of the vehicle After you have entered the navigation start location manually you ca...

Page 111: ...mic navigation function has been switched on page 111 Note When the dynamic navigation page 103 is switched on the route guid ance will automatically avoid any obstructions Selecting INFO The TMC traffic reports are indicated in the setup menu Fig 127 Display Main traffic information menu Press the function selector button marked page 8 The Info main setup menu fig 127 will then appear in the disp...

Page 112: ...filter page 111 Traffic programme page 112 Preferred TMC station The sound and tuning settings and the brightness of the display can be altered using the control buttons page 118 Note We recommend that you enter these settings when the vehicle is stationary Please note page 6 Notes on road safety TMC filter You can limit the TMC listings to those messages which are relevant for your route Fig 128 ...

Page 113: ... switched off or the route guidance is not activated TMC symbol crossed out A TMC station is not available but the dynamic navigation is switched on TMC symbol is not displayed A TMC station is not available and the dynamic navigation is switched off Fig 129 Dash panel display Example of the red TMC symbol Display Description TMC symbol is green TMC stations are available the dynamic navigation is...

Page 114: ...erred TMC station Starting from any one of the INFO menus press the button Select Preferred TMC station A list of possible TMC stations will be shown Select a station from the list While you are listening to a different radio station the preferred TMC station will receive TMC traffic messages in the background page 110 They are displayed in the Info main menu page 110 If auto is set the navigation...

Page 115: ...Media System 1 0_EN book Seite 114 Donnerstag 10 September 2009 1 52 13 ...

Page 116: ...ain function button that is already activated The Setup main menu corresponding to that function e g Radio will appear on the display fig 132 While in the Setup main menu press any one of the control buttons to call up the corresponding submenu e g Radio to fig 132 The Setup menu only works in conjunction with one of the activated main functions page 8 it provides access to further menu options Th...

Page 117: ... CD must be inserted in the the navigation system CD drive page 24 Press the Settings control button in the Setup menu Select Menu language Select the desired menu language The following languages can be selected German English French Italian Control button functions page 115 fig 132 Setup submenus Settings Menu language Measurement units Time settings Factory settings Sound page 53 Balance Fader ...

Page 118: ...igation system uses the units of measurement km miles the time and the date format 12 h 24 h of the driver information system Instructions for editing them are indicated in the Owner s Manual Factory settings Settings can be reset to default factory settings in this func tion Fig 134 Setup Default settings Fig 135 Setup Resetting to factory defaults Press the Settings control button in the Setup m...

Page 119: ...idual destinations and route plans is deleted Other navigation settings The settings stored data for the functions available in the navigation e g route criteria will be returned to the factory default values Telephone Personalised data e g stored telephone numbers is deleted and factory telephone settings are reset Display Menu Brightness Fig 136 Setup Adjusting the brightness of the display Pres...

Page 120: ... menu 46 Selecting a track 46 Setup menu 52 Control buttons 10 RETURN button 10 Control Panel Function selector buttons 8 Control panel Cleaning and care 7 Control buttons 10 Forward reverse buttons 11 RETURN button 10 Rotary pushbutton 9 Controls Control buttons 10 Forward reverse buttons 11 Function selector buttons 8 Rotary pushbutton 9 D Deleting data 22 Display A guide to the display 17 Clean...

Page 121: ...erface 27 Select folder 47 Tips 29 M Manual tuning 38 Media drives Aux in connection 32 CD player 24 Menu language setup 116 MMI Display Brightness 118 MMI display Settings 118 Mobile phone 59 Memory menu 68 Missed calls list 70 Numbers dialled list 68 Received calls list 71 Bluetooth 60 Functions hands free 66 Functions call 63 Functions call lists 63 Functions DTMF tones 63 Functions hanging up ...

Page 122: ...reen Switching on off 6 Navigation system voice guidance 87 Navigation systems Cleaning and care 7 Navigation Memory Menu 97 Special destination system 94 O Operating the radio navigation system basic rules 8 P PAUSE CD function 46 Phone book 69 76 PIN 62 R Radio Functions automatic seek mode 38 Functions band settings 34 Functions manual tuning 38 Functions station scan 39 Functions storing stati...

Page 123: ...ands 78 Entering a PIN 79 Phone book 76 81 82 Switching on and off 77 Spoken navigation directions 106 STORE 39 Storing current position 101 System setup INFO traffic information 111 RADIO 40 T Telephone Functions Redial 79 Settings 73 Telephone settings Bluetooth PIN 73 Factory settings 73 Telephone Setup Call options 74 TP traffic programme 41 112 Traffic information Setup menu 111 TMC symbol on...

Page 124: ...SEAT MEDIA SYSTEM 1 0 OWNER S MANUAL Inglés 3R0012006AA 07 09 GT9 3R0012006AA Portada Media System 1 0 qxd Maquetación 1 6 8 09 12 17 Página 3 ...

Reviews: