background image

12

MID-WIDTH TILLING - 22" PATH (See Fig. 17)

Assemble holes “A” in tine hubs to holes “C” in tine shaft.

A

C

A

C

FIG. 17

CUSTOMER RESPONSIBILITIES

MUFFLER

Do not operate tiller without muffler. Do not tamper with
exhaust system. Damaged mufflers or spark arresters could
create a fire hazard. Inspect periodically and replace if
necessary. If your engine is equipped with a spark arrester
screen assembly, remove every 50 hours for cleaning and
inspection. Replace if damaged.

SPARK PLUG

Replace spark plugs at the beginning of each tilling season
or after every 50 hours of use, whichever comes first.  Spark
plug type and gap setting is shown in “PRODUCT SPECIFI-
CATIONS” on page 3 of this manual.

TRANSMISSION

Your transmission is sealed and will only require lubrication
if it is serviced.

CAUTION:  Disconnect spark plug wire from spark plug and place wire where it cannot come into
contact with plug.

TILLER

TO ADJUST HANDLE HEIGHT (SEE FIG. 15)

Factory assembly has provided lowest handle height.  Se-
lect handle height best suited for your tilling conditions.
Handle height will be different when tiller digs into soil.

If a higher handle height is desired, loosen the four nuts
securing handle panel to engine brackets.

Slide handle panel to desired location.

Tighten the four nuts securely.

HANDLE
PANEL

ENGINE
BRACKETS

NUTS (ALSO 2
ON LEFT SIDE
OF TILLER)

FIG. 15

SERVICE AND ADJUSTMENTS

TINE ARRANGEMENT

Your outer tines can be assembled in several different ways
to suit your tilling or cultivating needs.

CAUTION:  Tines are sharp.  Wear gloves
or other protection when handling tines.

NORMAL TILLING - 24" PATH (See Fig. 16)

Assemble holes “A” in tine hubs to holes “B” in tine shaft.

OUTER TINE

INNER TINE

HAIRPIN CLIP

A

B

A

B

CLEVIS PIN

FIG. 16

CLEANING

Do not clean your tiller when the engine and transmission are
hot.  We do not recommend using pressurized water (garden
hose, etc.) to clean your unit unless the gasket area around
the transmission and the engine muffler, air filter and
carburetor are covered to keep water out.  Water in engine will
shorten the useful life of your tiller.

Clean engine, wheels, finish, etc. of all foreign matter.

Keep finished surfaces and wheels free of all gasoline,
oil, etc.

Protect painted surfaces with automotive type wax.

Summary of Contents for Craftsman 944.621531

Page 1: ...Instructions Before Operating This Equipment MODEL NO 944 621531 OWNER S MANUAL Assembly Operation Customer Responsibilities Service and Adjustments Repair Parts 5 5 HP 24 INCH TINE WIDTH FRONT TINE TILLER Sears Canada Inc Toronto Ontario M5B 2B8 ...

Page 2: ...TRAINING Read the Owner s Manual carefully Be thoroughly familiar with the controls and the proper use of the equipment Knowhowtostoptheunitanddisengagethe controls quickly Never allow children to operate the equipment Never allow adults to operate the equipment without proper instruction Keep the area of operation clear of all persons particu larly small children and pets PREPARATION Thoroughly i...

Page 3: ...D SERVICE CENTRE DEPARTMENT FOR SPARK ARRESTER REFER TO THE REPAIR PARTS SECTION OF THIS MANUAL FOR PART NUMBER TABLE OF CONTENTS SAFETY RULES 2 CUSTOMER RESPONSIBILITIES 3 10 12 PRODUCT SPECIFICATIONS 3 WARRANTY 3 ASSEMBLY 4 5 OPERATION 6 9 MAINTENANCE SCHEDULE 10 SERVICE ADJUSTMENTS 12 14 STORAGE 15 TROUBLESHOOTING 16 REPAIR PARTS TILLER 17 22 REPAIR PARTS ENGINE 23 28 SERVICE PARTS ORDERING BAC...

Page 4: ...T LEFT RIGHT OPERATOR S POSITION FIG 1 Your new tiller has been assembled at the factory with exception of those parts left unassembled for shipping purposes To ensuresafeandproperoperationofyourtillerallpartsandhardwareyouassemblemustbetightenedsecurely Usethecorrect tools as necessary to insure proper tightness 1 Plastic Cable Clip 2 Flange Locknuts 5 16 18 UNC 2 Carriage Bolts 5 16 18 UNC x 2 3...

Page 5: ...material from handle assembly Route tine control cable through plastic cable clip on handlecolumn Insert plastic cable clip into hole in handle column Cut cable ties securing tiller to skid Cut away carton and remove tiller from skid by pulling backwards HANDLE HEIGHT Handle height may be adjusted to better suit operator See HANDLE HEIGHT in the Service and Adjust ments section of this manual TILL...

Page 6: ...e American National Standards Institute FORWARD TINE CONTROL Engages tines in forward direction CHOKE CONTROL Used when starting a cold engine THROTTLECONTROL Controlsenginespeed FORWARD TINE CONTROL DEPTH STAKE CHOKE CONTROL TINES TINE SHIELD THROTTLE CONTROL RECOIL STARTER HANDLE These symbols may appear on your Tiller or in literature supplied with the product Learn and understand their meaning...

Page 7: ...ease tine control to stop movement ENGINE Move throttle control to STOP position Never use choke to stop engine TINE CONTROL OFF UP POSITION TINE CONTROL ON DOWN POSITION TINE OPERATION See Fig 5 Squeeze tine control to handle OPERATION DEPTH STAKE See Fig 6 Adjust depth stake by removing the hairpin clip and clevis pin Change depth stake to desired position Replace the clevis pin and hairpin clip...

Page 8: ...starter Repeat if necessary If engine fires but does not start move choke control to halfchokeposition Pullrecoilstarterhandleuntilengine starts Whenenginestarts slowlymovechokecontrolto RUN position as engine warms up NOTE A warm engine requires less choking to start Move throttle control to desired running position Allow engine to warm up for a few minutes before engagingtines NOTE Ifatahighalti...

Page 9: ...anderror and depends upon the soil condition The harder or wetter the ground the slower the engine and tine speed needed Under these poor conditions at fast speed the tiller will run and jump over the ground A properly adjusted tiller will dig with little effort from the operator Tilling is digging into turning over and breaking up packedsoilbeforeplanting Loose unpackedsoilhelps root growth Best ...

Page 10: ...RE EACH USE Check engine oil level Check tine operation Check for loose fasteners LUBRICATION Keep unit well lubricated See LUBRICATION CHART LUBRICATION CHART MAINTENANCE SCHEDULE FILL IN DATES AS YOU COMPLETE REGULAR SERVICE Check Engine Oil Level Change Engine Oil Oil Pivot Points Inspect Air Screen Inspect Spark Arrester Muffler Clean or Replace Air Cleaner Cartridge Clean Engine Cylinder Fins...

Page 11: ... and replace cover Tighten screws securely CAUTION Petroleumsolvents suchas kerosene are not to be used to clean cartridge Theymaycausedeterioration ofthecartridge Donotoilcartridge Do not use pressurized air to clean or dry cartridge FIG 11 COOLING SYSTEM See Fig 14 Your engine is air cooled For proper engine performance and long life keep your engine clean Clean air screen frequently using a sti...

Page 12: ... best suited for your tilling conditions Handle height will be different when tiller digs into soil If a higher handle height is desired loosen the four nuts securing handle panel to engine brackets Slide handle panel to desired location Tighten the four nuts securely HANDLE PANEL ENGINE BRACKETS NUTS ALSO 2 ON LEFT SIDE OF TILLER FIG 15 SERVICE AND ADJUSTMENTS TINE ARRANGEMENT Youroutertinescanbe...

Page 13: ... control cable is too tight which is extending lower spring and engaging tines Loosencableclipandpushdownoncableonlyenough to relieve spring tension Tighten cable clip Recheck in OFF position and adjust if necessary FINAL CHECK ON POSITION Withtinecontrol ON helddowntohandle pushdown on handle to raise tines off the ground Slowly pull recoil starter handle while observing tines Tines should rotate...

Page 14: ... Replace V belt if it has stretched considerably or if it has cracks or frayed edges Belt guard must be removed to service belt See TO REMOVE BELT GUARD in this section of manual BELTREMOVAL Remove V belt from transmission pulley first and then from engine pulley FIG 21 BELTREPLACEMENT Install new V belt to engine pulley first then to transmis sion pulley Be sure belt is positioned on inside groov...

Page 15: ...ORAGE Drain the fuel tank Start the engine and let it run until the fuel lines and carburetorareempty Neveruseengineorcarburetorcleanerproductsinthe fuel tank or permanent damage may occur Use fresh fuel next season NOTE Fuel stabilizer is an acceptable alternative in minimizing the formation of fuel gum deposits during storage Add stabilizer to gasoline in fuel tank or storage container Always fo...

Page 16: ...6 Stale or dirty fuel 6 Drain fuel tank and refill with fresh gasoline 7 Water in fuel 7 Drain fuel tank and carburetor and refill tank with fresh gasoline 8 Clogged fuel tank 8 Remove fuel tank and clean 9 Spark plug wire loose 9 Connect and tighten spark plug wire 10 Dirty engine air screen 10 Clean engine air screen 11 Dirty clogged muffler 11 Clean replace muffler 12 Carburetor out of adjustme...

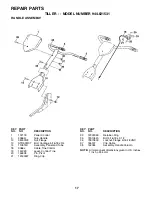
Page 17: ... TineControl 19 151229 Lever Control Tine 20 154805 Pin Pivot 21 12000027 Ring Clip KEY PART NO NO DESCRIPTION NOTE All component dimensions given in U S inches 1 inch 25 4 mm REPAIR PARTS TILLER MODEL NUMBER 944 621531 HANDLE ASSEMBLY 29 12000059 Retainer Ring 35 72010520 Bolt 5 16 18 x 2 1 2 36 73970500 Locknut Flange 5 16 18 UNC 37 165197 Clip Cable 38 152094 Assembly Handle Column ...

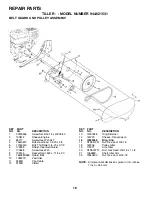
Page 18: ...65768X558 Guard Belt 10 109227X Pad Idler 11 9484R Clip Cable 12 9180R V Belt 13 12000028 Ring Retainer 14 151223 Sheave Transmisison 16 12000035 Ring Klip 17 STD541237 Nut Hex Jam 3 8 16 18 161806 Pulley Idler 19 175377 Arm Idler 20 STD523712 Bolt Hex Head 3 8 16 x 1 1 4 21 106968X Shaft Idler Arm 25 73350500 Nut Hex Jam 5 16 18 NOTE All component dimensions given in U S inches 1 inch 25 4 mm REP...

Page 19: ...ake R H 9 122233X Stake Depth 10 326J Pin Clevis 11 74780628 Bolt Hex 3 8 16 x 1 3 4 13 1951J Support Depth Stake L H 15 5388J Spring Stake 16 121117X Bolt Shoulder 17 9188R Wheel 18 STD551037 Washer 13 32 x 13 16 x 11 Gauge 19 9190R Bracket Wheel 20 STD541437 Locknut Crown 3 8 16 21 74760516 Bolt Hex Head 5 16 18 x 1 22 STD541431 Locknut w insert 5 16 18 NOTE All component dimensions given in U S...

Page 20: ...N KEY PART NO NO DESCRIPTION 4 156923 Tine Inner L H 5 156925 Tine Outer L H 6 4929H Pin Clevis 1 156926 Tine Outer R H 2 3146R Retainer Spring Zinc 3 156924 Tine Inner R H REPAIR PARTS TILLER MODEL NUMBER 944 621531 TINE ASSEMBLY ...

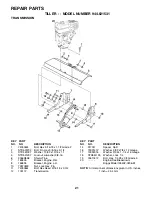
Page 21: ...l126402 0206 E1 1 74760524 Bolt Hex 5 16 18 x 1 1 2 Grade 2 2 STD523732 Bolt Fin Hex 3 8 16 x 3 1 4 3 STD551037 Washer 13 32 x 13 16 x 11 5 STD541437 Locknut w washer 3 8 16 6 9056R558 Shield Tine 7 165835 Bracket Engine R H 8 165834 Bracket Engine L H 10 73970500 Nut Lock Hex Flg 11 74760544 Bolt Hex Head 5 16 18 x 2 3 4 12 176112 Transmission NOTE All component dimensions given in U S inches 1 i...

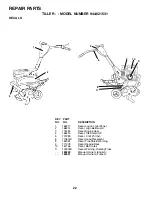
Page 22: ...al Tire Shield HP 5 137283 Decal Cntrl Pnl Inst 6 110614X Decal Hand Placement 8 162384 Decal Tine Shield Warning 9 171078 Decal Rewind Intek 10 167156 Decal B S Intek 11 120076X Decal Warning Rotating Tines 180350 Manual Owner s English 180351 Manual Owner s French 4 6 2 11 5 8 10 9 REPAIR PARTS TILLER MODEL NUMBER 944 621531 DECALS 3 ...

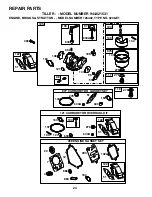
Page 23: ...2 REQUIRES SPECIAL TOOLS TO INSTALL SEE REPAIR INSTRUCTION MANUAL 21 306 1058 OWNER S MANUAL 1019 LABEL KIT 15 1 307 415 3 718 552 18 1022 40 1034 1029 45 1026 13 337 635 5 914 383 868 619 1022 914A 40 35 238 11 33 34 1023 146 16 741 24 46 746 742 32 30 29 27 28 220 219 27 25 26 36 830 189 32A 122 51 7 993 886 15A ...

Page 24: ...E NO 0206 E1 108 130 95 127 51 104 137 276 276 134 133 975 117 186 692 122 51 365 125 98 121 CARBURETOR OVERHAUL KIT 104 137 276 127 633A 633 134 137 276 633 977 CARBURETOR GASKET SET 51 633A 122 51 20 3 7 358 ENGINE GASKET SET 993 868 12 1022 163 633 633A 97 109 122 51 276 118 163 163 883 163 ...

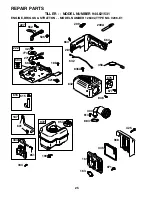
Page 25: ...44 621531 ENGINE BRIGGS STRATTON MODEL NUMBER 126402 TYPE NO 0206 E1 334 851 333 209 663 562 505 227 616 209A 632 836 836A 190 832 676 677 300 883 613 615 356 601 187 222 773 188 621 427 271 668 504 281 163 445 971 425 968 161 957 972 663 ...

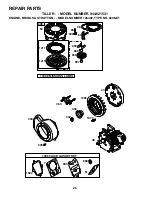
Page 26: ...MODEL NUMBER 944 621531 ENGINE BRIGGS STRATTON MODEL NUMBER 126402 TYPE NO 0206 E1 1022 7 1095 VALVE GASKET SET 51 868 993 332 23 363 455 1005 1070 1036 EMISSIONS LABEL 55 456 58 60 459 689 597 608 65 592 1211 1210 48 305 304 ...

Page 27: ...using Rewind Starter 58 692259 Rope Starter Cut to Required Length 60 281434 Grip Starter Rope 65 690837 Screw Rewind Starter 95 691636 Screw Throttle Valve KEY PART NO NO DESCRIPTION 97 690024 Shaft Throttle 98 398185 Kit Idle Speed 104 691242 Ø Pin Float Hinge 108 692567 Valve Choke 109 690023 Shaft Choke 117 498978 Jet Main Standard 118 497466 Jet Main High Altitude 121 696998 Kit Carburetor Ov...

Page 28: ...257 Spacer 676 393757 Deflector Muffler 677 690661 Screw Muffler Deflector 689 691855 Spring Friction 692 690572 Spring Detent 718 690959 Pin Locating 741 692565 Gear Timing 742 692564 Retainer E Ring KEY PART NO NO DESCRIPTION 746 692566 Gear Idler 773 694258 Retainer 830 694544 Stud Rocker Arm 832 693583 Guard Muffler 836 690661 Screw Muffler Guard 836A 693624 Screw Muffler Guard 851 493880 Term...

Page 29: ...29 SERVICE NOTES ...

Page 30: ...30 SERVICE NOTES ...

Page 31: ...31 SERVICE NOTES ...

Page 32: ...PRINTED IN THE U S A 180350 8 9 01 TR ...

Reviews: