background image

Page 7

OPERATION

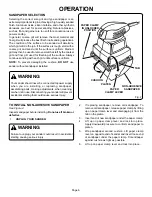
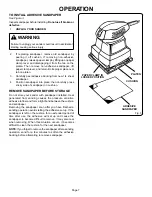
TO INSTALL ADHESIVE SANDPAPER

See Figure 3.

Inspect sandpaper before installing. Do not use if broken or
defective.

1.

UNPLUG YOUR SANDER.

WARNING:

Failure to unplug your sander could result in accidental
starting causing serious injury.

2.

If replacing sandpaper, remove old sandpaper by
peeling it off cushion. If removing non-adhesive
sandpaper, release paper clamp by lifting up on paper
clamp lever and disengaging it from the tab on the
platen. Then remove non-adhesive sandpaper, lift
paper clamp lever, and return it to its proper place over
tab on platen.

3.

Carefully peel adhesive backing from new 1/4 sheet
sandpaper.

4.

Position sandpaper into place, then carefully press
sticky side of sandpaper on cushion.

Fig. 3

CUSHION

PLATEN

ADHESIVE

SANDPAPER

PAPER CLAMP IN

LOCKED POSITION

REMOVE SANDPAPER BEFORE STORAGE

Do not store your sander with sandpaper installed. Heat
generated from sanding causes the pressure sensitive
adhesive to flow and form a tight bond between the cushion
and sandpaper.

Removing the sandpaper soon after you have finished a
sanding operation avoids letting the adhesive set up. If the
sandpaper is left on the cushion for an extended period of
time after use, the adhesive will set up and cause the
sandpaper to become difficult to remove. It may also tear
when removing. When this situation occurs, it becomes
difficult to clean the cushion for the next sandpaper.

NOTE: If you forget to remove the sandpaper after a sanding
operation, sand for a few minutes to soften the adhesive
backing before attempting to remove sandpaper.

Summary of Contents for Craftsman 315.116070

Page 1: ...oebuck and Co Hoffman Estates IL 60179 U S A 972000 257 7 00 Printed In U S A Palm Grip Finishing Sander DOUBLE INSULATED Rules for Safe Operation Warranty Operation Maintenance Repair Parts MODEL NO...

Page 2: ...d in a dry and high or locked up place out of the reach of children 8 DON T FORCE TOOL It will do the job better and safer at the rate for which it was designed 9 USE RIGHT TOOL Don t force small tool...

Page 3: ...parts binding of moving parts breakage of parts mounting and any other conditions that may affect its operation A guard or other part that is damaged should be properly repaired or replaced by an auth...

Page 4: ...e 12 FULL ONE YEAR WARRANTY ON CRAFTSMAN SANDER If this Craftsman Sander fails to give complete satisfaction within one year from the date of purchase RETURN IT TO THE NEAREST SEARS STORE IN THE UNITE...

Page 5: ...ction of a second is sufficient to inflict severe injury KNOW YOUR SANDER Before attempting to use your sander familiarize yourself with all operating features and safety requirements See Figure 1 SWI...

Page 6: ...ver be connected to power supply when you are installing or replacing sandpaper assembling parts making adjustments when cleaning orwhennotinuse Disconnectingyoursanderwillprevent accidental starting...

Page 7: ...press sticky side of sandpaper on cushion Fig 3 CUSHION PLATEN ADHESIVE SANDPAPER PAPER CLAMP IN LOCKED POSITION REMOVE SANDPAPER BEFORE STORAGE Do not store your sander with sandpaper installed Heat...

Page 8: ...let the sanding sheet and sander do the work Applying additional pressure only slows the motor rapidly wears sandpaper and greatly reduces sander speed Excessive pressure will overload the motor caus...

Page 9: ...ine Medium Coarse THE FOLLOWING STANDARD 4 1 2 IN X 11 IN SANDING SHEETS CAN BE CUT TO FIT YOUR SANDER NON LOADING ALUMINUM OXIDE SANDING SHEETS X Fine Fine Medium Coarse THE FOLLOWING RECOMMENDED ACC...

Page 10: ...tool be used for extended work on any fiberglass material wallboard spackling compounds or plaster During any use on these materials it is extremely important that the tool is cleaned frequently by bl...

Page 11: ...001 Data Plate 1 2 973762 001 Logo Plate 1 3 973776 002 Paper Clamp 2 4 623019 004 Rubber Plug 1 5 973764 000 Platen Includes Key Nos 4 and 8 1 6 974485 001 Paper Clamp Retainer 2 7 999306 009 Screw...

Page 12: ...S INFORMATION AND ORDERING CALL THIS TOLL FREE NUMBER 1 800 366 PART 1 800 366 7278 HOW TO ORDER REPLACEMENT PARTS When requesting service or ordering parts always provide the following information Na...

Page 13: ...ng Whenrequestingserviceororderingparts alwaysprovide the following information Name Of Product Part Number Palm Grip Finishing Sander Model Number Part Description 315 116070 MODEL NO 315 116070 SERV...

Reviews: