Seaory R600M Quick Use Manual Download Page 2

Shenzhen Seaory Technology Co., Ltd. 


     03  

                                                                                                  www.seaory.com                       

4


Exellent quality, Perfect service


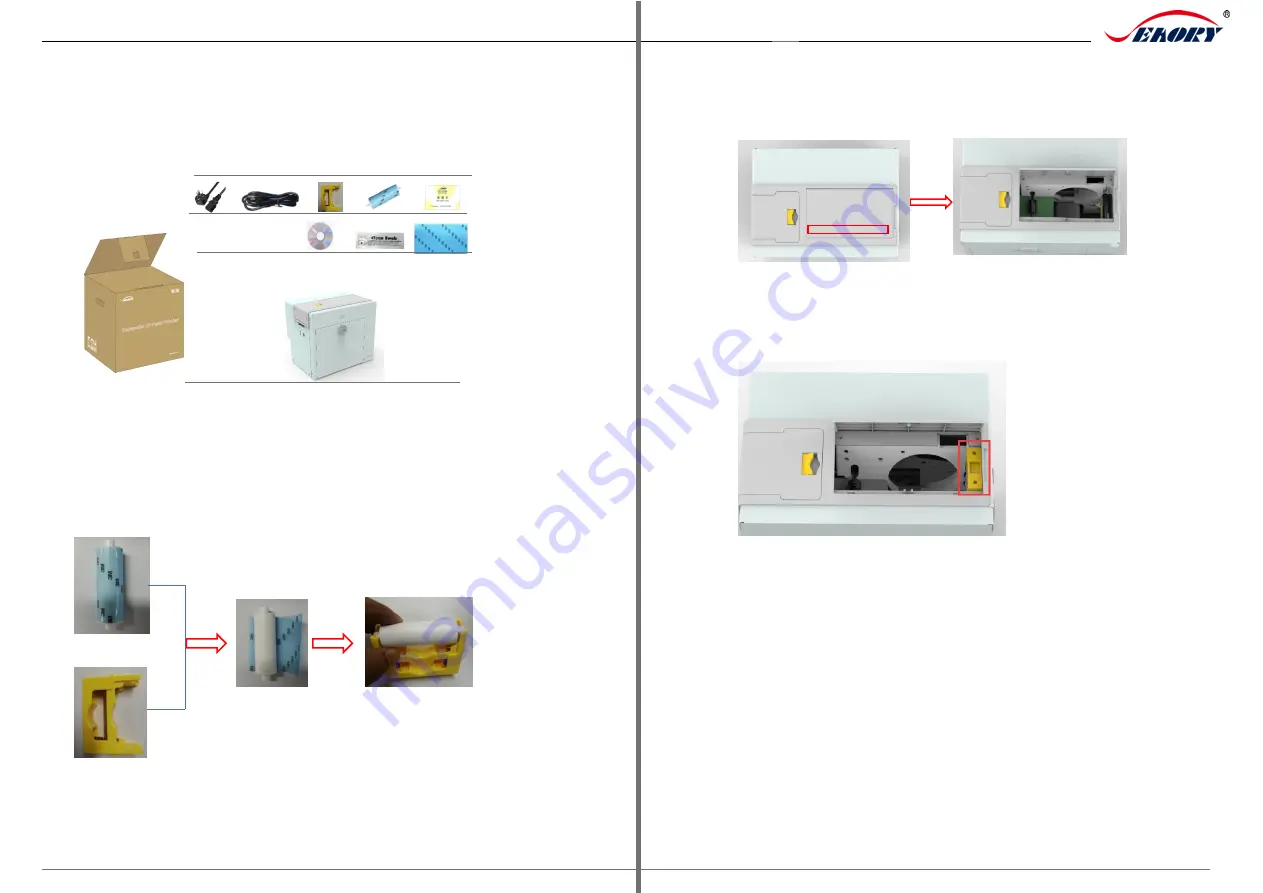
2.  Unpacking Inspection 

  Check whether the appearance is intact after opening the outer box, and 

check whether the accessories are complete according to the product instruction 
manual (prevailed by the sales contract). If there is any missing, please contact 

the dealer to communicate and solve. 


3.  Install Accessories and Consumables 

3.1 Install Cleaning Module (Top)   

(1) Take out the cleaning module and cleaning roller from the accessory box 

of the card printer, and assemble them as shown in the picture below. 


After tearing off the 3M adhesive layer, hold the two ends of the cleaning roller 

with your hands, push them to the installation position and gently press down to 
lock the two ends of the cleaning roller. 


(2) Press the red frame part of the upper door in the below left picture, open 

the upper door after the upper door lock pops out. 


(3) Press the assembled cleaning module as shown in the picture below and 

install  it  into  the  card  printer,  and  then  close  the  upper  door  to  complete  the 
installation of the cleaning module (top). 


Note: The purpose of the cleaning roller is to absorb the dust on the card and 

improve the printing performance. 


Summary of Contents for R600M

Page 1: ...cling pending card 2 3 Front end View Front end input slot The printer defaults to the input slot at the factory and it can also be set as the output slot Cleaning module door Open this door to instal...

Page 2: ...essory box of the card printer and assemble them as shown in the picture below After tearing off the 3M adhesive layer hold the two ends of the cleaning roller with your hands push them to the install...

Page 3: ...left and then press the cleaning module to place it vertically as shown in the lower center After above steps are completed then close the upper door to complete the installation of the cleaning modu...

Page 4: ...ard printer s outer packing box The USB A type interface is connected to the computer and the USB B type interface is connected to the USB interface of the printer Ethernet communication interface ins...

Page 5: ...card insertion direction can be customized according to needs The ISO7811 standard card should be inserted strictly according to the card direction in the picture below so that the magnetic stripe pos...

Page 6: ...r according to the software installation process prompts or the product instruction manual of this model 6 2 Print Test 1 Driver Test Page Step 1 In the list of printers and devices right click the Se...

Page 7: ...ty Perfect service 2 Seaory iCARDE Card Design Software After all the above steps are completed relevant software can be used to print and test the card printer You can also do print test through Seao...

Reviews: