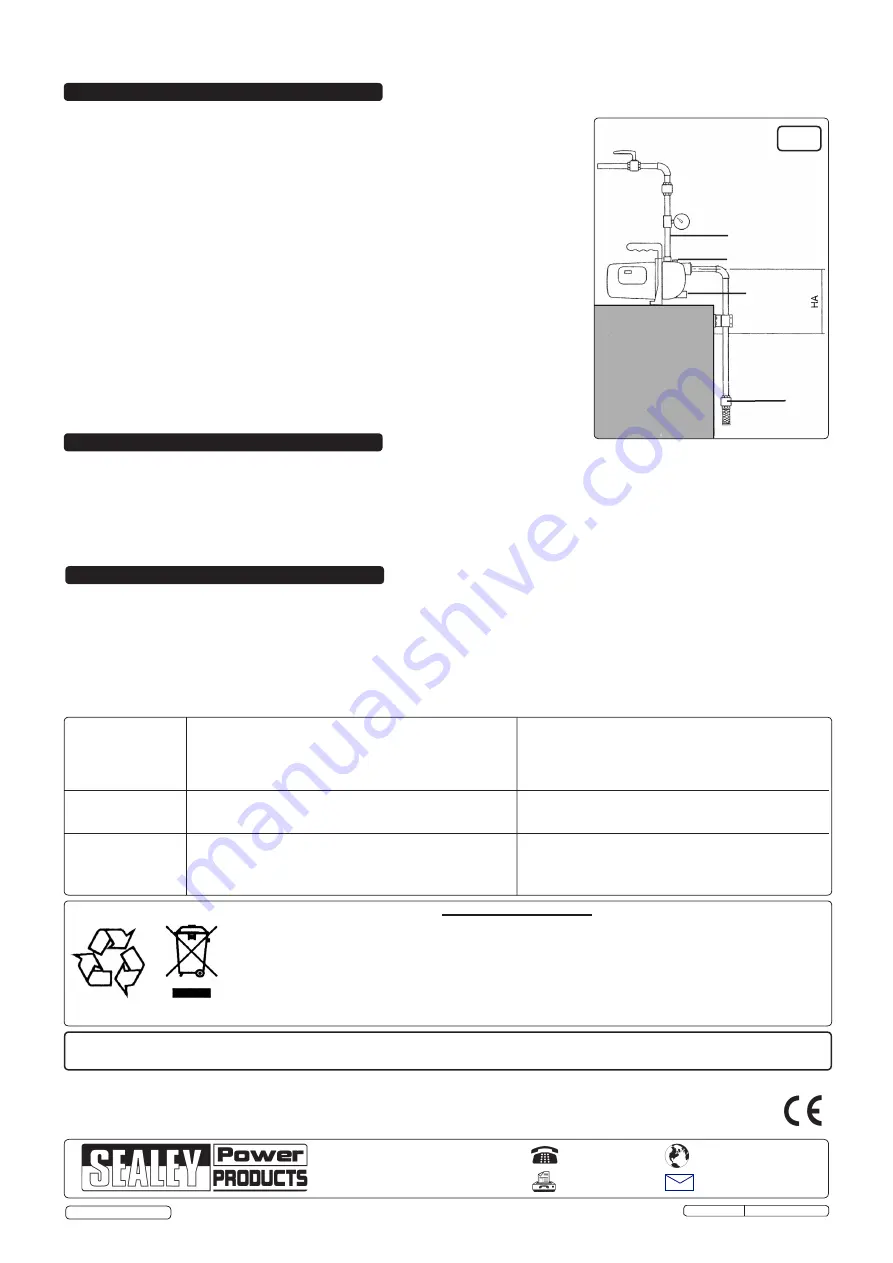
The pump may be gravity or suction fed. Gravity feed is the preferred arrangement as this will place
less strain on the long term operation of the pump. Depending on the installation, various plumbing
accessories will be required. Determine requirements and if necessary contact your local
Sealey dealer for advice on obtaining appropriate accessories.
3.1. PUMP.
Locate pump in a suitable area, ensuring that there is good air circulation. Externally the pump is
not designed to be totally waterproof to protect it from possible wet situations. Bolt the pump to a
flat horizontal surface with the outlet pipe (fig.1a) pointing vertically upwards.
3.2.
GRAVITY FEED (preferred arrangement when the feed water level is above the pump inlet).
Fit an isolation valve to the gravity feed pipe. Valve is used to turn water off and to restrict the
flow if required.
3.3.
SUCTION FEED (when the feed water level is lower than the pump inlet).
3.3.1. If the distance (HA) is less than 4mtr; use a feed pipe of 1” diameter.
If the distance (HA) is greater than 4mtr; use a feed pipe of greater than 1” diameter.
3.3.2. The distance (HA) must not exceed 8mtr.
3.3.3. Connect a filter valve to the feed pipe inlet (fig.1b) to ensure water will be retained in pump
system.
3.3.4. Connect other end to pump inlet. The filter should be situated approximately 0.5mtr beneath
the water level.
3.3.5. We advise that a check valve is installed directly on the delivery line, to prevent the pump
being damaged by “water hammer” and that a cut-off valve is also installed (downstream from check
valve) to facilitate maintenance work.
NOTE:
With both gravity and suction feed ensure that the supply inlet pipe is the same height as the
pump inlet or lower, and that, if connecting to a drinking water supply, the water authority regulations
are adhered to.
4. OPERATING INSTRUCTIONS
3. INSTALLATION
5. MAINTENANCE
WARNING! Ensure that you read, understand and apply Section 1 Safety Instructions.
4.1.
Check inlet water pipe is turned on or that inlet suction feed is placed in the water supply to a depth of at least 0.5mtr.
4.2.
If using gravity feed, check and set the outlet restrictor valve as necessary.
4.3.
Prime the pump via the filler hole (fig.1c). Replace cap and ensure that there are no leaks. Open any closing/cut-off devices on the delivery tube.
4.4.
To run the pump, plug into the electrical mains supply and press the switch located on the side of the pump to ‘I’.
4.5.
If, for any reason, the motor should overheat, a thermal circuit breaker will automatically activate and stop the pump. If this happens, switch the
mains power off and unplug. Check the reason for overheating and remedy the problem. If the pump is not switched off, the motor will cool, after which it
will automatically re-start.
WARNING! Apart from the exceptions listed below, mechanical and electrical service maintenance and repair must only be undertaken by an
authorised service agent. Failure to observe this rule may be dangerous and will invalidate your warranty.
WARNING! Ensure that the pump is disconnected from the mains power supply before attempting any service or maintenance.
5.1.
Keep all parts of the pump clean. Rinse and drain via draining hole (fig.1d) when not in use. Check all electrical connections to ensure that they are in
good condition.
5.2.
If pump becomes blocked, remove the inlet pipe and direct a jet of water through the outlet whilst running the motor for several seconds.
Repeat this operation until the blockage has been expelled. If this action does not remedy the problem contact your local Sealey service agent.
5.3.
Clean any accessory filters according to the manufacturer’s instructions.
The motor does not run.
1. No power.
2. Overload protection tripped.
3. Defective condenser.
4. Pump blocked.
1. Verify that voltage is present and that the plug has been correctly
inserted.
2. Determine the cause of the problem and reset the switch. If the thermal
switch has been activated, wait for the pump to cool down.
3. Contact your authorised Sealey dealer.
4. Verify the cause and unblock the pump (see section 5.2)
TROUBLESHOOTING
fig.1
a
b
c
d
The motor runs but no
water is being pumped.
1. The pump is drawing in air.
1. Verify that: all joints are sealed.
the water level is not below the filter valve (inlet).
the filter valve is not blocked.
The pump stops after
running for a short period
of time - the thermal motor
circuit breaker has been
tripped.
1. The power supply does not comply with the data on the nameplate.
2. A solid object is blocking the impellers.
3. The liquid is too viscous.
1. Check the voltage of the power supply.
2. Attempt to remove the blockage (see secton 5.2). If unsuccessful,
contact your authorised Sealey dealer.
3. Pump is designed for use only with water.
NOTE: It is our policy to continually improve products and as such we reserve the right to alter data, specifications and component parts without prior notice.
IMPORTANT:
No liability is accepted for incorrect use of this product.
WARRANTY:
Guarantee is 12 months from purchase date, proof of which will be required for any claim.
INFORMATION:
For a copy of our latest catalogue and promotions call us on 01284 757525 and leave your full name and address, including postcode.
01284 757500
01284 703534
Sole UK Distributor, Sealey Group,
Kempson Way, Suffolk Business Park
,
Bury St. Edmunds, Suffolk,
IP32 7AR
www.sealey.co.uk
Web
Original Language Version
WPS060.V2 Issue: 1 - 21/12/12
© Jack Sealey Limited
Parts support is available for this product. To obtain a parts listing and/or diagram, please log on to
www.sealey.co.uk, email [email protected] or phone 01284 757500.
Environmental Protection.
Recycle unwanted materials instead of disposing of them as waste.
All tools, accessories and packaging should be sorted, taken to a recycle centre
and disposed of in a manner which is compatible with the environment.
When the product is no longer required, it must be disposed of in an environmentally
protective way. Contact your local solid waste authority for recycling information.


