VS8801
EOBD CODE READER
(WITH LIVE DATA)
Original Language Version
VS8801 Issue No.1 23/04/12
Page 1: ...VS8801 EOBD CODE READER WITH LIVE DATA Original Language Version VS8801 Issue No 1 23 04 12 ...
Page 2: ...nners costing many times that of Model No VS8801 contents page 1 Safety precautions 1 2 General Information 2 2 1 On Board Diagnostics OBD II EOBD 2 2 2 Diagnostic Trouble Codes DTCs 2 2 3 Location of the Data Link Connector DLC 3 2 4 EOBD Readiness Monitors 4 2 5 EOBD Monitor Readiness Status 5 2 6 EOBD Definitions 6 2 7 EOBD Modes of Operation 7 3 USING THE CODE READER 10 3 1 Tool Description 10...
Page 3: ... for purchasing a Sealey product Manufactured to a high standard this product will give you years of trouble free performance if these instructions are carefully followed and the product is correctly maintained ...
Page 4: ...when using the code reader on or near machinery where there are rotational parts such as belts pulleys and fans Remove ill fitting clothing Remove ties watches rings and other loose jewellery and contain and or tie back long hair Maintain correct balance and footing Ensure the floor is not slippery and wear non slip shoes Keep Product Surfaces Clean and Dry DO NOT attempt to connect or disconnect ...
Page 5: ...driver typically by the phrase of Check Engine or Service Engine Soon The system will also store important information about the detected malfunction so that a technician can accurately find and fix the problem Here below follow three pieces of such valuable information 1 Whether the Malfunction Indicator Light MIL is commanded on or off 2 Which if any Diagnostic Trouble Codes DTCs are stored 3 Re...
Page 6: ...ld be there telling location For some Asian and European vehicles the DLC is located behind the ashtray and the ashtray must be removed to access Identifying specific malfunctioning section of the systems Systems B Body C Chassis P Powertrain U Network Code Type Generic SAE P0 P2 P34 P39 B0 B3 C0 C3 U0 U3 Manufacturer Specific P1 P30 p33 B1 B2 C1 C2 U1 U2 Sub systems 1 Fuel and Air Metering 2 Fuel...
Page 7: ... vehicles and the exact number of monitors in any vehicle depends on the motor vehicle manufacturer s emissions control strategy Continuous Monitors Some of the vehicle components or systems are continuously tested by the vehicle s EOBD system while others are tested only under specific vehicle operating conditions The continuously monitored components listed below are always ready 1 Misfire 2 Fue...
Page 8: ...tem 5 Exhaust gas sensor 6 PM filter 2 5 EOBD Monitor Readiness Status EOBD systems must indicate whether or not the vehicle s PCM s monitor system has completed testing on each component Components that have been tested will be reported as Ready or Complete meaning they have been tested by the EOBD system The purpose of recording readiness status is to allow inspectors to determine if the vehicle...
Page 9: ...nology for the on board computer that controls engine and drive train Malfunction Indicator Light MIL Malfunction Indicator Light Service Engine Soon Check Engine is a term used for the light on the instrument panel It is to alert the driver and or the repair technician that there is a problem with one or more of vehicle s systems and may cause emissions to exceed federal standards If the MIL illu...
Page 10: ...s the EOBD system not only sets a code but also records a snapshot of the vehicle operating parameters to help in identifying the problem This set of values is referred to as Freeze Frame Data and may include important engine parameters such as engine RPM vehicle speed air flow engine load fuel pressure fuel trim value engine coolant temperature ignition timing advance or closed loop status 2 7 EO...
Page 11: ... sensor monitor screen and the test results gathered about the oxygen sensor There are ten numbers available for diagnostics 1 01 Rich to Lean O2 sensor threshold voltage 2 02 Lean to Rich O2 sensor threshold voltage 3 03 Low sensor voltage threshold for switch time measurement 4 04 High sensor voltage threshold for switch time measurement 5 05 Rich to Lean switch time in ms 6 06 Lean to Rich swit...
Page 12: ...manufacturer specific Mode 09 Reports vehicle information This information includes vehicle VIN number and calibration information stored in the vehicle ECUs Mode 0A Request Emission Related Diagnostic Trouble Codes with Permanent Status This mode is required for all emissions related DTCs The presence of permanent DTCs at an inspection without the MIL illuminated is an indication that a proper re...
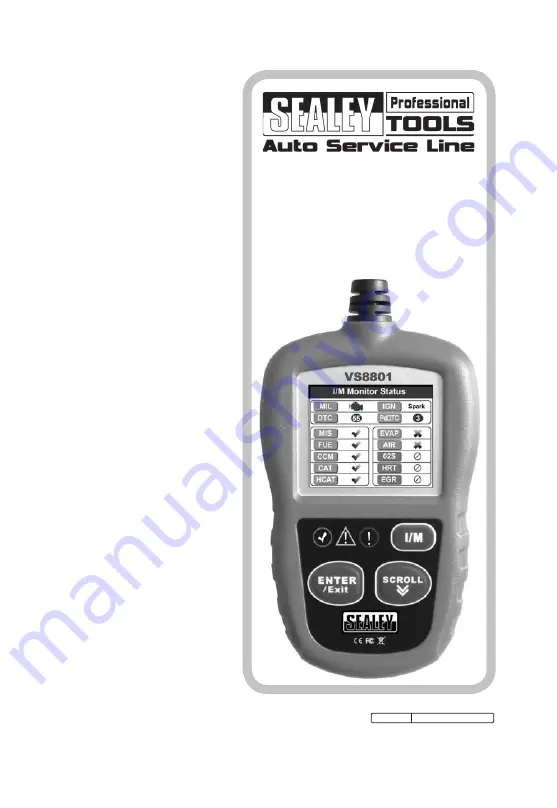
Page 13: ...to the vehicle s Data Link Connector DLC LCD DISPLAY Indicates test results GREEN LED Indicates that engine systems are running normally The number of monitors on the vehicle which are active and performing their diagnostic testing is in the allowed limit and no DTC s are present 10 ...
Page 14: ...checks State Emissions readiness and drive cycle verification ENTER Exit BUTTON Confirms a selection or action from a menu Or returns to previous menu SCROLL BUTTON Scrolls through menu items USB CONNECTOR Connects the code reader to the PC for upgrading 3 2 Specifications 1 Display TFT color display 220 x 176 dpi 2 Operating Temperature 0 to 60 C 32 to 140 F 3 Storage Temperature 20 to 70 C 4 to ...
Page 15: ... the keypad as the keypad is not waterproof 3 6 Power The code reader is powered via the vehicle Data Link Connector DLC Just follow the steps below to turn on the scan tool 1 Locate DLC on vehicle A plastic DLC cover may be found for some vehicles and you need to remove it before plugging the EOBD cable 2 Plug the tool s EOBD cable to the vehicle s DLC 3 7 System Setup The code reader allows you ...
Page 16: ...e To enter the Setup menu When the code reader is powered on it displays a Main Screen Figure 3 1 Figure 3 1 From the Main Screen Use the SCROLL button to select Setup and press the ENTER Exit button Follow the instructions to make adjustments and settings as described in the above setup options Figure 3 2 Figure 3 2 System Setup 1 8 Language Configure Monitors Unit of Measure Key Beep Set Status ...
Page 17: ...n and return to previous screen We provide three language options currently Figure 3 3 Figure 3 3 Configure Monitors From System Setup screen use the SCROLL button to select Configure Monitors and press the ENTER Exit button Figure 3 4 In this menu you could configure the number of monitors to pass diagnosis and restore the default settings Language 1 3 English Franç ais Españ ol Configure Monitor...
Page 18: ...e the SCROLL button to select Reset Factory Default and press the ENTER Exit button It will restore the default configuration settings in the Configure Monitors menu and delete any customized settings In this case the Allowed INC Monitors will be set to 1 The tool will display an information message to ask for your confirmation Select Yes to proceed and No to exit without change Unit of Measure Me...
Page 19: ...default setting is Beep On 1 From System Setup screen use the SCROLL button to select Key Beep Set and press the ENTER Exit button 2 From Key Beep Set menu use the SCROLL button to select Beep ON or Beep OFF to turn on off the beep Figure 3 6 3 Press the ENTER Exit button to save your selection and return to previous menu Unit of Measure 1 2 English Metric Key Beep Set 1 2 Beep ON Beep OFF ...
Page 20: ...eep Set and press the ENTER Exit button 2 From Status Beep Set menu use the SCROLL button to select Beep ON or Beep OFF to turn on off the beep Figure 3 7 3 Press the ENTER Exit button to save your selection and return to previous menu Tool Self test The Tool Self test function checks if the display LED lamps and keyboard are working properly A Display test The Display Test function checks if the ...
Page 21: ...functioning properly 1 Use the SCROLL button to select Keyboard Test from the Tool Self test menu and then press the ENTER Exit button 2 Press any key to start test When you press a key the key name should be observed on the display If the key name does not show up then the key is not functioning properly Figure 3 9 3 Double press ENTER Exit to return to previous menu Tool Self test 1 4 Display Te...
Page 22: ...ected commands Figure 3 10 3 When completed press the ENTER Exit button to exit Update Mode This function allows you to update the code reader software and DTC library through a computer To update your code reader you need the following items The Code Reader VS8801 A PC or laptop with USB ports A USB cable 1 Download the programs to be updated to your computer 2 Run the MaxiLink Tool Kit in your c...
Page 23: ...re 3 11 7 During the update procedure the code reader displays a message Update Program Please wait 8 When the update has finished the code reader will display a message Program Update has been done 9 Restart the code reader to finish the whole update NOTE When you made a wrong choice and the code reader is unable to work properly you may need to update the programs By holding the ENTER Exit butto...
Page 24: ... reader 1 From Main Screen use the SCROLL button to select About and press the ENTER Exit button wait for the About screen to appear Figure 3 1 2 View tool information on screen Figure 3 12 3 9 Vehicle Coverage The VS8801 EOBD Code Reader is specially designed to work with all EOBD compliant vehicles including those equipped with next generation protocol Control Area Network CAN A small number of ...
Page 25: ...he code reader Vehicle Linking Error A communication error occurs if the code reader fails to communicate with the vehicle s ECU Engine Control Unit You need to do the following to check up Verify that the ignition is ON Check if the code readers s EOBD connector is securely connected to the vehicle s DLC Verify that the vehicle is EOBD compliant Turn the ignition off and wait for about 10 seconds...
Page 26: ...east 8 0 volts LED lamps not working If you turn on the code reader and perform the I M Readiness test but the LED lamps are not working there may be several possible causes including bad connection and ignition off In this case follow these steps to check the code reader Make sure the EOBD cable is connected to the DLC securely Verify the ignition key is in the KOER position Run the LED Test in t...
Page 27: ...ure 3 1 6 Press the ENTER Exit button to wait for the Menu to appear A sequence of messages displaying the EOBD protocols will be observed on the display until the vehicle protocol is detected If the code readerr fails to communicate with the vehicle s ECU Engine Control Unit more than three times a LINKING ERROR message shows up on the display Verify that the ignition is ON Check if the code read...
Page 28: ... module and press the ENTER Exit button to confirm 4 1 Reading Codes Reading Codes can be done with the key on engine off KOEO or with the key on engine running KOER Stored Codes are also known as hard codes which are fault codes or trouble codes that have been stored in the vehicle computer memory because the faults have reoccurred for more than a specified amount of key cycles These codes will c...
Page 29: ...ermanent Codes are DTCs that are confirmed and are retained in the non volatile memory of the computer until the appropriate monitor for each DTC has determined that the malfunction is no longer present and is not commanding the MIL on Permanent DTC shall be stored in non volatile memory and may not be erased by any diagnostic services or by disconnecting power to ECU 1 Use SCROLL button to select...
Page 30: ...turn to previous screen Figure 4 5 The control module number sequence of the DTCs total number of codes detected and type of codes Generic or Manufacturer specific Stored or Pending codes will be observed on the upper right hand corner of the display 4 If more than one DTC is found use the SCROLL button to check all the codes If retrieved DTCs contain any manufacturer specific or enhanced codes a ...
Page 31: ...iagnostic Trouble Codes may allow the code reader to delete not only the codes from the vehicle s on board computer but also Freeze Frame data and manufacturer specific enhanced data Further the I M Readiness Monitor Status for all vehicle monitors is reset to Not Ready or Not Complete status Do not erase the codes before the system has been checked completely by a technician NOTE Erasing codes do...
Page 32: ...lect NO to exit A message of Command Cancelled show ups Wait a few seconds or press any key to return to Diagnostic Menu 3 Press the ENTER Exit button to confirm If the codes are cleared successfully an Erase Done confirmation message shows on the display Figure 4 8 If the codes are not cleared then an Erase Failure Turn Key on with Engine off message appears Erase Codes Erase trouble codes Are yo...
Page 33: ...from Diagnostic Menu and press the ENTER Exit button Figure 4 3 2 Wait a few seconds while the code reader validates the PID MAP Figure 4 10 3 To view complete set of data use SCROLL button to select Complete Data Set from View Data menu and press the ENTER Exit button Erase Codes Erase Failure Turn Key on with Engine Off Press any key to con Live Data Reading PID 01 Please Wait ...
Page 34: ...ious Menu from the Read Codes screen and press ENTER Exit button to return to previous menu 4 4 Viewing Freeze Frame Data Freeze Frame Data allows the technician to view the vehicle s operating parameters at the moment a DTC Diagnostic Trouble Code is detected For example the parameters may include engine speed RPM engine coolant temperature ECT or vehicle speed sensor View Data 1 3 Complete Data ...
Page 35: ...13 If there is no freeze frame data available an advisory message No freeze frame data stored shows on the display 4 Press ENTER Exit button to return to previous screen 4 5 Retrieving I M Readiness Status I M Readiness function is used to check the operations of the Emission System on EOBD compliant vehicles It is an excellent function to use prior to having a vehicle inspected for MOT Testing CA...
Page 36: ...tes one or more such monitors may be allowed to be Not Ready to pass the emissions inspection OK Indicates that a particular monitor being checked has completed its diagnostic testing INC Indicates that a particular monitor being checked has not completed its diagnostic testing N A The monitor is not supported on that vehicle There are two ways to retrieve I M readiness status A Retrieve I M Readi...
Page 37: ...r an Emission Test The LED and audio tone indications are interpreted as below LED Interpretation 1 GREEN LED Indicates that engine systems are OK and operating normally the number of Monitors supported by the vehicle which have run and performed their self diagnostic testing is in the allowed limit MIL is off There are no stored and pending DTCs The vehicle is ready for an Emissions Test and ther...
Page 38: ...ons professional to determine based on your test results if your vehicle is ready for an Emissions Test 3 RED LED Indicates there is a problem with one or more of the vehicle s system A vehicle displaying a red LED is definitely not ready for an Emissions Test The red LED is also an indication that there are DTCs present The MIL lamp on the vehicle s instrument panel will light steady The problem ...
Page 39: ...different LED light indicates different I M Readiness Status LED Light Audio Tone Beep Interval Green LED Two long beeps 5 seconds Yellow LED short long short beep 5 seconds Red LED Four short beeps 5 seconds After you have read the information press ENTER Exit to exit The other buttons are disabled to prevent misoperation B Retrieve I M Readiness status in typical way 1 Use the SCROLL button to s...
Page 40: ...tor CAT Catalyst Monitor EVAP Evaporative System Monitor HTR O2 Sensor Heater Monitor AIR Secondary Air Monitor HCAT Heated Catalyst Monitor For compression ignition engines MIS Misfire Monitor FUEL Fuel System Monitor CCM Comprehensive Component Monitor EGR EGR System Monitor HCCAT NMHC Catalyst Monitor NCAT NOx Aftertreatment Monitor BP Boost Pressure System Monitor EGS Exhaust Gas Sensor Monito...
Page 41: ...s Yellow LED short long short beep 2 minutes Red LED Four short beeps 2 minutes 7 Use the SCROLL button for more PIDs if additional information is available on more than one page 8 Press the ENTER Exit button to return to Diagnostic Menu Since DTCs Cleared 1 MIL Status OFF Misfire Monitor OK Fuel System Mon OK Comp Component OK Catalyst Mon INC Htd Catalyst N A This Drive Cycle 1 MIL Status OFF Mi...
Page 42: ...Exit button Figure 4 3 2 An advisory message comes up to remind you Wait a few seconds or press any key to continue Figure 4 18 3 Wait a few seconds while the code reader reads vehicle information Figure 4 19 If the vehicle does not support this mode a message shows on the display warning that the mode is not supported 4 From Vehicle Info Menu use the SCROLL button to select an available item to v...
Page 43: ...o the previous menu 4 7 Exiting the EOBD Test 1 To exit OBDII test use SCROLL button to select Previous Menu from Diagnostic Menu and press ENTER Exit button Figure 4 3 2 A warning message comes up asking your confirmation Press ENTER Exit button to exit Vehicle Info 3 4 Vehicle ID Number Calibration ID Cal Verf Number Previous Menu Cal Verf Number CVN1 BB BA A0 78 ...
Page 44: ...d before a state mandated emissions test can be conducted But how will you know when it is ready With this code reader you don t have to drive around endlessly and continuously coming back to the repair shop for retest if all required tests by the ECU are completed And you could also do a quick check of the vehicle to determine if it is ready to receive an emission test without the hassle of conne...
Page 45: ...ton to select Ready Test from Main Screen Figure 5 1 and press the ENTER Exit button Figure 5 1 As post repair diagnostic tool This function can be used after the vehicle has done any emission related repairs to confirm that the repair has been performed successfully After repairs some drive cycles are required to reset the monitoring systems Drive cycles vary among vehicles and for each monitor i...
Page 46: ...iance to a state emissions test you could use this function to check the readiness status first by yourself 1 While the code reader connected to the vehicle select Ready Test from Main Screen Drive the car till the code reader notifies you safely with color LEDs and audible tone if your vehicle is ready to conduct state emission test 2 If the GREEN LED lights and two long beeps are heard your vehi...
Page 47: ...nformation NOTE In this function only ENTER Exit button is available The other buttons are disabled to prevent misoperation 5 3 LED and Tone Interpretation Select Ready Test from the Main Screen and the screen shows as below including applicable monitors status MIL state Ignition type DTCs stored one and pending one Figure 5 2 If the code reader is idle it will show the result immediately If it is...
Page 48: ...h have run and performed their self diagnostic testing is in the allowed limit 2 RED LED Your vehicle is Not Ready Indicates that the number of Monitors supported by the vehicle which have run and performed their self diagnostic testing is out of the allowed limit Audio Tone Interpretation The audio tone could be configured according to the I M Readiness Status This function is invaluable when per...
Page 49: ...ages caused by improper use accident flood lightning or if the product was altered or repaired by anyone other than Sealey s Service Center 3 Sealey shall not be liable for any incidental or consequential damages arising from the use misuse or mounting of the scan tool 4 All information in this manual is based on the latest information available at the time of publication and no warranty can be ma...