background image

4.7. 


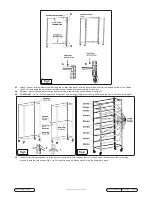
Starting at the bottom place the wire shelves into the frame ensuring the shelves for the larger bins are at the bottom and the shelves  


for the smaller bins are at the top. Place the flat wire shelf on the top. The storage system is now ready to use.

fig.5

fig.7

fig.8

fig.6

4.8. 

TPS72

4.8.1.  Take four uprights and link using top and bottom couplings

 (fig.8.B).

4.8.2.  Insert the double pin castors into the uprights, ensuring that    


they seat correctly (fig.8.A).

4.8.3.  Fit the remaining castors to the remaining four uprights (fig.1)

4.8.4.  Complete assembly as in sections 4.2 to 4.7.

TPS22,TPS36,TPS72   Issue: 3(SP) - 18/03/17

Original Language Version

 © Jack Sealey Limited

Summary of Contents for TPS22

Page 1: ...hich may damage the coated surface Ensure that the storage system is properly assembled before loading with heavy items Load for each shelf must be evenly distributed Place heavier items on the lower shelves of the storage system Always push the storage system from the sides pushing from the front or back creates a tipping hazard 2 INTRODUCTION Powder coated steel racks with robust composite stora...

Page 2: ...ngle tab half way up the frames See fig 3B 4 5 TPS36 ONLY As well as the side braces attach front and rear beam single tab exactly half way up the frame front and back fig 3B fig 4 4 6 Insert the remaining cross beams in the frame using fig 4 and fig 5 to space them correctly Ensure the beams are the correct way around to hold the wire shelves fig 4 fig 5 As before use a soft faced mallet to tap t...

Page 3: ...tem is now ready to use fig 5 fig 7 fig 8 fig 6 4 8 TPS72 4 8 1 Take four uprights and link using top and bottom couplings fig 8 B 4 8 2 Insert the double pin castors into the uprights ensuring that they seat correctly fig 8 A 4 8 3 Fit the remaining castors to the remaining four uprights fig 1 4 8 4 Complete assembly as in sections 4 2 to 4 7 TPS22 TPS36 TPS72 Issue 3 SP 18 03 17 Original Languag...

Page 4: ... for incorrect use of this product WARRANTY Guarantee is 12 months from purchase date proof of which will be required for any claim Environmental Protection Recycle unwanted materials instead of disposing of them as waste All tools accessories and packaging should be sorted taken to a recycling centre and disposed of in a manner which is compatible with the environment When the product becomes com...

Reviews: