background image

fig.12

fig.11

fig.10

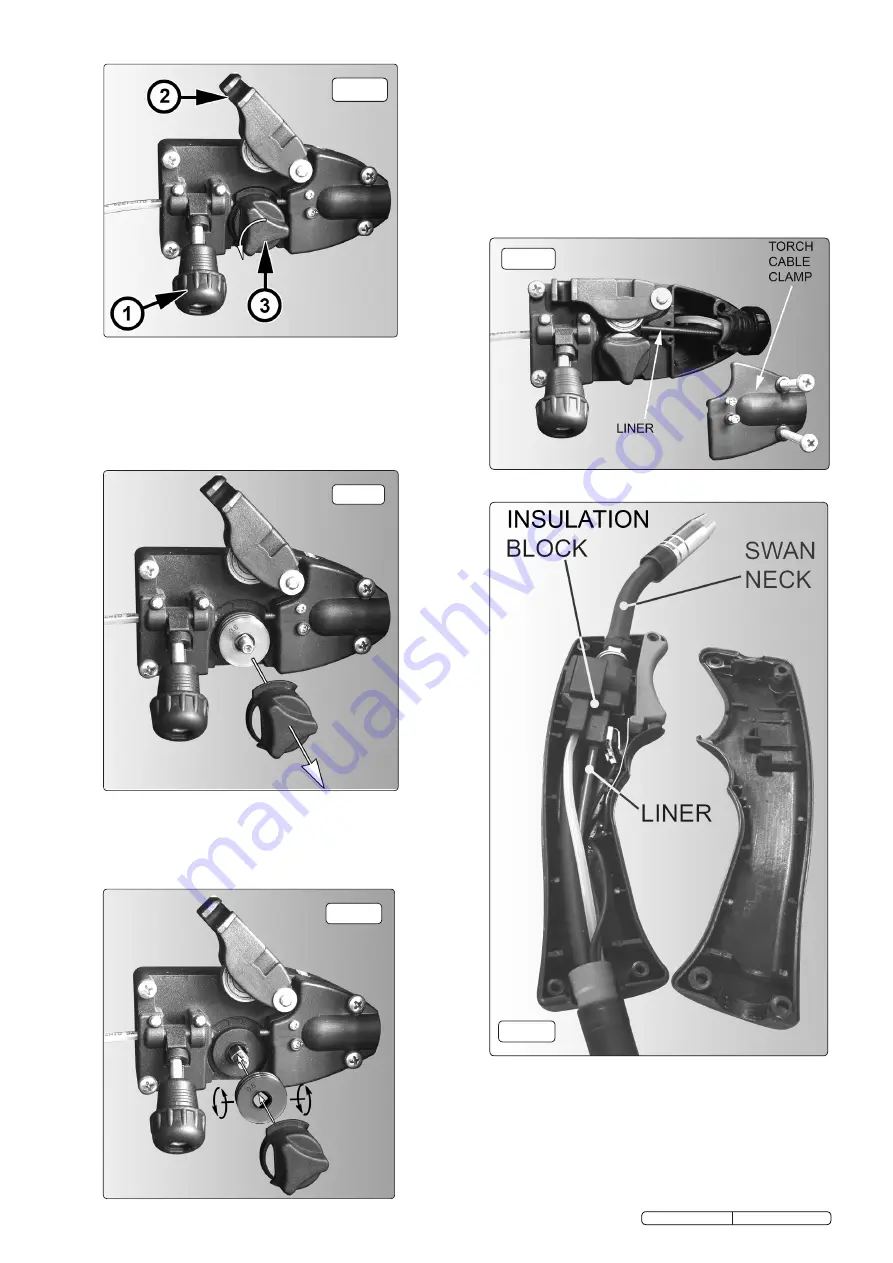
6.6.  Replacing wire liner. 

6.6.1.  A worn or damaged wire liner will seriously affect the performance of  


the welder and should be immediately replaced. first wind the wire  


back onto the spool and secure it. Remove the four screws securing  


the torch cable clamp to the wire feed unit (fig.13) and take off the  


clamp. Undo the torch case (fig.14) and pull the wire liner from the


insulation block. Pull out the liner from the torch cable and insert the  


new one. Reverse the process to re-assemble. Ensure the liner is fully  


inserted into the torch insulation block and reassemble the torch. Trim  


the other end of the liner as close to the feed roller as possible.  


Replace the torch cable clamp.

6.7.  Replacing gears.  

6.7.1.  An inexperienced welder can allow spatter to build up in the tip and  


shroud. In severe cases this can block the wire feed causing gear 


damage in the wire drive. To check if the gears are worn depress the  


button on the torch with the set switched on. If the gears are worn, a  


grating sound will be heard coming from the wire feed motor and you  


may also observe the feed roller vibrating instead of rotating smoothly.  


In this is the case, return the welder to your local Sealey dealer for  


repair.

6.5 

Turning feed roller 

IMPORTANT:

 Turn the feed roller to suit the wire size.  

6.5.1.  There are two grooves on the feed roller, 0.6mm and 0.8mm. Always  


have the groove that is being used on the outside of the roller (nearest  


to you). To turn the feed roller first loosen the wire tension knob and  


move it into its down position (see fig.10-1) then move the tensioning  


roller assembly to its up position (see fig.10-2). Take hold of the 


triangular knob on the roller retainer and rotate it 90°anticlockwise to  


release it as shown in fig.10.3. Now pull the roller retainer off the drive  


spindle to reveal the roller as shown in fig.11.

6.5.2.  Pull the roller off the drive spindle, flip it over and put it back on the  


drive spindle. (See fig 12) The groove size you require should now be  


visible on the face of the roller. Push the roller retainer back onto the  


drive spindle with the opening facing left. Ensure that the flanges at the  


base of the retainer, seat fully into the circular recess in the main  


moulding and then rotate the retainer through 90° to lock it in place.

fig.14

fig.13

SUPERMIG150.V3   Issue No:1 15/05/09

Summary of Contents for SUPERMIG Series

Page 1: ...INSTRUCTIONS FOR SUPERMIG WELDER SUPERMIG150 V3 model no SUPERMIG150 V3 Issue No 1 15 05 09 ...

Page 2: ...rm and frequency The output must be greater than the power consumption of the welder If any of these requirements is not met the electronics within the welder may be affected NOTE The use of an unregulated generator may be dangerous and will invalidate the warranty on the welder WARNING The welder may produce voltage surges in the mains supply which can damage other sensitive equipment e g compute...

Page 3: ...er to rest into the metal support See fig 2 D Secure the cylinder by hooking either end of the chain E through the metal support as shown in fig 2 3 3 Connecting the gas cylinder 3 3 1 When using Argon or Argon mixtures you will need to use the bull nose adaptor Fit the bull nose adaptor to the cylinder with a spanner If you intend to use CO gas the regulator will fit directly onto the cylinder 3 ...

Page 4: ...ler 4 1 Mig Mag welding Welding wire is automatically fed through an insulated liner to the tip of the torch The torch consists of a switch liner gas hose and control cable The switch activates the wire feed roller and the gas flow Releasing the switch stops wire feed and gas flow The weld current is transferred to the electrode the wire from the contact tip at the torch end The current to the ele...

Page 5: ...and you may also observe the feed roller vibrating instead of rotating smoothly In this is the case return the welder to your local Sealey dealer for repair 6 5 Turning feed roller IMPORTANT Turn the feed roller to suit the wire size 6 5 1 There are two grooves on the feed roller 0 6mm and 0 8mm Always have the groove that is being used on the outside of the roller nearest to you To turn the feed ...

Page 6: ... Gas leak Check hoses connections and torch assembly Wire sticking in gas cup nozzle Worn or defective gas cup nozzle Replace gas cup nozzle Section 6 4 Wire deformed Check roller tension Section 3 6 Wire speed too slow Increase wire speed Section 3 7 Irregular weld head Torch incorrectly held Use correct torch angle Wire weaving in weld pool Check roller tension and adjust Section 3 6 Weld bead t...

Reviews: