4. PREPARATION
4.1.
AIR SUPPLY
4.1.1.
You will require an air pressure supply of 90-145psi to get the best performance from the jacking beam.
WARNING!
Ensure the air supply is clean and does not exceed 145psi while operating the jacking beam. Too high an air pressure
and/or unclean air will shorten the product life due to excessive wear, and may be dangerous causing damage or personal injury.
4.1.2.
Drain the compressor air tank daily. Water in the line will damage the jacking beam.
4.1.3.
Clean the compressor air inlet
fi
lter weekly.
4.1.4.
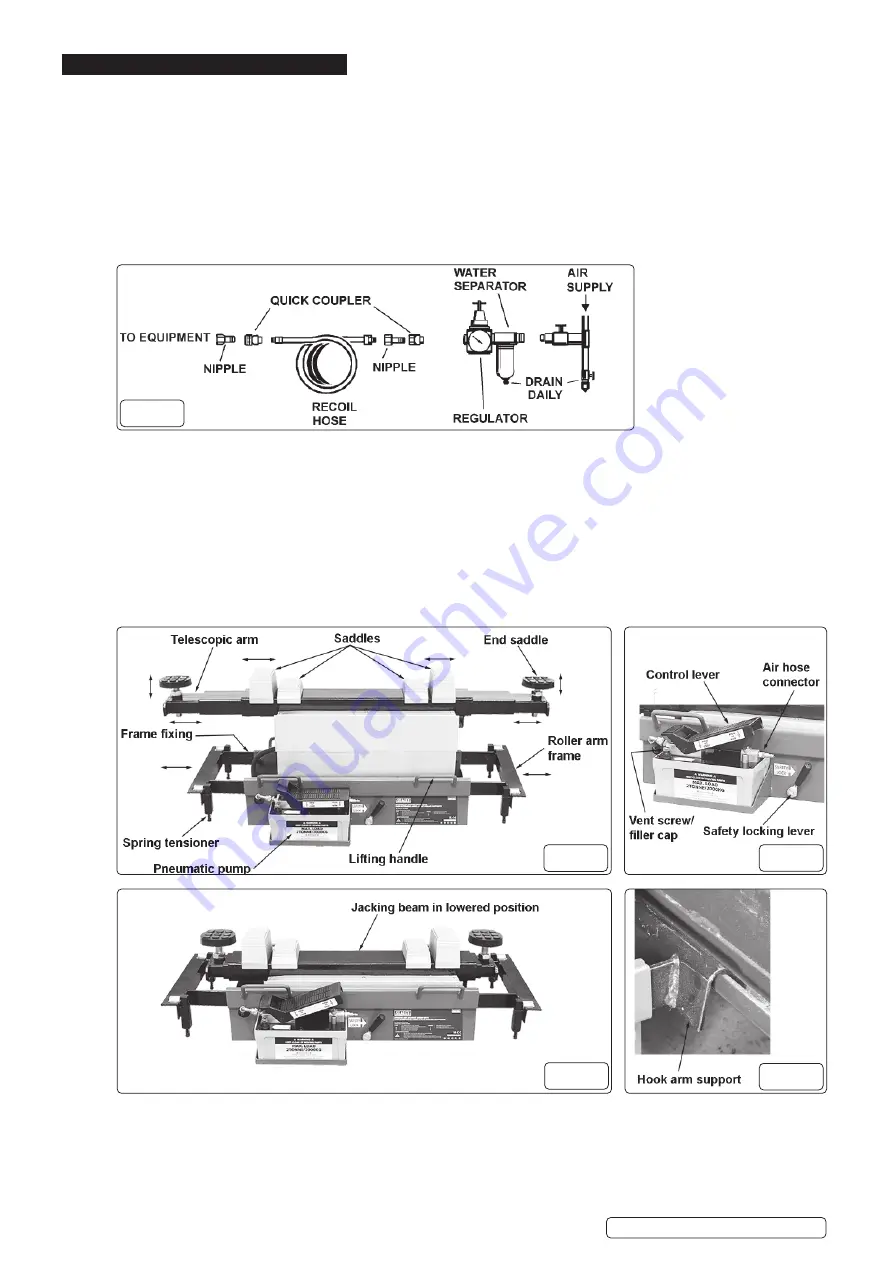
Recommended hook-up procedure is shown at (
fi
g 1).
4.1.5.
Line pressure should be increased to compensate for unusually long air hoses (over 8 metres). The minimum hose diameter
should be 1/4” I.D and
fi
ttings must have the same inside dimensions.
4.1.6.
Keep air hose away from heat, oil and sharp edges. Check air hose for wear before each use, and ensure that all connections are
secure.
4.2.
LOCATING THE JACKING BEAM
4.2.1.
Lift the jacking beam into place by using the lifting handles (
fi
g 2).
WARNING!
The jacking beam is heavy. Seek assistance from another person when locating the jacking beam onto the ramp or
inspection pit runners.
4.2.2.
Loosen the roller arm frame
fi
xings, on both sides (
fi
g 2), and extend the roller arm frames (
fi
g 2) outwards, equally each side, to
the correct width to suit the ramp or pit runners. Re-tighten
fi
xings.
4.2.3.
Adjust the spring tensioner (
fi
g 2) on all four rollers so the rollers will just support the weight of the jacking beam on it’s own and
allow the jacking beam to travel freely along the ramp or pit.
NOTE: DO NOT
put the roller spring under too much tension, this will cause the rollers to jam against the side arm frame. When the
jacking beam is in use the weight of the vehicle will overcome the spring tension, pushing the rollers upwards and allowing the
jacking beam to settle onto the two roller arms.
4.3.
USING THE HOOK ARM SUPPORTS
4.3.1.
Alternative hook arm supports are supplied for use where the runners on the ramp or pit are of a vertical section pro
fi
le (
fi
g 5).
4.3.2.
Loosen the roller arm frame
fi
xings (
fi
g 2), both sides, and withdraw the roller arm frames (
fi
g 2) from the jacking beam main frame.
4.3.3.
Insert the hook arm support frames (
fi
g 5) into the jacking beam main frame equally each side, to the correct width to suit the ramp
or pit runners. Re-tighten
fi
xings.
NOTE:
Ensure the hook arm supports are inserted to match the ramp or pit vertical runners (fig 5).
SJBEX200A Issue 1 05/10/21
Original Language Version
© Jack Sealey Limited
fi
g.1
fi
g.2
fi
g.3
fi
g.4
fi
g.5


