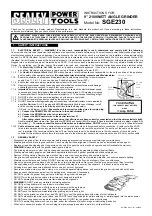


CONTENTS
1.
Main body.
2.
Safety guard
3.
Guard clamping washer
4.
Screws x 3
5.
Bolt x 1
6.
Washer x 1
7.
Bolt spanner
8.
Disc flange
9.
Joint ring (inserted into item 8).
10.
Disc securing ring.
11.
Pin wrench
12.
Handle
2. PACKAGE CONTENT & SPECIFICATIONS
fig 1
p
WARNING!
ensure the grinder is unplugged from the mains power supply before assembling.
3.1.
Guard Assembly.
3.1.1. Take the guard (fig 2.2) place over central spindle and seat on plastic flange.
3.1.2. Place clamping washer (fig 2.3) over spindle and align the three small and one large hole
with the screw holes in the grinder head.
3.1.3. Insert and tighten the three screws (fig 2. 4) through the small clamp washer holes allowing
the guard to move.
3.1.4. Place washer (fig 2.5) over bolt (fig 2.6) and screw in to the large clamping washer hole using
spanner (fig 1.7) but do not tighten.
3.2.
Assemble Grinding Disc. (Only be performed by person holding grinding wheel certificate).
3.2.1. Lay the grinder on its back and place the disc flange (fig 3.8) on the centre spindle (fig 3.A )
ensuring the joint ring (fig 3.9 ) is facing upward. Bed the disc flange (fig 3.8) on the spindle housing.
3.2.2. Place grinding disc on the spindle accordingly.
3.2.3. Screw disc securing ring (fig 3.10) with flange facing in if disc is more than 5mm thick,
or facing out if disc is less than 5mm thick (figs 3a & 3b).
3.2.4. Stop the spindle from turning by pushing in and holding stop button (fig 3.C).
3.2.5. Lock the grinding disc into place by tightening the disc securing ring (fig 3.10)
with the pin wrench ((fig 3.11).
3.2.6. When complete, release the locking button and check that it has sprung back
to its initial position.
3.3.
Positioning of the Guard.
The guard (fig 4.2) may be position at any angle according to the grinding task required.
3.3.1. Position the guard to allow maximum working performance whilst providing maximum
personal protection for the operator.
3.3.2. Lock the guard in place by tightening locking nut (fig 4.5) with spanner (fig 4.7).
3.4.
Hand Grip.
Hand grip will allow better control and safety.
Fit the hand grip (fig 5.12) by screwing into
the appropriate left, right or top body head
3. ASSEMBLY
Remove items from packing and identify parts against fig 1. Check to ensure they are in good order. If any part is damaged contact your
supplier immediately.
fig 5
SPECIFICATIONS
Power . . . . . . . . . . . . . . . . . . . . . . .2100Watt
No-load speed . . . . . . . . . . . . . . . .6,500RPM
Maximum grinding disc size . . . . . .230mm
Spindle thread . . . . . . . . . . . . . . . .M14
Unit weight . . . . . . . . . . . . . . . . . .4.01kg
SGE230 -0631- (2) - 010300


