2. SPECIFICATIONS
Ideal for quick clearing up of spillage. Convenient for use in
the home, workshop or car. Supplied with crevice tool.
Features removable collection chamber for easy disposal of
waste and removable battery with base charger.
Voltage:............................ 14.4V
Charging Time: ................. 3-5hr
Weight: .............................1.6kg
3. OPERATION
IMPORTANT WARRANTY INFORMATION:
The battery pack fitted to this cordless tool is
considered to be a consumable item and its ability to
accept charge will reduce over time. We will warranty
it against mechanical and electrical defect for a period
of one year - this does not cover fair wear and tear. If
the battery is not properly charged before first use, or
regularly conditioned, its capacity will diminish. Under
these circumstances we will not replace the battery
pack even if it is less than one year old.
3.1
CHARGING BATTERY PACK
WARNING! Ensure you read and understand safety
instructions before use.
3.1.1 Ensure your supply corresponds with the voltage
rating of the charger, 230V 50Hz AC only.
3.1.2 Connect the charger plug to the power supply. Plug
the lead from the charger plug into the charger stand.
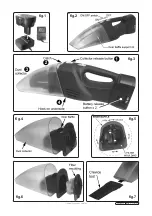
3.1.3 Insert the battery pack into the charge stand. Align
the raised rib on battery pack with groove in the
charging stand (fig.1). As the pack is inserted into the
stand the red charging light will come on.
3.1.4 Press lightly down on the battery pack to ensure the
contacts on the battery pack engage properly with
the contacts in charging stand.
3.1.5 Charging time is 3 - 5 hours. The red charging light
will remain on until the battery pack is removed from
the charging stand or the charger is disconnected
from the supply.
Note: The battery pack will become slightly warm to the
touch while charging. This is normal and does not
indicate a problem.
3.1.6 The battery pack will only go into the main body one
way round. Hold the battery pack with the neck
towards the bottom of the pack and insert it into the
back of the main body. Push the battery home until it
snaps into place.
IMPORTANT!
When using your vac continuously, the
batteries will become very hot. You should let a hot
battery pack cool down for approximately 30 minutes
before attempting to recharge.
3.2
TO VACUUM DRY SPILLS, DUST AND DIRT
q
Warning. When dry vacuuming, the filter must be
attached to the inner baffle moulding. Failure to
do this will result in debris entering the motor
compartment causing damage to the motor and
invalidating your warranty.
3.2.1 If required attach the crevice tool to the dust collector
by pushing it into the front opening as indicated in
fig.7.
3.2.2 Slide the ON/OFF switch forwards (fig 2) and proceed
to vacuum.
3.2.3 Upon completion of vacuuming slide the On/Off switch
back to the OFF position.
3.2.4
To empty the dust collector, position the vac over a
suitable waste receptacle with the dust collector
pointing downward by 45°.
Original Language Version
CPV144.V2 Issue: 3 - 17/01/12
3.2.5 Press down on the release button (fig.3-1) and release
the dust collector carefully to avoid spilling the
contents.
3.2.6 Remove the filter and inner baffle from the dust
collector (fig.4).
3.2.7 Tip the dust collector contents into the waste
receptacle. The dust collector may be rinsed in warm
soapy water but must be dried thoroughly before use.
3.2.8 The filter moulding is attached to the baffle moulding
with four keyholes positioned north, south, east and
west. Remove the filter from the inner baffle using a
rotational movement as indicated in fig.5. Hold the inner
baffle with one hand and turn the filter moulding clock
wise using the rib across the filter moulding aperture.
Apply pressure to the points indicated by the two white
arrows in fig.5. To clean the filter, shake the dirt out
over a suitable waste receptacle. Do not scrub the
filter material. If necessary reverse flush the filter by
holding it under a flow of warm water and dry
thoroughly afterwards. This will be necessary after
considerable use as the filter will restrict the airflow and
performance of the vac if it becomes blocked.
3.2.9 Re-assemble the vac by firstly re-attaching the filter to
the inner baffle moulding. Place the filter moulding over
the four pins on the baffle and rotate the moulding anti
clockwise to lock it into place. Push the assembly into
the dust collector until it makes contact with the ribs
inside the collector. Reattach the dust collector to the
main vac body as indicated in fig.3. Firstly hook the
projection on the underside of the main body into the
slot in the lower back edge of the collector (fig.3-4).
Swing the collector upwards so that the top back edge
snaps into place on the catch (fig.3-2).
3.3
TO VACUUM WET SPILLS
q
Warning. The vacuum is designed to pick up small
spills of liquid only such as a spilled drink. Any
attempt to vacuum larger quantities of water may
result in water entering the motor compartment
damaging the product and invalidating your
warranty.
3.3.1 For wet vacuuming detach the filter moulding from the
inner baffle as described in section 3.2.8.
3.3.2 The inner baffle has an integral rubber seal around its
outer perimeter. Make sure that the baffle is pressed
fully home into the collector moulding. Reattach the
collector moulding to the main body.
3.3.3 If required attach the crevice tool to the collector by
pushing it into the front opening as indicated in fig.7.
3.3.4 Slide the ON/OFF switch forwards (fig 2) and, holding
the unit with the nose of the collector pointing down
wards at 45°, move slowly over the liquid.
3.3.5 Upon completion of vacuuming slide the On/Off switch
back to the OFF position. Do not turn the unit horizontal
as the small amount of water in the nose will run out of
the collector intake.
3.3.6 Keeping the collector pointing downwards at 45°
release the main body from the collector. Remove the
inner baffle and pour the liquid down a drain or into a
suitable receptacle such as a bucket.
3.3.7 When vacuuming is complete, thoroughly dry every
thing including the inside of the collector and the baffle
moulding.
3.3.8 Re-assemble the vac and store in a dry location out of
reach of children. If the vac is to be stored for a long
period of time remove the battery from the vac and
store in a safe location.
3.3.9 NOTE: Next time the vac is required for dry vacuuming
ensure that the filter is fitted.


