Sealey Group, Kempson Way, Suffolk Business Park, Bury St Edmunds, Suffolk. IP32 7AR
01284 757500
01284 703534
www.sealey.co.uk
ENVIRONMENT PROTECTION
Recycle unwanted materials instead of disposing of them as waste. All tools, accessories and packaging should be sorted, taken to
a recycling centre and disposed of in a manner which is compatible with the environment. When the product becomes completely
unserviceable and requires disposal, drain any fluids (if applicable) into approved containers and dispose of the product and fluids
according to local regulations.
WEEE REGULATIONS
Dispose of this product at the end of its working life in compliance with the EU Directive on Waste Electrical and Electronic Equipment
(WEEE). When the product is no longer required, it must be disposed of in an environmentally protective way. Contact your local solid
waste authority for recycling information.
Note
: It is our policy to continually improve products and as such we reserve the right to alter data, specifications and component parts without prior
notice.
Important
: No Liability is accepted for incorrect use of this product.
Warranty
: Guarantee is 12 months from purchase date, proof of which is required for any claim.
Parts support is available for this product. Please email [email protected] or telephone 01284 757500
5. OPERATION
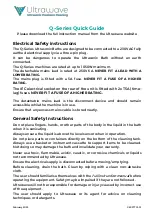
5.1.
Check the level of the electrolyte and add electrolyte solution if required (see section 4 and fig.3 - Fluid level indicator).
5.2.
Ensure that the unit is set to OFF before plugging into mains power supply.
5.3.
Ensure that CAMS safety cable (fig.1) is fitted to the vehicle battery (red clip to positive terminal, black clip to negative terminal).
5.4.
Place gas outlet pipe into air filter inlet or another area of negative pressure.
5.5.
Connect the unit to the mains power and turn it on (fig.3).
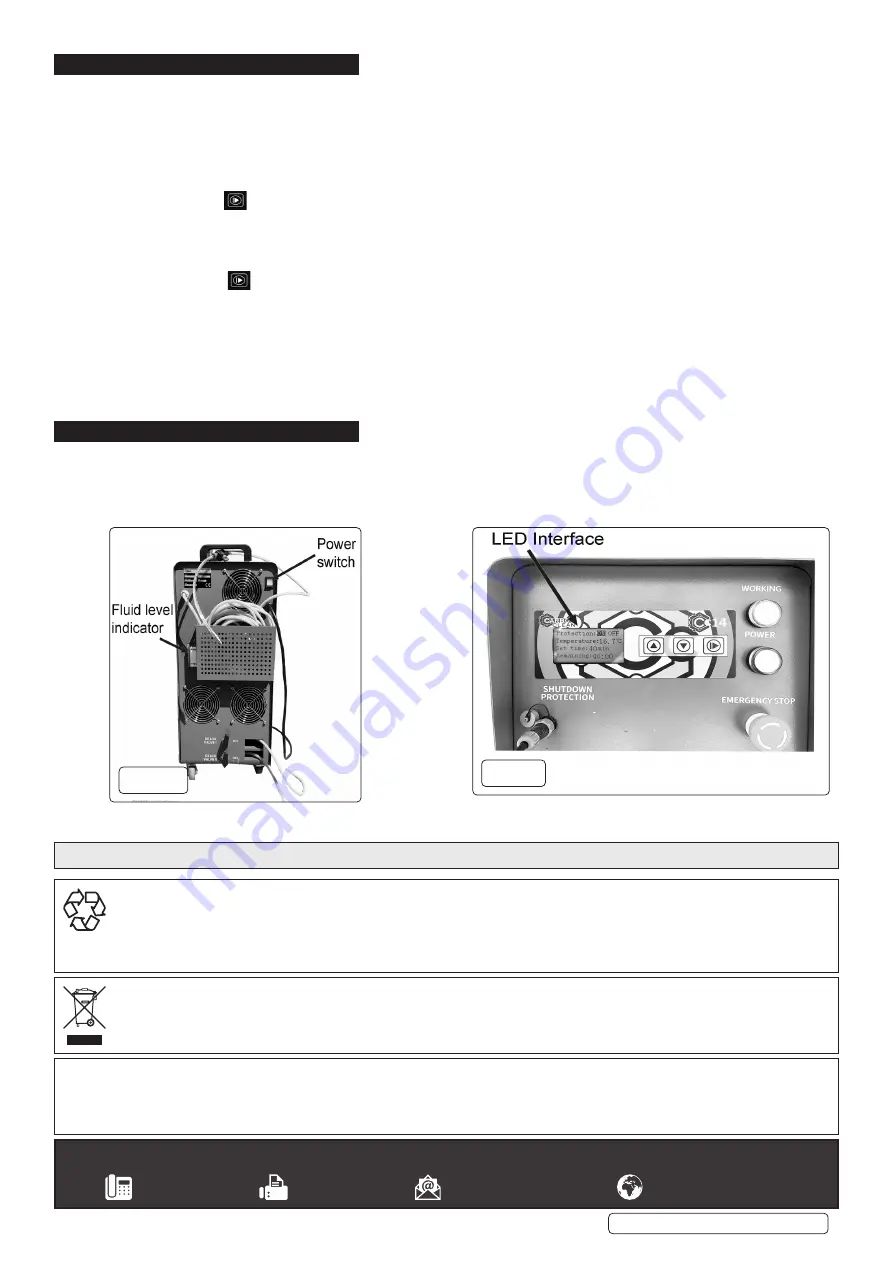
5.6.
When first turned on, a default ‘Home Screen’ is displayed (fig.4).
5.7.
To set the time for cleaning, choose the “SET TIME” option and select time by using the UP / DOWN arrow keys. Once selected
press the right arrow to set the displayed value.
NOTE:
Recommended cleaning time for 2L and smaller engines is 30 mins and for 2L or greater 60 mins.
5.8.
Operate LED interface to ensure Shutdown Protection on.
5.9.
While the unit is running, the green WORKING light will flash intermittently.
5.10.
To begin cleaning, start the engine and open the blue gas control valve on the delivery hose.
5.11.
Select the right arrow to start generating gas.
NOTE:
To test that gas is being produced, open the blue gas control valve on the delivery hose and place the end of the hose into a clear
container of water. Bubbles in the liquid will indicate a gas flow.
5.12.
Ensure gas hose is delivering gas to an area of negative pressure (see section 5.4).
5.13.
D
uring gas generation, keep vehicle engine running and ensure that air con, stereo and lights are switched off.
5.14.
T
he machine will sound an alarm tone when the specified cleaning cycle time completes.
5.15.
Close the gas control valve immediately and disconnect the CAMS systems clips from the vehicle battery.
5.16.
After cleaning cycle is complete, slowly increase the engine revs to 3000rpm for 3 minutes or take the vehicle for a short run during
which the engine can be put under load.
6. TROUBLESHOOTING
6.1.
If engine stops or stalls, close the gas valve and switch off the gas generation process by disconnecting the CAMS clips from the
battery.
DO NOT
restart the vehicle for 5 minutes.
6.2.
In event of gas production decline, check that the gas hose is not blocked and check and top-up / replace the electrolyte if low level.
C
C230V Issue 1 15/05/2020
Original Language Version
© Jack Sealey Limited
fig.4
fig.3