

BSL102 - 1 - 281004
3.2.
Use the ruler, marked on the cassette, to measure the
correct length. (Fig.5)
3.3.
Cut the band, using plier position 2, handles 2 & 3 held
together. (Fig. 6)
Fig. 5
Fig. 6
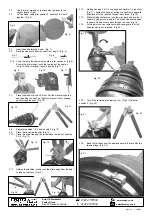
3.4.
Insert the band through a seal. (Fig. 7)
3.5.
Bend the band tail under the seal (1cm length). (Fig. 8)
Fig. 7
Fig. 8
Fig. 9
Fig. 10
Fig. 11
3.1.6. Crimp the tail to the seal using the pliers (plier position 4). (Fig.9)
Ensure the pliers tongs touch the two legs of the seal as
in Fig.10. When crimped it should look as (Fig. 11).
3.7.
Place the band over the CV Boot. Pull the slack through the
seal, bending the band up slightly to prevent it from slipping
back through the seal. (Fig. 12)
Fig. 12
3.8.
Split plier handles 1 & 2 from handle 3 (Fig.13).
3.9.
Place the tail inside the plier (Fig. 14).
3.10. Close the pliers trapping the tail between the jaws of handles
3 & 2. (Fig. 15)
Fig. 15
Fig. 13
3.11. Holding the handles locked, rock the pliers away from the seal
to take up the slack. (Fig.16)
Fig. 16
Fig 17
Fig. 18
3.12. Holding handles 2 & 3 in one hand and handle 1 in the other
(Fig. 17), tighten the band by pulling the handles in opposite
directions until the required tension is achieved. (Fig 18)
3.13. Whilst holding the tension, rock the plier back until number 3
handle is lying across the seal. This will bend back the band
to ensure it does not slip back through the seal. (Fig. 19)
3.14. At this point you can remove the plier taking care that the
band tension is not released. (Fig. 20)
Fig. 19
Fig. 20
3.15. Cut off the remaining tail leaving 1 cm. (Fig.21) Use plier
position 2. (Fig. 22)
3.16. Bend the tail back over the seal and secure in place with the
two seal legs. (Fig. 23)
01284 757500
01284 703534
Sole UK Distributor
Sealey Group,
Bury St. Edmunds, Suffolk.
www.sealey.co.uk
Web
Fig. 14
Fig. 21
Fig. 22
Fig. 23


