WORKSHOP BICYCLE STAND
MODEL NO:
BS103
Thank you for purchasing a Sealey product. Manufactured to a high standard, this product will, if used according to these instructions,
and properly maintained, give you years of trouble free performance.
IMPORTANT:
PLEASE READ THESE INSTRUCTIONS CAREFULLY. NOTE THE SAFE OPERATIONAL REQUIREMENTS, WARNINGS & CAUTIONS. USE
THE PRODUCT CORRECTLY AND WITH CARE FOR THE PURPOSE FOR WHICH IT IS INTENDED. FAILURE TO DO SO MAY CAUSE DAMAGE AND/OR
PERSONAL INJURY AND WILL INVALIDATE THE WARRANTY. KEEP THESE INSTRUCTIONS SAFE FOR FUTURE USE.
1. SAFETY
9
Maintain the stand in good condition, replace or repair damaged parts. Use recommended parts only. Non authorised parts may be
dangerous and will invalidate the warranty.
9
Before use ensure that all stand nuts, bolts and clamps are tight and that moveable and clamping parts are in good working order.
9
Place stand on a sound, level surface offering adequate working clearance for its function.
9
Keep area clean, tidy and free from unrelated materials. Ensure there is adequate lighting.
9
Remove ill fitting clothing. Remove ties, watches, rings, and other loose jewellery, and contain long hair.
9
Maintain correct balance and footing. Ensure the floor is not slippery and wear non slip shoes.
9
Keep children, pets and unauthorised persons away from the working area.
8
DO NOT
use the stand for any purpose other than for which it is designed.
8
DO NOT
get the stand wet or use in damp or wet locations or areas where there is condensation.
9
When not in use, store the stand in a safe, dry, child proof area.
9
Avoid damage to the bicycle frame and cables etc. when tightening clamps.
8
DO NOT
exceed the maximum load of
30kg
.
NOTE:
This appliance is not intended for use by persons (including children) with reduced physical, sensory or mental capabilities or lack
of experience and knowledge, unless they have been given supervision or instruction concerning the use of the appliance by a person
responsible for their safety. Children should be supervised to ensure that they do not play with the appliance.
2. INTRODUCTION
Adjustable work height and fitted with articulated rubber coated frame clamp preventing damage to paintwork. Features four folding legs with a
1370mm span for added stability and multi-position tool tray to ensure tools are always close to hand.
3. SPECIFICATION
Model no: .................................................................... BS103
Minimum working height:.......................................... 1050mm
Maximum working height:......................................... 1750mm
Maximum load: ............................................................... 30kg
Minimum cycle frame size ............................................ 25mm
Maximum cycle frame size ........................................... 40mm
F
rame tube diameter: ......................... inner pipe:Ø35x1.5mm
...........................................................outer pipe:Ø38x1.2mm
4. OPERATION
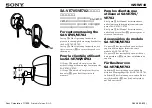
4.1.
Release the quick release clamp (1) hold the tube (A) and push down on the clamp
so that the legs spread out fully. Tighten the quick release clamp. The legs can be
spread out less wide, but this may compromise the stability of the stand, depending
on the position/weight of the cycle when mounted on the stand.
4.2.
Ensure the four feet (2) are placed flat on the floor surface, which should be stable
and level. The stand can be permanently fixed to the floor if required.
4.3.
Insert the telescopic shaft (B) into tube (A) and lock into place.
4.4.
Attach the bike support clamp head (C) onto the telescopic bar.
4.5.
Attach the tool storage tray (D) to the tube (A) and tighten the two hex. bolts.
4.6.
Check all fixings for stability and adjust and/or re-tighten them if necessary.
4.7.
Lift a cycle onto the stand, making sure that it is mounted centrally for maximum
stability and to avoid straining the clamp.
4.8.
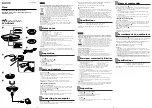
Secure it on the stand by positioning the top frame tube into the clamp and
tightening it using the quick release clamp (fig.2).
4.9.
To adjust the angle of the cycle, it is advisable to remove the cycle from the stand
and to make the required adjustments. If adjusting with the cycle still mounted on
the stand, it is recommended that two people are utilised.
4.10.
R
elease the adjustment clamp just enough so that the cycle can be moved to the
required angle and then re-tighten the clamp.
B
S103 | Issue:3 (2,F) 04/06/20
Original Language Version
© Jack Sealey Limited
Refer to
instruction
manual
Fig.1