background image

BounceBack QuickRestore for 
Windows 2000 Pro and XP

BounceBack QuickRestore can restore files and 
folders from the backup drive quickly and easily. 

Note:

The BounceBack QuickRestore feature does not function

with Mac OS.

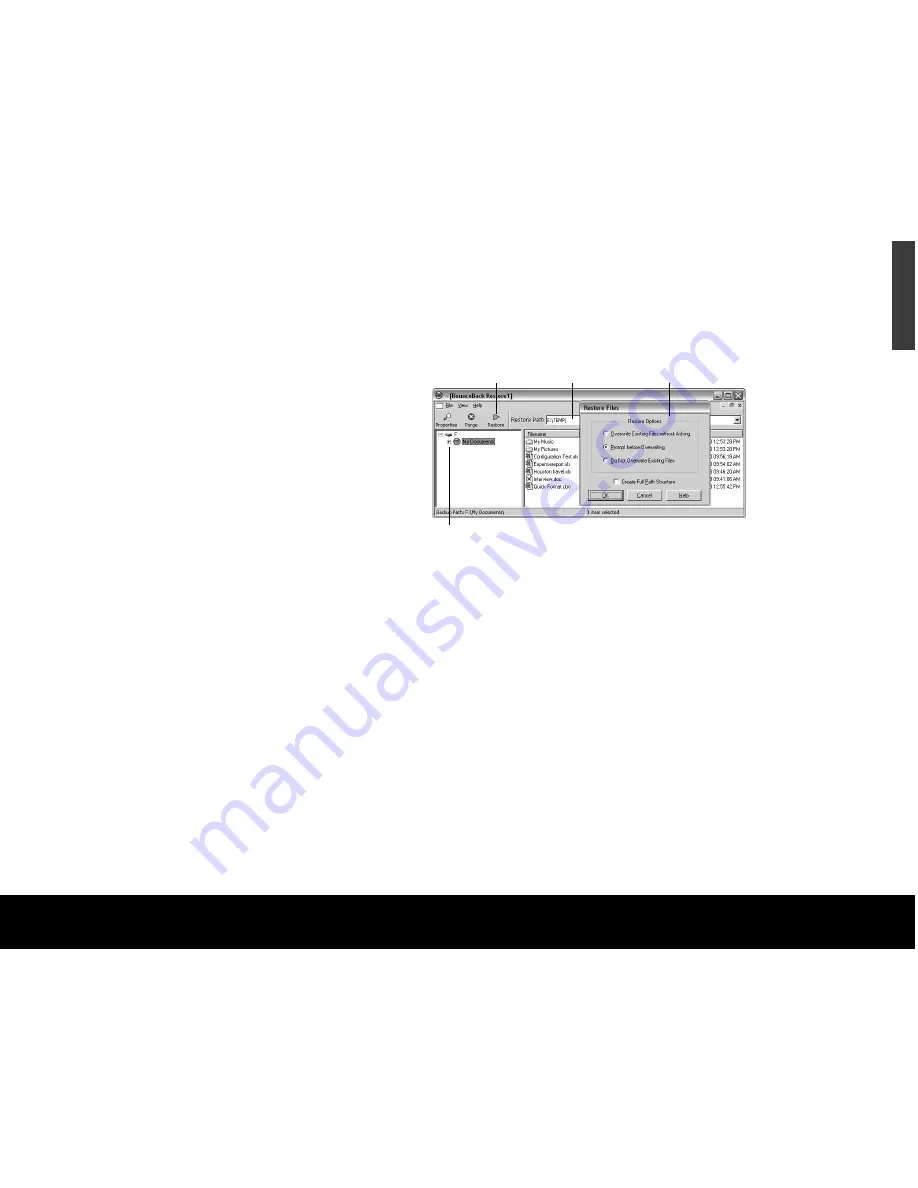
Follow these steps to restore data: 

1. Start BounceBack Control Center and select

Restore

.

2. In the left side of the BounceBack QuickRestore box,

navigate to the backup that contains the file(s) you
want to restore. You will see the file details on the
right side of the screen.

3. Note the Status information for the files.

Unchanged

—the file on the backup drive unit is the

same as the file on your hard drive.

Older

—the file on the backup drive unit is older than

the file on your hard drive.

Newer

—the file on the backup drive unit is newer

than the file on your hard drive.

Deleted

—the file on the backup drive unit 

represents a file that has been deleted on your 
hard drive.

4. Click on the file(s) you want to restore.

5. Select the 

Restore Path

:

• Select 

“Restore to original location.”

6. Click the 

Restore

button.

7. Select the 

Restore Option

you want and click 

OK

:

• Overwrite Existing Files without Asking

• Prompt before Overwriting

• Do Not Overwrite Existing Files

8. BounceBack QuickRestore scans and verifies that

the hard drive has enough space to accept the
restore. Click 

Continue

on the Statistics screen.

9. BounceBack QuickRestore restores the file(s) and

reports under Restore Totals. Click 

OK

to return to

BounceBack.

External Hard Drive

13

ENGLISH

Folder to restore

Restore button Restore location

Restore options

Summary of Contents for ST3500601XS-RK - 500 GB External Hard Drive

Page 1: ...External SATA Hard Drive Quick Start Guide...

Page 2: ...ndows and the Mac operating system See page 10 for more information about BounceBack Express Contents The external SATA hard drive kit includes Seagate external hard drive with an eSATA interface A pe...

Page 3: ...you risk excessive wear reduced reliability and possible data loss Power button operations Press the button LED comes on Power On occurs Press the button LED shuts off Power Down occurs External Hard...

Page 4: ...lways need to follow this sequence For example in Windows XP only if you want to attach your drive after your computer has already booted you can simply connect the interface cable turn on power to th...

Page 5: ...ve is factory formatted for a FAT32 file system and no further formatting is needed for Windows operating systems However if you are using Windows 2000 Pro or Windows XP and you prefer to use an NTFS...

Page 6: ...does not recommend that you use your external hard drive to share data between the Windows and Macintosh operating systems This is due primarily to all of the variables in OS types and versions format...

Page 7: ...connect the interface cable or turn off the drive Macintosh OS Mac OS 10 4 or higher eSATA host bus adapter card installation Turn the power off to your computer Open the computer case Install the PCI...

Page 8: ...ing drive that may contain data because reformatting and or partitioning erases all data on the selected drive 3 Click Partition if you want to partition your drive or click Erase to reformat the driv...

Page 9: ...is the beginning and dismounting is the end of the conversation between your computer and your external hard drive Mounting occurs automatically when you connect and turn on your drive but you must i...

Page 10: ...ert the Seagate Disc Utility CD Install BounceBack Express from the menu Note If the BounceBack Control Center fails to appear Windows OS users Double click the CD icon open the CMS folder and then cl...

Page 11: ...d increase incrementally as the size of each file in the backup set is determined 10 The BounceBack Installation screen will then show the estimated time it will take for your first backup to run comp...

Page 12: ...system tray and select Disable BounceBack Launcher Scheduled Backups Use the Settings function from the BounceBack Control Center to create or modify Backup Sets and schedule their run times File res...

Page 13: ...t is older than the file on your hard drive Newer the file on the backup drive unit is newer than the file on your hard drive Deleted the file on the backup drive unit represents a file that has been...

Page 14: ...ecover instantly from a disaster by either using the rescue CD or by exchanging the internal PC hard drive with the backup drive The advanced restore function provides a graphical user interface to co...

Page 15: ...m for details about how to install service packs and Windows updates in your system Contact Microsoft Customer Service for information about obtaining these system enhancements if you don t have Inter...

Page 16: ...and another eSATA port Macintosh specific problems First be sure you have the latest Apple operating system software updates installed on your computer before you spend time looking for a drive proble...

Reviews: