Scytek electronic Vectra X5 Product Manual Download Page 23

VECTRA X5  -  Page 19

System  Wiring

6-Pin Starter Harness

Pin 1

RED WIRE A

: Main Power Input A (+). Connect to the battery or constant power wire at the ignition

switch with a minimum 25 Amp supply. Remove the fuse until the installation is complete and all wiring

is checked. 

Pin 2

RED WIRE B

: Main Power Input B (+). Connect to the battery or constant power wire at the ignition

switch with a minimum 25A supply.  Note: if connecting at the ignition switch it is highly recommended

to use separate power wires for each Red wire, each with a minimum 25A supply. Remove the fuse

until the installation is completed and all wiring is checked. 

Pin 3

BROWN WIRE

: Second Ignition Output (+). The Brown wire pr12V for a second ignition

wire. This wire may instead be programmed for use as a second accessory or second starter wire.

Pin 4

ORANGE WIRE

: Accessory Output (+).  Connect to the accessory wire coming from the ignition

switch that supplies power to the heater/air-conditioner.  Some cars may have multiple accessory wires. 

Pin 5

YELLOW WIRE

: Ignition Output (+).  Connect to the main ignition wire that pr12V when the

ignition is on and while cranking the starter. 

Pin 6

VIOLET WIRE

: Starter Output (+). Connect to the the vehicle’s starter wire.

20-Pin Main Harness

Pin 1

GREEN/WHITE WIRE

: Brake Input (+).  Connect to the wire that shows +12V when pressing the

brake.  The Green/white wire is a safety shutdown wire that

must be connected.

Pin 2

BLACK/GRAY WIRE

: Tach Input. Connect to the vehicle’s tach wire or a fuel injector wire if the

tachless mode does not provide satisfactory operation.

Pin 3

WHITE/RED WIRE

: Auxiliary 2 Output (-) 500 mA. Connect to a relay or module for an optional

feature such as power window activation, etc. This output may be programmed for momentary, timed,

or latched operation.

Pin 4

BLACK/WHITE WIRE

: Dome Light Output (-) 500 mA. Connect to the wire that activates the

vehicle’s dome light, usually the door pin switch wire (see Green and Violet door trigger wires).

Note:

MUST USE RELAY(see page 26)

Pin 5

YELLOW WIRE

: +12V Ignition Input.  The Yellow wire must connect to a main ignition wire at the

ignition harness. This wire must show +12V when the ignition is on and while cranking the starter. The

voltage must not drop when the car is starting. 

Pin 6

BLUE/YELLOW WIRE

: Glow Plug Input (+).  For vehicles equipped with diesel engines the

Blue/yellow wire must be connected to the wait-to-start light in the gauge panel.  This wire will show

+12V when the light is on, and ground when the light turns off.  If the wait-to-start wire shows ground

when the light is on, a relay must be installed (see wiring diagrams).

Pin 7

BLUE/WHITE WIRE

: Passenger Unlock Output (-) 500 mA. Connect to a relay to unlock the

passenger doors when the system is configured for Driver Priority Unlocking. 

Pin 8

BLUE/ORANGE WIRE

: Ground When Running Output (-) 500 mA. Connect to an optional factory

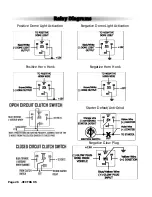
security bypass module if required

Or to a clutch switch bypass relay pin#86 for manual

transmissions

Pin 9

BLACK WIRE

: Ground Input (-). The Black wire must connect to a solid chassis ground. Clean away

any paint or dirt to insure the best possible ground.   

Pin 10

RED WIRE

: Module Power Input (+). Connect to a constant source of +12V.

Summary of Contents for Vectra X5

Page 1: ...VECTRA X5 SERIES VEHICLE SECURITY SYSTEM WITH REMOTE START W WITH SEPERA ATE LOCK UNLOCK BUTTONS PRODUCT MANUAL...

Page 2: ...ear if required for repair and or replacement of any defective parts A copy of the original purchase and installation receipt must accompany any products returned for warranty service Warranty is limi...

Page 3: ...age 13 Quick Stop Page 13 Automatic Start Mode Page 14 Turbo Timer Feature Page 14 Manual Transmission Remote Starting Page 15 5 Extended Features Page 16 Ignition Door Locking Page 16 Ignition Door U...

Page 4: ......

Page 5: ...s Main Unit with built in ScyNet Network Interface Port One 5 Button 2 Way LCD Remote and One 1 Way 5 Button Remote Transmitter RS 2W models Two 5 Button Random Code Remote Transmitters RS SP models H...

Page 6: ...1 output This output will remain on for as long as the button is pressed Button 4 Activates the Remote Start feature Button 5 is the Page Shift button Each time the Shift Button is pressed the LED on...

Page 7: ...remote transmitter If all four transmitters are to be used with both cars program transmitters A and B into the first vehicle in the manner described above Program transmitters C and D by pressing the...

Page 8: ...n 5 will activate the Page 2 function Pressing button 5 for 2 seconds activates the system s confirmation feature which will then display the current status of the system armed disarmed engine running...

Page 9: ...s will be shown indicating time set mode is entered 2 Press and release Button 2 until the correct hour is displayed hold button to scroll 3 Press and release Button 3 until the desired minute is disp...

Page 10: ...atic Hot Start Temperature 2 step procedure for second step see page 7 under h o The Automatic Hot Start setting sets the temperature threshold If automatic start is set to hot temperature setting the...

Page 11: ...play on if enabled or off if disabled VLT Valet mode function sets and resets the security system s valet mode this function is enabled only when the system is disarmed unlocked Set or reset the Valet...

Page 12: ...Page 8 VECTRA X5...

Page 13: ...sensor is disturbed When the alarm triggers the siren will sound the horn will honk and the parking lights will flash If the system is triggered by the doors hood or trunk the system will alarm for 4...

Page 14: ...button before Arming Locking or Disarming Unlocking the system will bypass the chirp honk confirmations and allow one time silent operation Note The open zone warning chirps will not be bypassed when...

Page 15: ...stem 1 Unlock the door using the key 2 Enter the vehicle The system will trigger and the siren will sound 3 Turn the ignition key to the ON position 4 Press and hold the override switch until the alar...

Page 16: ...e Start System so that the vehicle may be operated by a mechanic or parking attendant To activate the Valet Mode 1 Turn the ignition switch to the ON position 2 Press and hold the override switch for...

Page 17: ...hen the the Remote Start feature is active any of the following actions will shut down the engine 1 Pressing Button 4 After the engine shuts down the doors will lock if the optional keyless entry feat...

Page 18: ...preset value factory default 138oF See the 2 way LCD Remote Transmitter section for Auto Start Cold or Hot Temperature Activation To disable Auto Start function Do one of the following Turn ignition...

Page 19: ...1 Be sure the system is not in Valet Mode 2 Press and hold Button 4 for three seconds The parking lights will turn on The LED will flash rapidly The engine will start and run for the duration of its p...

Page 20: ...tures such as power trunk release power window activation power sunroof control auxiliary lighting audio video system control and more The Pulsed operation setting allows an output to activate as long...

Page 21: ...tarting during engine servicing 6 Verify with the owner the mounting locations for all visible components including the LED and Override switch 7 Verify with the owner the optional features of the VEC...

Page 22: ...ren Choose a siren mounting location that is away from heat sources such as exhaust manifolds and where it cannot be easily accessed from underneath the vehicle Be sure to face the siren downward to p...

Page 23: ...uel injector wire if the tachless mode does not provide satisfactory operation Pin 3 WHITE RED WIRE Auxiliary 2 Output 500 mA Connect to a relay or module for an optional feature such as power window...

Page 24: ...ed or latched operation Pin 19 WHITE WIRE Parking Light Output relay Connect the White wire to the circuit that shows 12V or ground only when the parking lights are on and set the internal parking lig...

Page 25: ...With the engine running apply the parking brake then push the remote start button on transmitter lights will flash twice Turn off the ignition the engine will stay running Now push and release the bu...

Page 26: ...m Programming 2 Press Transmitter Button 3 The siren horn will chirp honk 6 times indicating that the reset signal was received All System Programming parameters are now set to factory default setting...

Page 27: ...pon start Branch Feature Button 1 default Button 2 Button 3 1 Arm Mode Manual Arming Passive Arming 2 Auto Rearming Mode Disabled Enabled 3 Arming Chirps Siren Chirps On Siren Horn Chirps On Silent 4...

Page 28: ...ether or not the vehicle can remote start while in the valet mode 16 Lock After Start When selected the doors will automatically lock after remote starting 17 Lock After Shutdown When selected the doo...

Page 29: ...gram Selects one of three operating modes for the Ignition 2 relay output Ignition 2 Accessory 2 or Starter 2 23 Horn Output When set for Horn Output the horn wire will pulse when the alarm is trigger...

Page 30: ...Page 26 VECTRA X5 Relay Diagrams Positive Dome Light Activation Negative Dome Light Activation Positive Horn Honk Negative Horn Honk Starter Defeat Anti Grind Negative Glow Plug...

Page 31: ...larity Vacuum Adding Actuators Follow the diagrams below for connecting basic door lock systems For Two Stage door lock systems separately unlocks driver and passenger doors see following pages Door L...

Page 32: ...CTRA X5 Series is equipped with a dedicated Passenger Unlock output allowing Two Stage Door Lock operation When connected as shown below disarming the system will unlock only the driver s door Pressin...

Page 33: ...VECTRA X5 Page 29 Two Stage Door Lock Diagrams cont d Two Stage Reverse Polarity Two Stage Adding Actuators...

Page 34: ...ce may not cause harmful interference 2 This device must accept any interference received including interference that may cause undesired operation Technical Information Page 30 VECTRA X5 Built in LED...

Page 35: ...Hood Trigger is active hood is open wire is shorted to ground or pin switch is defective 4 Times Brake Trigger is active Brake switch input is shorted to ground or incorrect 5 Times Unit is in Valet...

Page 36: ...t to start Input Blue White Passenger Unlock Output 500mA Blue Orange Remote Start Output 500mA Black Ground Red 12V Battery Input 3 Violet Door Trigger Input Green Door Trigger Input White Black Hood...

Reviews: