SciCan StatClean SC-P4862 User Manual Download Page 8

4

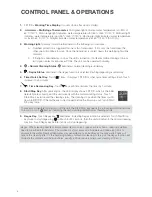
CONTROL PANEL & OPERATIONS

1. 

10:00


– Working Time Display.

 It counts down after work is started.

2. 


– Multistage Thermometer.

 Solid green light indicates: water temperature is 0-30% of 

60 ºC/140 ºF. Solid orange light indicates: water temperature is 30-60% of 60 ºC/140 ºF. Solid red light 

indicates: water temperature is 60-90% of 60 ºC/140 ºF. Flashing red light indicates: water temperature 

is close to 60 ºC/140 ºF. All lights indicates: water temperature is at 60 ºC/140 ºF (90-100%).

3. 


Warning Light.

 Normally it could be illuminated in the following two scenarios:

a. 

 Overheat protection is triggered for one or two transducers. If it is only one transducer, the 

other one will continue to work. Once the transducer is cooled down, the warning light will be 

dimmed.

b. 

 If the light is illuminated as soon as the unit is turned on, it indicates malfunctioning at one or 
two signal cables for transducer PCBs. The unit can be operated normally.

4. 


– Normal Cleaning Status.


 Illuminated, normal cleaning is underway.

5. 


– Degas Status.

 Illuminated, the degas function is selected. Flashing degassing is underway.

6.   Timer Quick Set Key.

 Touch 

 Time+, it displays 

10:00

 or other quick timer settings. Each touch 

increase it by 5 minutes.

7. 


– Time Decreasing Key.

 Touch   key each time reduces the timer by 1 minute.

8. 


Start/Stop Key.

 After powering on, the LED display shows 

10:00

, which is the initial 

default time (as shown), and the unit is ready with the normal working status. Touch 

Start/Stop key twice and the cleaning starts. The cleaning stops when the timer counts 

down to 

00:00

. If the unit needs to be stopped before the timer runs out, touch Start/

Stop key twice.

9.   Degas  Key.

 Touch Degas key,   illuminates, indicating Degas function is selected. Touch Start/Stop 

key twice to start degassing.   will flash for 90 seconds, then the unit will return to the normal cleaning 

function. Touch Degas key before it ends will stop degassing.  

To prevent accidentally turning on or off the unit, the Start/Stop key needs to be touched within 6 seconds 

to turn it on or off. 

 flashes, indicating the unit is running under Normal Cleaning mode.

Degas: When cleaning heavily soiled or greasy items or silver, copper or brass items, chemical solutions 

need to be added into the water. The solution may form many small droplets and take a long time to 

dissolve in the water. Newly added water may generate many air bubbles on the tank walls. These will 

reduce the cleaning effect in the beginning phase of ultrasonic cleaning. Turning on the degas function will 
dissipate the droplets and the air bubbles, usually in 90 seconds, and improve cleaning efficiency.


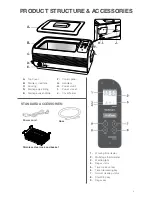
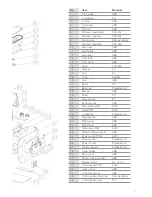
Summary of Contents for StatClean SC-P4862

Page 1: ...ent control circuit for each ultrasonic transducer 40 higher cleaning efficiency not susceptible to interference more durable Multiple circuit protectors When overloaded or improperly used the protect...

Page 2: ......

Page 3: ...e air bubbles within the liquid which when in contact with an object dislodges the debris Using tap water is sufficient however it is recommended to use filtered water for best results Read the Manual...

Page 4: ...y Precautions 1 Product Structure Accessories 3 Control Panel Operations 4 Operation Guidelines 5 Memory Operations 7 Common Cleaning Methods 8 Product Exploded View 10 Care and Maintenance 12 Specifi...

Page 5: ...ved by the manufacturer Remove power cord by grasping its plug and not its cord Keep power cord away from obstructions cupboard doors chairs etc and hot surfaces to prevent cord damage Do not use devi...

Page 6: ...ot use solution containing abrasive substances or strong corrosive chemical solution not recommended by the manufacturer or the supplier Operate unit on a dry and flat surface for operation When the u...

Page 7: ...ol panel G Handlesa H Power switch I Power socket J Cover holder 1 Working time display 2 Multistage thermometer 3 Warning light 4 Degas status 5 Timer quick set key 6 Timer decreasing key 7 Normal cl...

Page 8: ...Time Decreasing Key Touch key each time reduces the timer by 1 minute 8 Start Stop Key After powering on the LED display shows 10 00 which is the initial default time as shown and the unit is ready wi...

Page 9: ...th preexisting damages may experience more peeling DEGAS PROCEDURE 1 Remove the cover and put it on the cover holder vertically Add room temperature water to below the MAX but higher than the MIN fill...

Page 10: ...the cassettes or basket If additional cleaning is required reset the timer and repeat the process above OPERATION GUIDELINES DRAINING TANK At the end of the day the tank should be drained and cleaned...

Page 11: ...er it will not remain if the power is off 4 If the Start Stop key is touched twice during a cycle the cycle and timer will stop It resumes when the Start Stop key is touched twice again NOTE To preven...

Page 12: ...lease ensure you follow its instructions for use Suitable Locations Dental and medical offices and labs Cleaning Method 1 Place dirty items into basket and set basket inside the tank 2 Add water to th...

Page 13: ...age valve to release the dirty water Close the valve afterwards 6 Clean the tank and add fresh water Wash the items for another 3 minutes to remove the residual debris and detergent D Special cleaning...

Page 14: ...10 PRODUCT EXPLODED VIEW...

Page 15: ...ndard part 22 Bracket ABS 23 Elbow PP 24 Valve handle PC 25 Bottom cover ABS 26 Main power PCB 94V0 27 Filter PCB 94V0 28 Cooling fan Standard part 29 Right handle ABS 30 Right panel ABS 31 Right cove...

Page 16: ...ct sunlight for extended periods of time Keep the unit in a dry cool and ventilated area A thermal switch is attached to the bottom of the cleaning tank If the unit is turned on accidentally without w...

Page 17: ...inum foil and cut 3 pieces 2cm 3 4 wide and 14cm 5 5 long Fold each piece to L shape along the length 6 Stick the 3 pieces evenly spaced from left to right across the center of the tank sticking the e...

Page 18: ...ion StatClean Ultrasonic Cleaner Model SC P4862 Tank Capacity 6 0 L 1 6 gallon US Max 5 0 L 1 3 gallon US Min 3 35 L 0 9 gallon US Tank Size 32 3 x 20 5 x 9 9 cm 12 8 x 8 1 x 3 9 Longest Item Fits ins...

Reviews: