

Copyright:
This manual is protected by copyright. The author is
SCHUNK GmbH & Co. KG. All rights reserved.
Technical changes:
We reserve the right to make alterations for the purpose of
technical improvement.
Document number: 1510527
Edition: 02.00 | 03/11/2022 | en
SCHUNK GmbH & Co. KG
Spann- und Greiftechnik
Bahnhofstr. 106 – 134
D-74348 Lauffen/Neckar
Tel.+49-7133-103-0
Fax +49-7133-103-2399
[email protected]
schunk.com
1510527
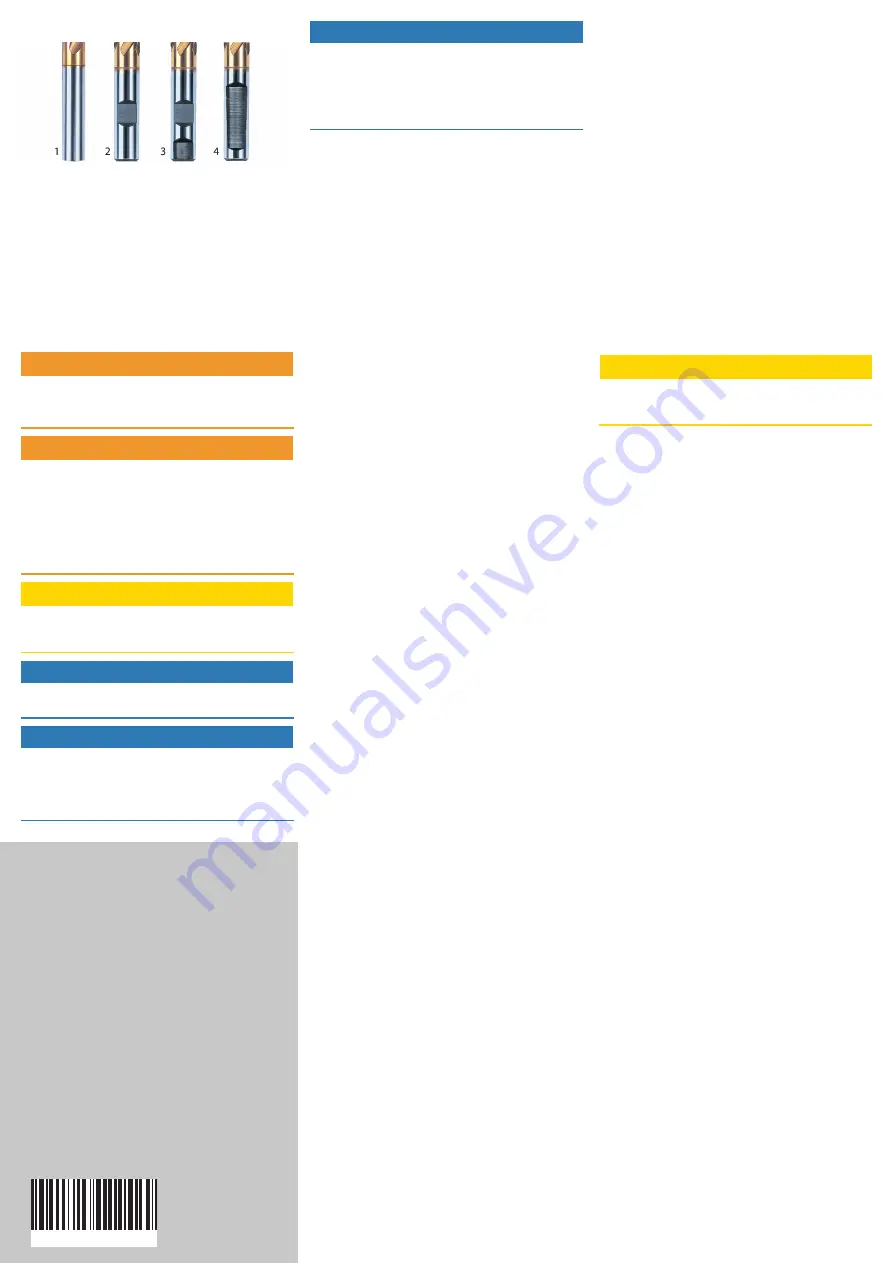
3.1 Permitted shank types
1. Shank type according to DIN 1835-1 form A and DIN 6535
form HA
2. Shank type according to DIN 1835-1 form B and DIN 6535
form HB (up to Ø 20 mm)
3. Shank type according to DIN 1835-1 form B and DIN 6535
form HB (from Ø 25 mm)
4. Shank type according to DIN 1835-1 form E and DIN 6535
form HE
Tool shanks with reliefs (type 2, 3 and 4) can impair the
balancing grade and concentricity of the overall system.
4 Operation
4.1 Basic information
WARNING
Risk of injury due to ejected parts!
The max. speed of rotation of the machine/automated
system must be reduced when using long, projecting or
heavy tools and with extensions.
WARNING
Risk of injury and material damage due to the expansion
sleeve bursting!
If not used as intended, the expansion sleeve may burst. This
can cause metal shards and oil to be ejected from the
product under high pressure, resulting in serious injury.
•
Never heat the product in heat shrink devices;
only perform a tool change using the integrated
clamping screw.
•
Do not exceed the specified operating temperature.
CAUTION
Risk of injury from tools with sharp edges!
Sharp edges on tools can cause cuts.
•
Wear protective gloves when assembling the tool.
NOTICE
Material damage due to burrs and dirt!
•
The tool must be free of burrs and dirt at the shank.
NOTICE
Material damage due to incorrect minimum clamping
depth!
Too small a clamping depth of the tool leads to a loss of
accuracy and torque on the product.
•
Observe the minimum clamping depth of the tool.
NOTICE
Potential impairment of the clamping function and damage
to the product!
If the product is not used as intended, the clamping function
may be impaired or the product may get damaged.
•
Only operate the clamping screw by hand.
•
Do not adjust the tool length when the tool is clamped.
4.2 Mounting tool
1. Unclamp the product by loosening the clamping screw.
NOTE:
The clamping screw is not secured against falling
out!
2. If required, the tool length can be adjusted by screwing the
integrated length adjustment screw in or out. Observe the
adjustment travel of the length adjustment
screw
.
3. Ensure that the set-screws for adjusting the concentricity
do not protrude into the clamping bore and thus obstruct
the joining of the tool.
4. Insert the tool to the minimum clamping depth or stop.
5. Screw the clamping screw in by hand until it reaches the
stop. Observe the maximum specified tightening
torque
.
4.3 Assembling the product
1. Position the product with tool correctly in the machine
interface and tighten.
NOTE:
Observe the machine manufacturer's specifications!
2. Check that the product is in the correct position and
securely clamped in the machine.
IMPORTANT! Safe clamping of the product in the machine
must be ensured!
4.4 Adjusting concentricity
Use a suitable measuring device with a resolution of 0.001
mm to adjust the concentricity.
NOTE:
When using an
intermediate sleeve, the concentricity cannot be adjusted.
1. Mount the tool
.
.
NOTE:
The concentricity is
ineffective if the product is not mounted in the machine
during this process.
3. Slightly screw in all set-screws for the concentricity
adjustment. Observe the specified preload
torque
.
4. Check the concentricity.
5. Screw in set-screw(s) on the opposite side of the highest
deflection to correct the run-out error. Observe the
specifications for the max. tightening torque of the set-
screws for the concentricity adjustment
NOTE:
Do not change the remaining set-screws in the
process.
6. Check the concentricity and correct again if necessary
4.5 Tool change
1. Unclamp the product by loosening the clamping screw.
NOTE:
The clamping screw is not secured against falling
out!
2. Loosen all set-screws for the concentricity adjustment.
3. Remove tool.
4. Mount new tool
5 Maintenance and storage
If you have any questions regarding maintenance, our technical
after-sales service is available during our business hours:
Service telephone: +49-7133-103-2956
[email protected]
All repair work may only be performed by SCHUNK!
5.1 Cleaning the clamping bore
Clean the clamping bore during every tool change with a
cleaning agent containing solvents and a cleaning brush.
5.2 Checking the clamping force
Check the clamping force before initial use, after approx. 100
tool changes and at least every 3 months.
1. Unclamp the product by loosening the clamping screw.
NOTE:
The clamping screw is not secured against falling
out!
2. Insert the test shaft to the minimum clamping depth.
3. Screw the clamping screw in by hand until it reaches the
stop. Observe the maximum specified tightening
torque
.
4. The clamping force is no longer sufficient if the test shaft
can be pulled out of the product with little effort using two
fingers.
In this case, send the product to SCHUNK for inspection.
5.3 Lubricating the clamping screw
CAUTION
Allergic reactions if lubricating grease comes into contact
with the skin.
•
Wear protective gloves to lubricate the clamping screw.
It is necessary to adapt the cleaning and lubrication of the
clamping screw to the ambient conditions. Especially in the
case of high clamping frequencies, high operating
temperatures, and abrasive dirt or dust. For optimum
lubrication of the clamping screw, we recommend copper
paste MOLYKOTE CU 7439. (100 g tube, ID 9247204).
1. Unscrew the clamping screw from the product.
IMPORTANT! The actuating piston underneath is not
secured against falling out and must not be removed!
2. Clean the clamping screw and actuating thread and check
for damage to the thread flanks. Replace if necessary.
3. Lubricate the clamping screw and actuating thread.
4. Screw the clamping screw into the product.
5. Check the clamping force
.
5.4 Storage
– Lightly oil the entire surface of the product.
– Only store the product in an unclamped state and protected
against corrosion.
– Store the product in a suitable transport container.
– Protect the product from excessive temperature fluctuations.
NOTE:
Before recommissioning, clean the product and check
for damage, functionality and tightness!
6 Disposal
– Follow local regulations on dispatching product components
for recycling or proper disposal.
– Alternatively, you can return the product to SCHUNK for
correct disposal.


