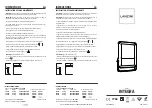
4. FEATURES
1.
Charging status LED indicator
2.
SMD LEDs (30)
3.
Rocker switch:
HIGH (II) / OFF (O) / LOW (I)
4.
Charging input jack
5.
Thumb screws
6.
12V DC car charger
7.
100-240V AC wall charger
1 2
3
4
5
6
7
5. CHARGING
IMPORTANT! CHARGE THE WORK
LIGHT IMMEDIATELY AFTER
PURCHASE, AFTER EACH USE, AND
AT LEAST EVERY 3-6 MONTHS.
Failure to do this will reduce the battery’s
capacity and may void the warranty.
5.1
Before charging, make sure the rocker
switch is in the OFF (O) position. Failure
to do so will damage the charger plug/
vehicle plug.
5.2 Using the AC wall charger:
Insert the end of the AC charger cable into
the input jack on the back of the work light.
Plug the AC charger into a live AC outlet.
5.3 Using the 12V DC car charger:
Insert the end of the 12V DC car charger
cable into the input jack on the back of the
work light. Plug the 12V DC car charger into
a 12V DC power outlet.
NOTE: Charging the work light from a
12V vehicle socket will drain the vehicle’s
battery, unless the engine is running.
5.4
Plug into your power supply. The charging
LED will light
RED
, to indicate charging has
begun.
5.5
Charging will take approximately 4-6 hours.
When the battery is fully charged, the
charging LED will change to
GREEN
.
5.6
When fully charged, unplug the charger
from the AC or DC outlet, and then from
the work light. The work light is now ready
for use.
5.7
Recharge the work light after use, and at
least every 3-6 months.
6. OPERATING INSTRUCTIONS
6.1 IMPORTANT:
Charge the internal battery
before use. Make sure the rocker switch is
in the OFF (O) position.
6.2
Press the rocker switch on the back of the
unit to turn on the work light to HIGH (II),
OFF (O) or LOW (I).
6.3
The position of the main body can altered
by loosening the thumb screws and moving
the main body.
6.4
ING
7. MAINTENANCE INSTRUCTIONS
7.1
After use and before performing
maintenance, unplug and disconnect
the work light.
7.2
Ensure the work light is unplugged and
allowed to cool before attempting any
cleaning.
7.3
Any servicing should be performed by
qualified service personnel.


