background image

• 14 •

1.12 Nunca coloque la unidad directamente sobre la batería que se iniciará. 

1.13 No use la unidad arrancar con un vehículo mientras se carga la 

batería interna.

2.  PRECAUCIONES DE SEGURIDAD PERSONAL

ADVERTENCIA: RIESGO DE GASES EXPLOSIVOS. UNA CHISPA 

CERCA DE LA BATERÍA HACER QUE LA BATERÍA EXPLOTE. PARA 

REDUCIR EL RIESGO DE CHISPAS CERCA DE LA BATERÍA:

2.1  NUNCA fume o permita la presencia de chispas o llamas en la 

proximidad de una batería o motor.

2.2  No utilice elementos personales de metal tales como anillos, pulseras, 

collares y relojes al trabajar con una batería de plomo-ácido. Una 

batería de plomo-ácido puede producir una corriente de cortocircuito lo 

suficientemente elevada como para soldar un anillo o provocar efectos 

similares sobre el metal, causando una quemadura de gravedad.

2.3  Tenga especial cuidado para reducir el riesgo de dejar caer una 

herramienta de metal sobre la batería. Esto podría provocar chispas 

o un cortocircuito en la batería o en cualquier otra pieza eléctrica que 

podría provocar una explosión.

2.4  No deje que la batería interna se congele. Nunca cargue una batería 

congelada. 

2.5  Para prevenir cortos, NUNCA permita que las pinzas se junten o 

hagan contacto por medio de un mismo metal.

2.6  Considere la idea de que alguna persona se encuentre cerca suyo 

para poder ayudarlo cuando trabaje en forma cercana a una batería 

de plomo-ácido.

2.7  Cuente con una gran cantidad de agua potable y jabón a mano en caso 

de que el ácido de la batería tenga contacto con su piel, ropa u ojos. 

2.8  Utilice protección visual y corporal completa, incluyendo gafas de 

seguridad y prendas de protección. Evite tocar sus ojos mientras 

trabaje en forma cercana a la batería.

2.9  Si el ácido de la batería tiene contacto con su piel o su ropa, lave de 

inmediato el área afectada con agua y jabón. En caso de que ingrese ácido 

en un ojo, sumerja el mismo de inmediato bajo agua potable corriente por 

al menos 10 minutos y obtenga atención médica en forma inmediata.

2.10 Si el ácido de la batería es accidentalmente ingerido, se recomienda 

beber leche, clara de huevo o agua. NO provoque vómito. Busque 

ayuda médica de inmediato.

2.11 Neutralice el ácido derramado abundantemente con bicarbonato de  

sodio antes de intentar limpiarlo.

2.12 Este producto contiene una batería de ión-litio. En caso de incendio, 

puede utilizar agua, extintor de espuma, halón, CO

2

 polvo químico seco 

ABC, grafito en polvo, polvo de cobre o soda (carbonato de sodio) para 

extinguir el fuego. Una vez que el fuego se haya extinguido, empape 

el producto con agua, un agente de extinción basado en agua u otros 

líquidos sin alcohol para enfriar el producto y evitar que la batería se 

vuelva a encender. NUNCA intente levantar o mover un producto caliente, 

que emita humo o que esté en llamas, ya que puede resultar herido. 

Summary of Contents for SL1441

Page 1: ...nd follow these instructions and precautions carefully POR FAVOR GUARDE ESTE MANUAL DEL PROPIETARIO Y LEER ANTES DE CADA USO En este manual se explica cómo utilizar la unidad segura y efectiva Por favor lea y siga las siguientes instrucciones y precauciones ESSAYER DE GARDER LE MANUEL D INSTRUCTIONS ET LE LIREAVANT CHAQUE UTILISATION Ce manuel explique comment utiliser l unité d une façon sûre et ...

Page 2: ...E UNIT 7 FOLLOW THESE STEPS WHEN CONNECTING TO A BATTERY 7 FEATURES 8 CHARGING THE JUMP STARTER 8 OPERATING INSTRUCTIONS 9 MAINTENANCE INSTRUCTIONS 11 STORAGE INSTRUCTIONS 11 TROUBLESHOOTING 11 SPECIFICATIONS 12 REPLACEMENT PARTS 12 BEFORE RETURNING FOR REPAIRS 12 LIMITED WARRANTY 12 ...

Page 3: ...SO 15 SIGA ESTOS PASOS CUANDO SE CONECTE A LA BATERÍA 15 CARACTERÍSTICAS 16 CARGAR ELARRANCADOR 16 INSTRUCCIONES DE OPERACIÓN 17 INSTRUCCIONES DE MANTENIMIENTO 19 INSTRUCCIONES DE ALMACENAMIENTO 19 RESOLUCIÓN DE PROBLEMAS 19 ESPECIFICACIONES 21 REPUESTOS 21 ANTES DE DEVOLVER A REPARACIONES 21 GARANTÍA LIMITADA 21 ...

Page 4: ...APPAREIL 24 SUIVEZ CES ÉTAPES LORSQUE CONNEXION À UNE BATTERIE 24 CARACTÉRISTIQUES 25 CHARGE LE DÉMARREUR 26 CONSIGNES D UTILISATION 26 CONSIGNES D ENTRETIEN 28 INSTRUCTIONS DE STOCKAGE 28 TABLEAU DE DÉPANNAGE 29 SPÉCIFICATIONS 30 PIÈCES DE RECHANGE 30 AVANT DE RETOURNER POUR LES RÉPARATIONS 30 GARANTIE LIMITÉE 30 ...

Page 5: ...risk of damage to the electric plug or cord pull by the adaptor rather than the cord when disconnecting the unit 1 7 Do not operate the unit with damaged cables or clamps 1 8 Do not operate the unit if it has received a sharp blow been dropped or otherwise damaged in any way take it to a qualified service person 1 9 Do not disassemble the unit take it to a qualified service person when service or ...

Page 6: ...ng soda nearby for use in case battery acid contacts your eyes skin or clothing 2 8 Wear complete eye and body protection including safety goggles and protective clothing Avoid touching your eyes while working near the battery 2 9 If battery acid contacts your skin or clothing immediately wash the area with soap and water If acid enters your eye immediately flood the eye with cold running water fo...

Page 7: ...tal part of the battery clips or cut the insulation of the cables 4 3 Stay clear of fan blades belts pulleys and other parts that can cause injury 4 4 Check the polarity of the battery posts The POSITIVE POS P battery post usually has a larger diameter than the NEGATIVE NEG N post 4 5 Determine which post of the battery is grounded connected to the chassis If the negative post is grounded to the c...

Page 8: ...RNAL BATTERY FULLY CHARGED AND PROLONG BATTERY LIFE 6 1 CHECKING THE LEVEL OF THE INTERNAL BATTERY 1 Press the display button The LCD display will show the battery s percentage of charge Afully charged internal battery will read 100 Charge the internal battery if the display shows it is under 85 2 To reduce the risk of electric shock unplug the unit s charging cable from a USB or wall charger befo...

Page 9: ...r a negative grounded vehicle connect the POSITIVE RED clamp from the jump starter to the POSITIVE POS P ungrounded post of the battery Connect the NEGATIVE BLACK clamp to the vehicle chassis or engine block away from the battery Do not connect the clamp to the carburetor fuel lines or sheet metal body parts Connect to a heavy gauge metal part of the frame or engine block 5 For a positive grounded...

Page 10: ...as possible after each use 7 2 CHARGING A MOBILE DEVICE USING THE USB PORTS The unit includes two USB ports One provides up to 2 4A at 5V DC the other is a USB Fast Charging port which provides up to 5V at 3A 9V at 2A or 12V at 1 5A 1 Consult your mobile device manufacturer for proper charging power specifications Connect a mobile device cable to the appropriate USB port 2 Charging should begin au...

Page 11: ...o reset The thermometer symbol is flashing The unit is too hot or cold The thermometer symbol will disappear when the condition is removed The jump starter will not recharge Make sure the power source is live The jump starter turns on but won t jump start my vehicle Check connections Verify the charge level of the jump starter is at least 40 Do not attempt to jump start your vehicle more than thre...

Page 12: ...to the vehicle battery Solid Red and Green LEDs beeps once per second Temperature protection NOTE When the condition is corrected the smart cable will automatically reset 11 SPECIFICATIONS Internal battery type Lithium ion polymer Capacity 37 Wh USB output 5V DC 2 4A USB Fast Charging 5V 3A 9V 2A 12V 1 5A Jump start 800A peak 400A cranking Charging Temperature 32 122 F 0 50 C 12 REPLACEMENT PARTS ...

Page 13: ... lesiones a personas o daño a la propiedad 1 6 Para reducir el riesgo de daños al enchufe o cable eléctrico jale del adaptador en lugar de jalar del cable al desconectar la unidad 1 7 No utilice la unidad si el mismo posee los cables o las pinzas dañado 1 8 No utilice la unidad si el mismo recibió un golpe fuerte si se cayó o si sufrió daños de cualquier otra forma hágalo revisar por una persona c...

Page 14: ... para poder ayudarlo cuando trabaje en forma cercana a una batería de plomo ácido 2 7 Cuente con una gran cantidad de agua potable y jabón a mano en caso de que el ácido de la batería tenga contacto con su piel ropa u ojos 2 8 Utilice protección visual y corporal completa incluyendo gafas de seguridad y prendas de protección Evite tocar sus ojos mientras trabaje en forma cercana a la batería 2 9 S...

Page 15: ...ños a la cubierta a la puerta y a las piezas móviles o calientes del motor NOTA Si es necesario cerrar el cofre durante el proceso de arranca asegúrese que el cofre no toque parte metálica de la batería o pele los cables 4 3 Manténgase alejado de las paletas del ventilador correas poleas y otras piezas que podrían provocar lesiones 4 4 Verifique la polaridad de los bornes de la batería El borne PO...

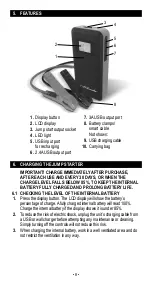
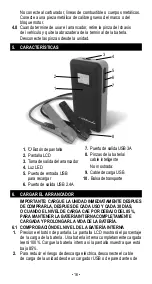
Page 16: ...batería cable inteligente No mostrada 9 Cable de carga USB 10 Bolsa de transporte 6 CARGAR EL ARRANCADOR IMPORTANTE CARGUE LA UNIDAD INMEDIATAMENTE DESPUES DE COMPRARLA DESPUES DE CADA USO Y CADA 30 DÍAS O CUANDO EL NIVEL DE CARGA CAE POR DEBAJO DEL 85 PARA MANTENER LA BATERÍA INTERNA COMPLETAMENTE CARGADA Y PROLONGAR LA VIDA DE LA BATERÍA 6 1 COMPROBACIÓN DEL NIVEL DE LA BATERÍA INTERNA 1 Presion...

Page 17: ...arrancador mientras se carga su batería interna IMPORTANTE Utilización de la función arranque del motor sin una batería instalada en el vehículo dañará el sistema eléctrico del vehículo NOTA La batería interna debe tener un cargo si al menos el 40 para iniciar un vehículo 1 APAGUE el motor 2 Conecte el cable de las pinzas de la batería a la toma de salida del arrancador 3 Ponga los cables de CD le...

Page 18: ...te se apagará automáticamente después de 90 segundos y los LED rojo y verde estarán solidos Para reiniciar desconecte las pinzas de la batería del vehículo y luego vuelva a conectar IMPORTANTE NO intente poner en marcha su vehículo más de tres veces consecutivas Si el vehículo no arranca después de tres intentos consulte a un técnico de servicio 8 Después de arrancar el motor desenchufe las pinzas...

Page 19: ...s que el usuario cualquier reparación o mantenimiento debe ser realizado por personal técnico cualificado 9 INSTRUCCIONES DE ALMACENAMIENTO 1 Cargue la batería a plena capacidad antes de su almacenamiento 2 Almacene la unidad a temperaturas entre 20 C 60 C 4 F 140 F 3 Nunca descargue completamente la batería 4 Cargue después de cada uso 5 Cargue al menos una vez al mes si no en el uso frecuente pa...

Page 20: ...ó El usuario puede girar la llave para arrancar el motor del vehículo LED del cable inteligente y comportamiento de la alarma COMPORTAMIENTO RAZÓN LED verde parpadeando LED rojo apagado no bip El cable está conectado solamente a la batería El cable está conectado al arrancador solamente LED verde sólido LED rojo apagado no bip Cable conectado correctamente a la batería y el arrancador LED rojo sól...

Page 21: ...900Z Cable de carga USB 3899003781Z 13 ANTES DE DEVOLVER A REPARACIONES Para REPARACIONES O DEVOLUCIONES visite 365rma com Visite batterychargers com para obtener piezas de repuesto 14 GARANTÍA LIMITADA Para obtener información sobre nuestra garantía limitada de un año visite batterychargers com o llame al 1 800 621 5485 para solicitar una copia Visite nuestra página en batterychargers com para re...

Page 22: ...i peut s ensuivre dans la blessure sérieuse ou la mort 1 2 Ne le laissez pas a la portée des enfants 1 3 Ne pas mettre les doigts ou les mains dans l un des points de sortie de l appareil 1 4 Ne pas exposer l unité à la pluie ou la neige 1 5 N utilisez que les accessoires recommandés SA900 câble de démarrage L utilisation d accessoires non recommandés ou vendus par le fabricant pour l unité peut e...

Page 23: ...e ou produire un court circuit à la batterie ou à d autres parties électriques et pourrait produire une explosion 2 4 Veillez à ce que la batterie interne ne gèle pas Ne tentez jamais de recharger une batterie gelée 2 5 Pour éviter les étincelles NE JAMAIS laisser pinces se toucher ensemble ou contacter la même pièce de métal 2 6 Considérez d être assez proche d une personne quand vous travaillez ...

Page 24: ...3 Déterminez la tension de la batterie en vous référant au guide d utilisation de votre véhicule et assurez vous que le tension de sortie est de 12V 3 4 Assurez vous que les pinces des câbles du l unité sont fermement connectées 4 SUIVEZ CES ÉTAPES LORSQUE CONNEXION À UNE BATTERIE AVERTISSEMENT UNE ÉTINCELLE PRÈS DE BATTERIE PEUT CAUSER SON EXPLOSION POUR RÉDUIRE LES RISQUES D ÉTINCELLE PRÈS DE LA...

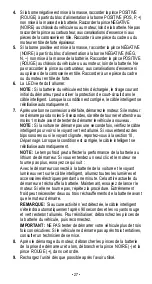
Page 25: ...TIVE NÉG N non mise à la masse de la batterie Raccorder la pince POSITIVE ROUGE au châssis du véhicule ou au moteur loin de la batterie Ne pas raccorder la pince au carburateur aux canalisations d essence ni aux pièces de la carrosserie en tôle Raccorder à une pièce du cadre ou du moteur en tôle de forte 4 8 Lorsque vous avez terminé avec le démarreur retirer la pince du châssis du véhicule puis r...

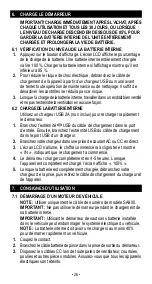
Page 26: ...B du câble de chargement dans le port d entrée Ensuite branchez l extrémité USB du câble de chargement dans le port USB d un chargeur 2 Branchez votre chargeur dans une prise de courantAC ou CC en direct 3 L écran LCD s allume le chiffre commencera à clignoter et montre IN indiquant que le chargement a commencé 4 Le démarreur charger complètement en 4 5 heures Lorsque l appareil est complètement c...

Page 27: ...e a nouveau NOTE Si la voiture ne démarre pas une seconde fois vérifiez le câble intelligent pour voir si le voyant vert est allumé Si vous entendez des bips sonores ou si le voyant clignote reportez vous à la section 10 Dépannage Lorsque la condition est corrigée le câble intelligent se réinitialise automatiquement NOTE Le temps froid peut affecter la performance de la batterie au lithium de déma...

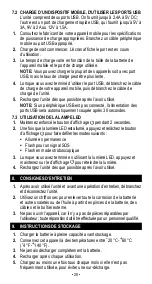
Page 28: ...ON DE LA LAMPE LED 1 Maintenez enfoncé le bouton d affichage pendant 2 secondes 2 Une fois que la lumière LED est allumé appuyez et relâchez le bouton d affichage pour faire défiler les modes suivants Allumé en permanence Flash pour un signal SOS Flash en mode stroboscopique 3 Lorsque vous avez terminé en utilisant la lumière LED appuyez et maintenez sur le d affichage pour éteindre la lumière 4 R...

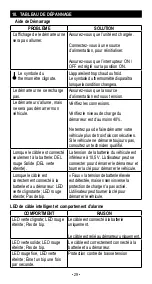
Page 29: ... technicien qualifié Lorsque le câble est connecté seulement à la batterie DEL rouge Solide DEL verte éteinte La tension de la batterie du véhicule est inférieure à 10 5 V L utilisateur peut se connecter pour démarrer le démarreur et tourner la clé pour démarrer le véhicule Lorsque le câble est correctement connecté à la batterie et au démarreur LED verte clignotante LED rouge éteinte Pas de bip F...

Page 30: ... automatiquement 11 SPÉCIFICATIONS Type de batterie interne Polymère au lithium ion Capacité 37 Wh Sortie USB 5V CC 2 4A Port de chargement rapide USB 5V 3A 9V 2A 12V 1 5A Démarrage 800 A un pic 400A démarrage Température de charge 32 122 F 0 50 C 12 PIÈCES DE RECHANGE Pinces de la batterie avec câble intelligent 94500900Z Câble de recharge USB 3899003781Z 13 AVANT DE RETOURNER POUR LES RÉPARATION...

Reviews: