


32
8. INSTALLATION
It is important that the motor be grounded. Consult the instructions in item 4- Electrical
connection.
IMPORTANT
1. Initial arrangement:
• Remove the product of the package;
• Verify if the product does not present problems due to transportation and if it is in operating conditions. If
necessary, contact the nearest Schulz Authorized Dealer.
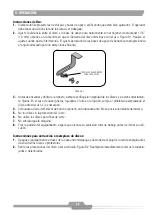
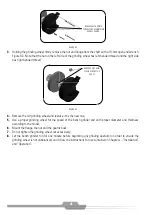
2. Assembling:
• Assemble the eyeshield brackets
4
, the eyeshields
1
and the tool rests
2
using the screws and other hardwa-
re supplied with the product.
• Make sure to position the tool rest and eyeshields no farther than 1.6 mm (1/16”) from the surface of the
grinding wheel and make the adjustments if there is interference with it.
• Fasten the bench grinder to a bench or workstation.
3. Location:
• The product must be installed and used in an area that is covered, illuminated, ventilated, free of dust, toxic
gases, humidity and any other kind of pollution. Places such as stockrooms, pantries, basements, garages,
bathrooms and chemically contaminated areas must be avoided.
4. Electrical connection:
• Consult a specialized technician to evaluate the general conditions of the electrical network and select
theadequate supply and protection devices.
• There must be followed the existing legislation and norms in safety and electrical installation of low-voltage,
according to the installation place and country.
• The supply cable must be dimensioned according to the motor power, network voltage and distance to the-
source of electricity. See orientations in Table 8.1.
• Before connecting the equipment to the electrical network, check if the tension of the product matches the
local one.
• Do not wet the electric components, water may cause short-circuit and component burning or electrical
shock.
• Before the equipment, at the distribution panel, install a residual circuit breaker to ensure greater safety
against electric shock.
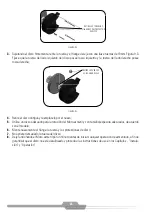
• Figure 8.1 shows the recommended wiring diagram for the product.
• Grounding
instructions:
this product must be grounded. In case of short circuit, the grounding reduces the
risk of electric shock through a path to discharge the electric current. Therefore, connect the grounding wire
to the motor terminal or, if there’s no terminal, to the motor housing.
Pay attention so that the wall socket has the same confi guration as the plug. Adapters
must not be used. Figure 8.1.
ATTENTION