background image

19

8.  Suspension bracket for luggage 

carrier with "Top Light" (optional).

Insert the suspension bracket acc. Figs. 

A

 and 

B

.

Turn the ends of the suspension bracket around the edge of the luggage 

carrier (

C

) and insert the ends at the top (

D

).

In addition, you can secure the adapter bar with a cable tie (

E

). 

Now you can suspend the 

follow-me momo. 

from the suspension bracket 

using a snap hook (

F

).

A

C

E

B

D

F

Summary of Contents for follow-me momo

Page 1: ...Instructions for use follow me momo The cleaver parent child tandem coupling for Schuchmann tricycles follow me momo...

Page 2: ...for use carefully prior to initial commissioning of the product and to observe them Please note that gui delines and representations in these Instructions for use may deviate from your product due to...

Page 3: ...r 12 4 4 Mounting thru axle adapter 13 4 5 Mounting the follow me momo 14 5 Preparation of the momo tricycle 15 5 1 Mounting the axle extension 15 5 2 Attaching the adapter clamp on the tricycle down...

Page 4: ...In order to preserve and protect the environment to prevent environmental pollution and to improve the recycling of raw materials please note the disposal instructions in points 1 3 1 and 1 3 2 1 3 1...

Page 5: ...les from 2008 by Schuchmann without elec tric drive may be coupled Do NOT couple momo therapy bicycles or therapy bicycles and tricycles from other manufacturers 2 3 Use not in accordance with the int...

Page 6: ...with a user on the tricycle The most important factor when riding with the product is reliable brakes It may be expedient to retrofit better brakes Consult a specialist dealer prior to making any chan...

Page 7: ...ground and avoid jerky pedaling When riding and especially when turning always pay attention to the overall width of the rear wheels of the coupled tricycle This differs significantly from the one of...

Page 8: ...r wheel Incl special axle nuts Suspension straps 2 6 Product overview The Fig below is intended to show you the designation of the most important components as well as the terms which you will find in...

Page 9: ...le with quick release clamp please read sections 4 1 and 4 1 1 If your bicycle has a solid axle with wheel nuts please read section 4 2 If your bicycle has a hub gear with Click Box please read sectio...

Page 10: ...other side slightly and re clamp the lever After this the wheel must be centred i e the distance between the rim and the frame must be the same on both sides In assembled condition at least 10 12 mm m...

Page 11: ...both sides The full axle adapter also takes over the function of the wheel nuts Therefore regularly check the full axle adapter for tight fit best of all prior to each journey If the solid axle adapt...

Page 12: ...he lower section tube D into the U tube C push the flat profile with hole E onto the axle and tighten the wheel nut again Now fix the U tube C to the luggage carrier strut F with a cable tie G Then ca...

Page 13: ...the thru axle adapter B into the opening on the frame Now screw on the thru axle adapter B e g with the help of an Allen key D Finally mount the previously loosened screw C on the other side of the th...

Page 14: ...lease clamp To do this insert the straight end of the safety splint F into the hole on the inside of the follow memomo cou pling and push it through until it has fully en gaged into the quick release...

Page 15: ...tre This means that the distance between the rim and the fork tube must be the same on both sides The axle extensions B also take over the function of the wheel nuts A There fore regularly check the a...

Page 16: ...ap hook and hook it into the pin D Now pull the locking pin E out of the clamping plate F at the side and thus secure the strut on the pin D Ensure that the spring washer closes comple tely If not rot...

Page 17: ...omo Roll the bicycle back in this time place the axle extension D into the aperture of the clamping plate B 6 2 Adjusting the position of the adapter clamp First unscrewthehandlenuts E onboth sides ra...

Page 18: ...nd the saddle tube and attach the snap hook to the saddle linkage Then unfold the strut and hook it into the pin B Pull the locking pin C out of the clamping plate to the side and secure the strut A w...

Page 19: ...et acc Figs A and B Turn the ends of the suspension bracket around the edge of the luggage carrier C and insert the ends at the top D In addition you can secure the adapter bar with a cable tie E Now...

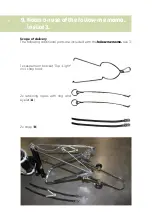
Page 20: ...e follow me momo in size 3 Scope of delivery The following additional parts are included with the follow memomo size 3 1x suspension bracket Top Light incl snap hook 2x retaining ropes with ring and e...

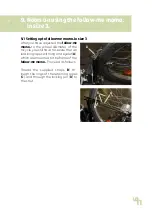
Page 21: ...follow me momo to the wheel diameter of the tricycle you still have to secure the two retaining ropes with ring and eyelet A which are mounted to the frame of the follow me momo Proceed as follows Thr...

Page 22: ...remove the snap hook A of the suspension bracket B and insert both rings of the retaining ropes C Af terwards suspend the snap hook A together with the rings C from the suspension bracket B 9 2 1 Secu...

Page 23: ...eratures 10 2 Servicing Please carry out a daily visual inspection and regularly check the parent child tandem coupling for cracks fractures missing parts and malfunctions In case of a defect or malfu...

Page 24: ...statutory guarantee period shall apply for all products This begins with the delivery or handover of the goods Should a verifiable ma terial or manufacturing fault occur within this time period we sha...

Reviews: