background image


IT 


Durante i lavori di pulizia e manutenzione è sempre 

necessario isolare la cappa dalla rete di alimentazione. 
Staccare quindi la spina. 
Al fine di assicurare un'efficacia ottimale e costante 
della cappa, si raccomanda di effettuare regolarmente 
la sua manutenzione (ogni 10 giorni circa). 
  

Pulizia 

La cappa va frequentemente pulita (almeno con la 
stessa frequenza con cui si esegue la manutenzione 
dei filtri grassi), sia internamente che esternamente. 
Per la pulizia usare un panno inumidito con detersivi 
liquidi neutri.  
Evitare l’uso di prodotti contenenti abrasivi. NON 
UTILIZZARE ALCOOL! 
Attenzione: 
L’inosservanza delle norme di pulizia dell’apparecchio 
e della sostituzione dei filtri comporta rischi di incendi. 
Si raccomanda quindi di attenersi alle istruzioni 
suggerite. 
Si declina ogni responsabilità per eventuali danni al 
motore, incendi provocati da un’impropria 
manutenzione o dall’inosservanza delle suddette 
avvertenze. 

Pulizia del filtro grassi 

Trattiene le particelle di grasso derivanti dalla cottura. 
Deve essere pulito una volta al mese  con detergenti 
non aggressivi, manualmente oppure in lavastoviglie a 
basse temperature ed a ciclo breve. 
Con il lavaggio in lavastoviglie il filtro antigrasso 
metallico può scolorirsi ma le sue caratteristiche di 
filtraggio non cambiano assolutamente.  
Per smontare il filtro grassi tirare la maniglia di sgancio 
a molla. 


Pulizia del filtro a carbone 

Trattiene gli odori sgradevoli derivanti dalla cottura. 
Il filtro al carbone può essere lavato ogni due mesi  in 
acqua calda e detergenti idonei o in lavastoviglie a 
65°C (in caso di lavaggio in lavastoviglie eseguire il 
ciclo di lavaggio completo senza stoviglie all'interno). 
Togliere l'acqua in eccesso senza rovinare il filtro, 
dopodiché togliere il materassino posto all'interno del 
telaio in plastica e riporlo nel forno per 10 minuti a 
100°C per asciugarlo definitivamente. 
Sostituire il materassino ogni 3 anni e ogni volta che il 
panno risulta danneggiato. 

Montaggio e sostituzione del filtro 


Filtro carbone


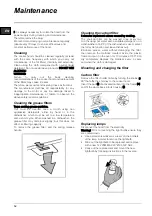
Rimuovere il telaio reggi filtro girando di 90° i pomelli 
(g) che lo fissano alla cappa. 
Inserire il materassino (i) di carbone all’interno del 
telaio (h) e rimontare il tutto nella apposita sede (j). 


Sostituzione Lampade 

Disinserire l’apparecchio dalla rete elettrica. 
Attenzione! Prima di toccare le lampade sincerarsi che 
siano fredde. 
•  Con un piccolo cacciavite a taglio, far leva sui bordi 

della lampadina per estrarla. 

•  Sfilare la lampadina da sostituire e sostituirla con 

una nuova da 12V 20W MAX 30° Ø35 12V GU4. 

•  Eseguire il montaggio della nuova lampada 

procedendo in senso inverso. 


Manutenzione 

Summary of Contents for HDB 9

Page 1: ...DN 9 HDB 9 Sommario Installazione 2 Installazione 2 Descrizione dell apparecchio 4 Pannello di controllo 4 Funzionamento 5 Manutenzione 6 Pulizia 6 Pulizia del filtro grassi 6 Pulizia del filtro a carbone 6 Montaggio e sostituzione del filtro 6 Sostituzione Lampade 6 Avvertenze 7 Sicurezza generale 7 Smaltimento 7 ...

Page 2: ...di raccordo L utilizzo di tubi e fori di scarico a parete con diametro inferiore determinerà una diminuizione delle prestazioni di aspirazione ed un drastico aumento della rumorosità Si declina perciò ogni responsabilità in merito L azienda declina ogni responsabilità qualora queste norme non vengano rispettate Informazioni preliminari per l installazione della cappa Scollegare la cappa agendo sul...

Page 3: ...asselli a muro 11 Applicare la staffa di supporto camini G alla parete aderente al soffitto utilizzare la staffa di supporto come schema di foratura la piccola asola ricavata sul supporto deve coincidere con la linea precedentemente tracciata sul muro operazione 1 e segnare con la matita 2 fori eseguire i fori Ø8mm inserire 2 tasselli 12 Fissare la staffa di supporto camini alla parete con 2 viti ...

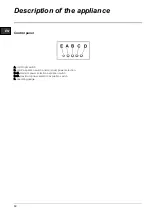
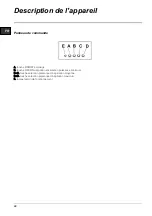
Page 4: ...F B Interruttore ON OFF e selezione velocità 1 in caso di poco vapore e fumo B C Selezione velocità 2 in caso di media quantità di vapore e fumo B D Selezione velocità 3 in caso di molto vapore e fumo E spia di funzionamento Descrizione dell apparecchio ...

Page 5: ...sione Aspirante I vapori vengono evacuati verso l esterno tramite un tubo di scarico fissato alla flangia di raccordo che si trova sopra la cappa Il diametro del tubo di scarico deve essere equivalente al diametro dell anello di connessione Attenzione Il tubo di evacuazione non è fornito e va acquistato Nella parte orizzontale il tubo deve avere una leggera inclinazione verso l alto 10 circa in mo...

Page 6: ...ntigrasso metallico può scolorirsi ma le sue caratteristiche di filtraggio non cambiano assolutamente Per smontare il filtro grassi tirare la maniglia di sgancio a molla Pulizia del filtro a carbone Trattiene gli odori sgradevoli derivanti dalla cottura Il filtro al carbone può essere lavato ogni due mesi in acqua calda e detergenti idonei o in lavastoviglie a 65 C in caso di lavaggio in lavastovi...

Page 7: ...mente ALMENO UNA VOLTA AL MESE rispettare comunque quanto espressamente indicato nelle istruzioni di manutenzione riportate in questo manuale L inosservanza delle norme di pulizia della cappa e della sostituzione e pulizia dei filtri comporta rischi di incendi Non utilizzare o lasciare la cappa priva di lampade correttamente montate per possibile rischio di scossa elettrica Si declina ogni respons...

Page 8: ......

Page 9: ...utsch HDN 9 HDB 9 Contents Installation 10 Installation 10 Description of the appliance 12 Control panel 12 Operation 13 Maintenance 14 Cleaning 14 Cleaning the grease filters 14 Cleaning the carbon filter 14 Mounting and changing the filter 14 Replacing lamps 14 Caution 15 General safety 15 Disposal 15 ...

Page 10: ...cause a diminution of the suction performance and a drastic increase in noise Any responsibility in the matter is therefore declined The company declines any responsibility whenever these regulations are not respected Preliminary information for installation of the hood Disconnect the hood during electrical connection by turning the home mains switch off Remove the fat s filter s and the carbon fi...

Page 11: ...sert 2 wall plugs 11 Rest the chimney support bracket G against the wall touching the ceiling Use the support bracket as a drilling template the small slot formed on the support must coincide with the line drawn on the wall as above operation 1 and mark 2 holes with a pencil drill the holes Ø8mm insert 2 wall plugs 12 Fix the chimney support bracket to the wall using two 5x45mm screws 13 Hook the ...

Page 12: ...nel A on off light switch B on off aspiration switch and minimum power selection B C medium power selection aspiration switch B D maximum power selection aspiration switch E operating gauge Description of the appliance ...

Page 13: ...onveyed outside by means of a special pipe connected with the connection ring located on top of the hood Attention The exhausting pipe is not supplied and must be purchased apart Diameter of the exhausting pipe must be equal to that of the connection ring 150mm In the horizontal runs the exhausting pipe must be slightly slanted about 10 and directed upwards to vent the air easily from the room to ...

Page 14: ... a dishwasher the grease filter may discolour slightly but this does not affect its filtering capacity To remove the grease filter pull the spring release handle Cleaning the carbon filter It absorbs unpleasant odours caused by cooking The charcoal filter can be washed once every two months using hot water and a suitable detergent or in a dishwasher at 65 C if the dishwasher is used select the ful...

Page 15: ...ssary to proceed in accordance with the maintenance instructions provided in this manual Failure to follow the instructions as concerns hood and filter cleaning will lead to the risk of fires Do not use or leave the hood without the lamp correctly mounted because of the possible risk of electric shocks We decline any responsibility for any problems damage or fires caused to the appliance as the re...

Page 16: ......

Page 17: ...B 9 Sommaire Installation 18 Installation 18 Description de l appareil 20 Panneau de commande 20 Fonctionnement 21 Entretien 22 Nettoyage 22 Nettoyage des filtres anti gras 22 Nettoyage du filtre à charbon 22 Montage et remplacement du filtre 22 Remplacement des lampes 22 Attention 23 Sécurité générale 23 Mise au rebut 23 ...

Page 18: ...ollier de raccord L utilisation de tubes et des trous d évacuation à paroi avec un diamètre inférieur entraînera une diminution des performances d aspiration et une nette augmentation du bruit Nous déclinons toute responsabilité à cet égard La société décline toute responsabilité si ces normes ne sont pas respectées Informations préliminaires pour l installation de la hotte Débrancher la hotte en ...

Page 19: ... 11 Appliquer la bride de support des cheminées G contre la paroi qui touche le plafond utiliser la bride de support en tant que schéma de perçage le petit oeillet obtenu sur le support doit coïncider avec la ligne précédemment tracée sur le mur opération 1 puis marquer 2 trous à l aide d un crayon percer les trous ø 8 mm insérer les deux chevilles 12 Fixer la bride de support des cheminées contre...

Page 20: ...N OFF éclairage B touche OFF ON aspiration et sélection puissance minimum B C touche selection puissance d aspriration moyenne B D touche selection puissance d aspiration maximum E lampe témoin de fonctionnement Description de l appareil ...

Page 21: ...on à évacuation extérieure Les vapeurs sont évacuées vers l extérieur à travers un conduit d évacuation fixé à la bride de raccord qui se trouve au dessus de la hotte Attention Le tuyau d évacuation n est pas fourni et doit être acheté à part Le diamètre du tuyau d évacuation doit être égal à celui de la bride de raccord 150 mm Sur la partie horizontale le tuyau doit avoir une légère inclinaison v...

Page 22: ... provoquer la décoloration Toutefois les caractéristiques de filtrage ne seront en aucun cas modifiées Pour démonter le filtre anti graisse tirer la poignée de décrochement à ressort Nettoyage du filtre à charbon Retient les odeurs désagréables de cuisson Le filtre à charbon peut être nettoyé tous les deux mois avec de l eau chaude et au moyen de détergents appropriés ou dans le lave vaisselle à 6...

Page 23: ... respecter néanmoins les instructions relatives à l entretien fournies dans ce manuel La non observation de ces normes de nettoyage de la hotte et du changement et nettoyage des filtres comporte des risques d incendie Ne pas utiliser ou laisser la hotte sans que les ampoules soient correctement placées pour éviter tout risque de choc électrique La société décline toute responsabilité pour d éventu...

Page 24: ......

Page 25: ...nhoudsopgave Het installeren 26 Het installeren 26 Beschrijving van de wasemkap 28 Bedieningspaneel 28 Werking 29 Onderhoud 30 Schoonmaak 30 Reiniging van het vetfilter 30 Schoonmaak van de koolstoffilter 30 Montage en vervanging van de filter 30 Vervanging lampjes 30 Waarschuwing 31 Algemene veiligheidsvoorschriften 31 Afdanking 31 ...

Page 26: ...bindingsflens Het gebruik van wandafvoerpijpen of afvoeropeningen met een kleinere diameter zal leiden tot een vermogensverlies en een sterke toename van het bedrijfsgeluid Iedere aansprakelijkheid hiervoor wordt afgewezen Het bedrijf wijst iedere aansprakelijkheid af indien deze voorschriften niet in acht worden genomen Voorafgaande informatie voor installatie van de wasemkap Koppel de wasemkap t...

Page 27: ... pluggen in de muur 11 Bevestig de draagbeugel van de schouwdelen G aan de muur aansluitend aan het plafond gebruik de draagbeugel als boormal de kleine uitsparing op de steun moet samenvallen met de eerder op de muur getrokken lijn handeling 1 en teken met het potlood 2 gaten boor de gaten Ø8 mm steek er 2 pluggen in 12 Bevestig de draagbeugel van de schouwdelen aan de muur met 2 schroeven van 5x...

Page 28: ...paneel A ON OFF lichtknop B OFF ON knop voor de zuigfunctie en voor de selectie van de laagste zuigkracht B C Knop middelste zuigkracht B D Knop maximale zuigkracht E werkingscontrolelampje Beschrijving van de wasemkap ...

Page 29: ...r buiten De aangezogen rook en damp worden naar buiten geleid via een afvoerpijp die is aangesloten op de verbindingsring aan de bovenkant van de wasemkap Attentie De afvoerpijp wordt hierbij niet geleverd en moet apart aangekocht worden De middellijn van de afvoerpijp moet even groot zijn als die van de verbindingsring 150mm De horizontale stukken van de buis moeten enigszins omhoog hellen ongeve...

Page 30: ... programma Door hem in de vaatwasmachine te wassen kan het metalen vetfilter ontkleuren maar dit is niet van invloed op de eigenschappen die beslist niet veranderen Om het vetfilter te demonteren trekt u aan de veerbelaste ontgrendelingshandgreep Schoonmaak van de koolstoffilter Houdt de lastige kookgeuren vast De koolstoffilter kan om de twee maanden gewassen worden in warm water en met geschikte...

Page 31: ...et in acht nemen van de reinigingsnormen van de wasemkap en van de vervanging en reiniging van de filters kan brandgevaar veroorzaken Zorg altijd dat de lampjes in de kap aanwezig en goed gemonteerd zijn om het gevaar voor elektrische schokken te voorkomen Iedere aansprakelijkheid voor eventuele schade aan het apparaat of brand veroorzaakt door het niet in acht nemen van de aanwijzingen uit deze h...

Page 32: ......

Page 33: ... HDN 9 HDB 9 Inhalt Befestigung 34 Befestigung 34 Beschreibung der Dunstabzugshaube 36 Bedienfeld 36 Betrieb 37 Wartung 38 Reinigung 38 Reinigung des Fettfilters 38 Reinigung des Aktivkohlefilters 38 Aufbau und Auswechslung des Filters 38 Ersetzten der Lämpchen 39 Warnung 40 Allgemeine Sicherheit 40 Entsorgung 40 ...

Page 34: ...d Wandabluftauslass mit dem selben Durchmesser wie der Luftausgang verbinden Anschlussflansch Die Benutzung von Rohren und Wandabluftauslass mit geringerem Durchmesser verursacht eine Verringerung der Abluftleistung und eine drastische Zunahme der Geraeuschentwicklung Jegliche Verantwortung diesbezueglich wird daher abgelenkt Jegliche Verantwortung wird von der Firma abgelehnt sollten diese Normen...

Page 35: ...bel einfügen 11 Den Kamin Haltebügel G an der Wand fixieren der Decke anliegend hierbei wird der Haltebügel als Bohrplan verwendet das kleine Langloch am Haltebügel muss mit der zuvor an der Wand gekennzeichneten Linie übereinstimmen Arbeitsgang 1 mit dem Bleistift 2 Bohrungen kennzeichnen bohren Ø8mm und 2 Dübel einfügen 12 Den Kaminhaltebügel mit 2 Schrauben 5x45mm an der Wand fixieren 13 Die Ha...

Page 36: ... Schalter ON OFF der Absaugfunktion und zum Einschalten der geringsten Saugstärke B C Schalter zum Einschalten der mittleren Saugstärke B D Schalter zum Einschalten der maximalen Saugstärke E Funktionskontrolleuchte Beschreibung der Dunstabzugshaube ...

Page 37: ... Kochdünste werden über ein Abluftrohr das an den oben an der Dunstabzugshaube befindlichen Abluftstutzen angeschlossen wird ins Freie geleitet Das Abluftrohr wird hierbei nicht geliefert und soll separat angekauft werden Das Abluftrohr muß denselben Durchmesser wie der Abluftstutzen aufweisen 150mm Das Abluftrohr muß muß in waagrechter Lage leicht nach oben geneigt sein ca 10 damit die Luft ungeh...

Page 38: ...lich gewaschen werden Das kann mit einem milden Waschmittel von Hand oder in der Spülmaschine bei niedriger Temperatur und kurzspülgang erfolgen Der Metallfettfilter kann bei der Reinigung in der Spülmaschine abfärben was seine Filtermerkmale jedoch in keiner Weise beeinträchtigt Zwecks Demontage der Fettfilter den Aushakgriff ziehen Reinigung des Aktivkohlefilters Dieser Filter bindet die unangen...

Page 39: ...fe eines kleinen Schlitzschraubenziehers den Rand des Lämpchens anheben um dieses herausziehen zu können Das zu ersetzende Lämpchen entfernen und dieses mit einer Lampe mit 12V 20W MAX 30 Ø35 12V GU4 ersetzen Das Ersetzen und die Montage des neuen Lämpchens durchführen indem die beschriebenen Schritte in umgekehrter Reihenfolge ausgeführt werden ...

Page 40: ...gsanleitung dieses Handbuchs zu beachten Eine Nichtbeachtung der Vorschriften zur Reinigung der Haube sowie zur Auswechselung und Reinigung der Filter führt zu Brandgefahr Die Dunstabzugshaube nie benutzen oder sie ohne die nicht richtigen montierten Lampen lassen um einen Risiko von einem Stromschlag zu vermeiden Es wird keinerlei Haftung übernommen für Fehler Schäden oder Brände des Gerätes die ...

Reviews: