background image

2019/07/09 

Operating manual/BEAROMOS 2020/Version 1.0 


     Page 12 of 26 


4.3


Installing the sensor 

 
The  BEAROMOS  2020  sensor  is  installed  on  the  stand  of  the  object  to  be  monitored  with  a 
supporting tube. Make sure that the connection is electrically conductive. You must also make sure 
that the flange surface is flat, so that the sensor can be aligned. 
If liquid is likely to enter the sensor from the object to be monitored (e.g. oil spraying in the direction 
of the sensor shaft), a suitable splash guard must be installed (available from Schaller Automation on 
request), as ingress of liquid will cause the sensor to fail. 


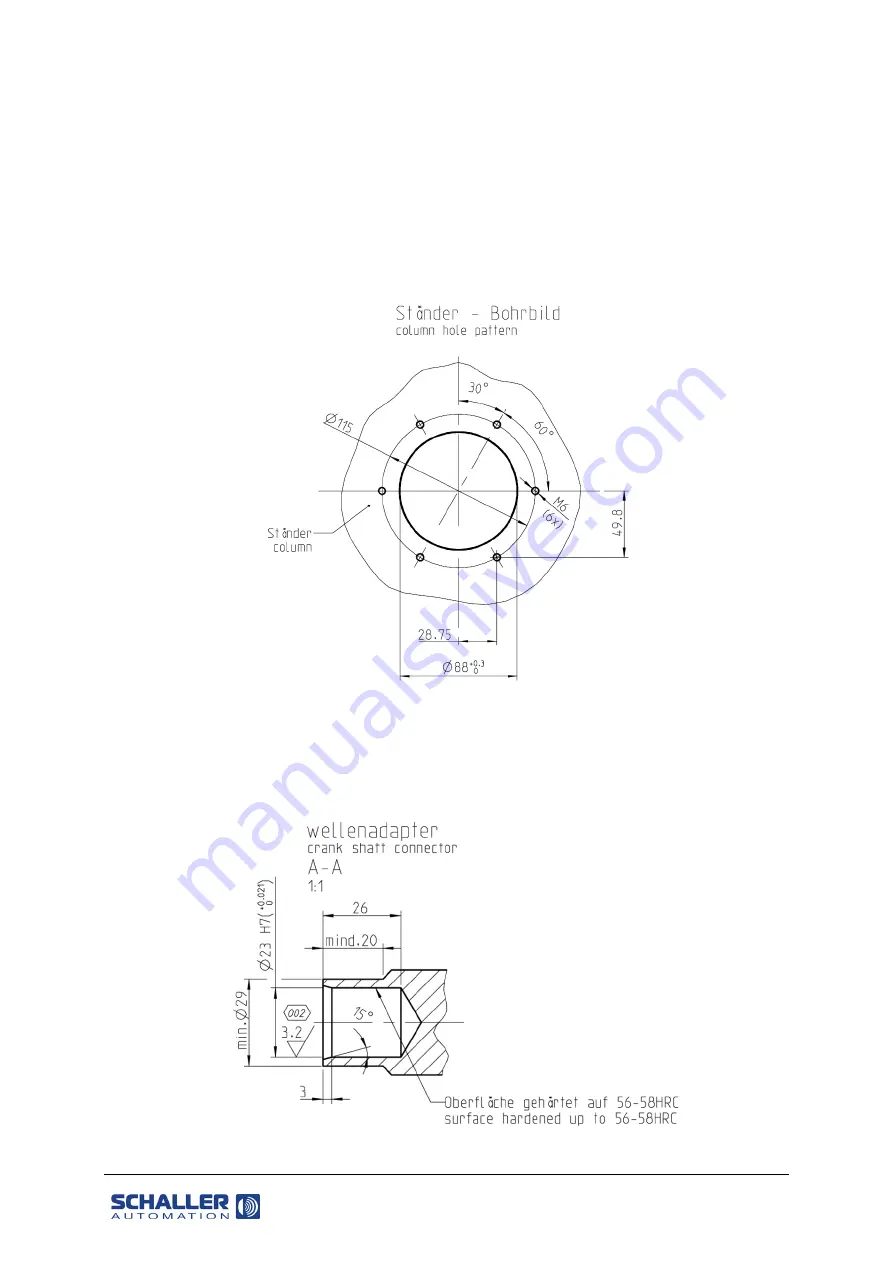
Figure 2: Stand hole pattern 

The shaft of the slide bearing is connected using a specific shaft adapter (available on request from 
Schaller  Automation),  which  is  connected  to  the  sensor  with  an  expansion  cone  connection.  Once 
again, make sure that the connection is electrically conductive. 


Figure 3: Expansion cone connection 

Summary of Contents for BEAROMOS 2020

Page 1: ...1 of 26 Schaller Automation Industrielle Automationstechnik GmbH Co KG Industriering 14 66440 Blieskastel BEAROMOS 2020 Sensor thermoelectric effect Seebeck effect for measuring electrical voltage on...

Page 2: ...y and the operator If the system is relocated the operating manual and or the operating manuals including those of suppliers must be provided at the new location In all phases of life all the informat...

Page 3: ...or 12 4 3 1 Installing the shaft adapter 13 4 3 2 Installing the BEAROMOS 2020 14 4 4 Electrical adaptation of the sensor 16 4 5 Software installation 16 4 5 1 System requirements 16 4 6 Removing the...

Page 4: ...2019 10 07 Operating manual BEAROMOS 2020 Version 1 0 Page 4 of 26 Index Index Change Date Changed by 1 0 Release 07 10 2019...

Page 5: ...ective 2014 30 EU EMC Directive EC Directive 2011 65 EU RoHS Directive Applied harmonised standards EN ISO 12100 2010 IEC 60529 Edition 2 2 IEC 60068 2 1 Edition 6 0 2 2 Edition 5 0 2 6 Edition 7 0 2...

Page 6: ...equipment The devices are built and tested in accordance with DIN EN 60947 and leave the factory in a technically safe condition In order to maintain this condition you must observe the safety instruc...

Page 7: ...act discharge 8000 V air discharge Overvoltage category I Degree of contamination 3 Test voltage input output 548 V 50 Hz EMC interference immunity EN 61000 6 3 EMC interference emission EN 60945 Comm...

Page 8: ...ensor you must make sure that it is aligned with the shaft when it is installed The safety instructions must be observed 2 2 Foreseeable misuse The sensor must not be installed removed without the cen...

Page 9: ...sons Wear protective gloves if necessary The sensor must be aligned correctly otherwise the sensor shaft may be damaged which may then damage the motor as a result The supplied centring pin must be us...

Page 10: ...damage to both the bearing and the rotating shaft which in the case of the rotating shaft means substantial downtimes repair times and therefore considerable cost As a basic principle a distinction mu...

Page 11: ...nsor communication must be set up in the PC software see 6 1 3 Parameter settings The user must follow safety rules and regulations The sensor is installed with a crankshaft adapter The device is rate...

Page 12: ...to enter the sensor from the object to be monitored e g oil spraying in the direction of the sensor shaft a suitable splash guard must be installed available from Schaller Automation on request as in...

Page 13: ...AROMOS 2020 Version 1 0 Page 13 of 26 Figure 4 Sensor setup 4 3 1 Installing the shaft adapter 1 Insert the shaft adapter and screw it to the shaft with a 36x41 spark plug spanner Figure 5 Installing...

Page 14: ...plate To help you during installation we recommend using an angle to check the alignment as well 4 Tighten the hexagon nut Figure 6 Shaft adapter alignment 4 3 2 Installing the BEAROMOS 2020 1 Before...

Page 15: ...e centring pin with a spanner size 46 5 Loosen the bolts of the centring pin press the centring pin down evenly using its set screws and remove it 6 Put the brush in place on the shaft by pulling the...

Page 16: ...r also has write permissions for the folder you choose A shortcut to the BEAROMOS Recorder is created automatically on the Windows desktop The program is started by double clicking the BEAROMOS icon F...

Page 17: ...supply voltage of the device and the mains voltage match If the sensor is correctly connected the BUS connection indicator on the software window should come on green after the supply voltage is switc...

Page 18: ...at least one of the sliding contacts is worn out and is no longer in contact with the slip ring There is a button to print the current screen for both the Main screen and the Chart screen The content...

Page 19: ...apter Save location for ring buffer log file Version number Freely editable field the same data is displayed on all tiles the content is retained across restart Schaller logo as a link button to the S...

Page 20: ...le name of the individual files has the following structure with a time stamp BEAROMOS_AV_YYYY MM DD_HH MM csv If recording is interrupted e g by closing the Recorder program a new file is created whe...

Page 21: ...rip pulse that occurs Calculating the test byte To keep the computing time as low as possible the check byte is created by bytewise XOR linking of the bytes below Start character S1 1Byte Consecutive...

Page 22: ...sensor is connected The polarity of the BUS circuit A and B wires reversed The terminating resistors of the BUS system If it is malfunctioning replace the device When you return the device for repair...

Page 23: ...f the supporting tube make sure that the carbon brushes are not damaged 6 Insert new O ring seal into supporting tube 7 Carefully place the new sensor housing on the supporting tube make sure that the...

Page 24: ...socket 153170 BEAROMOS 2020 sensor clockwise rotation without internal socket 153180 BEAROMOS 2020 anticlockwise rotation without internal socket 11 Spare parts catalogue Material Description Content...

Page 25: ...e 3 Expansion cone connection 12 Figure 4 Sensor setup 13 Figure 5 Installing the shaft adapter 13 Figure 6 Shaft adapter alignment 14 Figure 7 Alignment and installation Part 1 14 Figure 8 Alignment...

Page 26: ...Fax 1 954 794 1951 Person in charge Mrs Jurate Holm E Mail info schalleramerica com Schaller Automation Pte Ltd 114 Lavender Street 09 93 CT Hub 2 Singapore 338729 Phone 65 6643 5151 Mobile 65 9788 75...

Reviews: