


4
PVM18C Cart Assembly
Remove all items from cartons, remove packing material
and place on a level surface. The fan is mounted on the
bracket and the pump assembly is contained in the lid, so
please remove carefully.
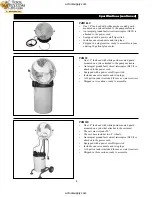
STEP 1 - ASSEMBLE CART
TOOLS REQUIRED: Two 1/2" wrenches.
1.
Remove the four bolts, washers and flange locks from
the cart base.
2.
Position the post vertically over the four holes in the
base, with the handle oriented toward the back/wheels.
3.
Insert the bolt through the washer and then through
the flange of the post and down through the hole in
the base. On the underside, put a flange lock on the
bolt just tight enough to hold it in place.
4.
Repeat until all four bolts are in. Tighten the four
flange locks on the four bolts.
STEP 2 - PLACE TANK ON CART
STEP 3 - REMOVE BOLT FROM POST
TOOLS REQUIRED: One 9/16" wrench.
Remove the bolt, lock washer and washer from the top of
the post.
STEP 4 - PLACE PUMP ASSEMBLY ON TANK
Place the pump assembly on the tank. Be sure the intake
line and filter are in the bottom of the tank. The metal
plate with the rocker switch installed should be oriented
toward the back/wheels.
STEP 5 - INSTALL FAN
Place the fan and bracket on the post with the hole in the
bracket over the hole in the top of the post. Insert the bolt
through the lock washer and washer and down through the
bracket and into the hole in the post. Tighten securely.
CONTINUE WITH SET-UP / OPERATION
INSTRUCTIONS
STEP 1
Bolt
Lock washer
STEP 5
STEP 4
STEP 3
STEP 2
Intake line
Filter
Washer
Bracket
actoolsupply.com
actoolsupply.com


