background image

SCEPTRE X42 HDTV User Manual 

- 68 - 

www.SCEPTRE.com 


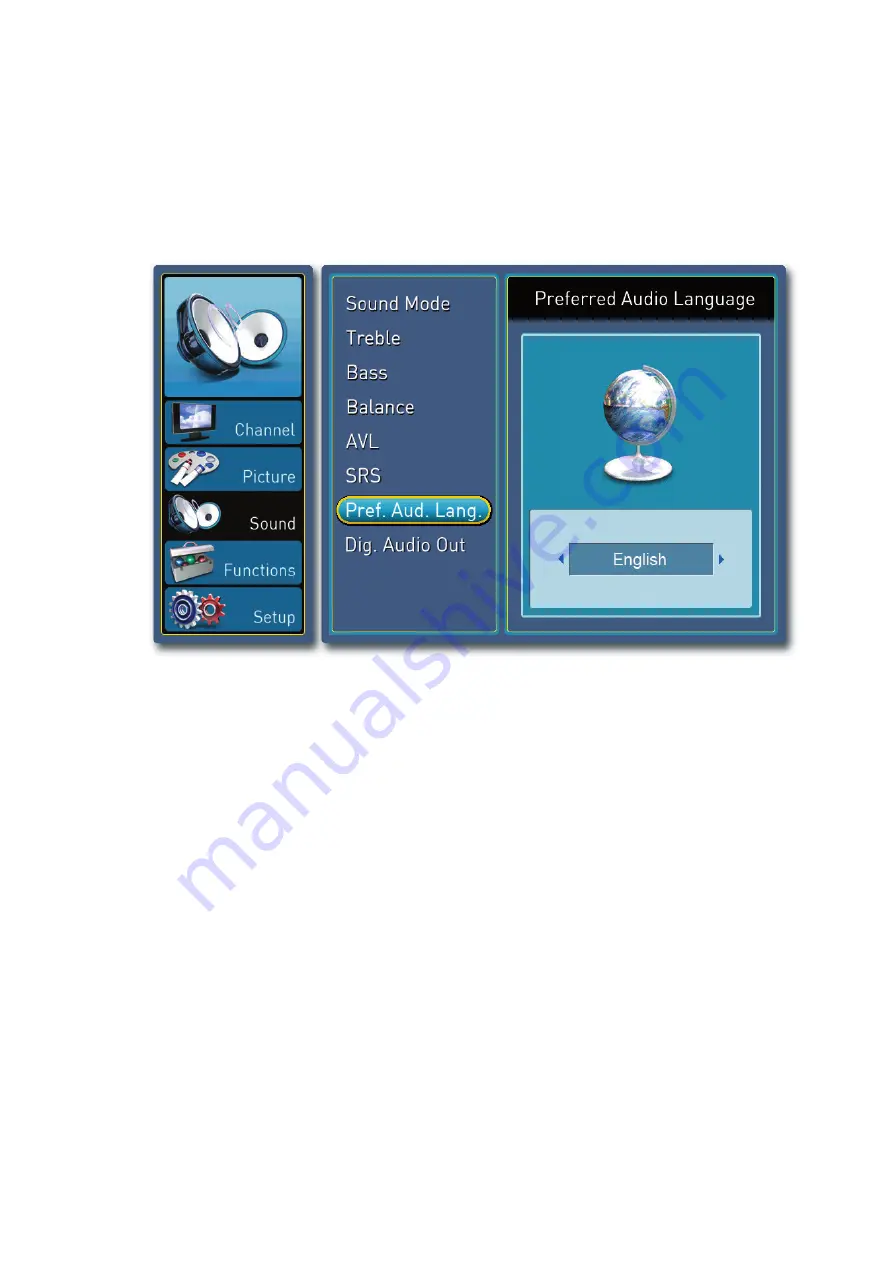
PREFERED AUDIO LANGUAGE

 – This function is for MTS (multi-channel 

television sound). It will change the spoken language of a TV program via SAP 
(secondary audio programming).  The TV station will need to support the TV 
program in different languages in order for this function to work. 


6.  Press MENU to open the OSD and highlight SOUND by pressing the ▼ 

button. 

7.  Press 

 or ► to move to the functions and highlight SOUND MODE. 

8.  Press 

▼ 

repeatedly to select AUDIO LANGUAGE. 

9.  Press 

 or ► to select the function. 

10.  Use 

◄ 

or

 ►

 to switch between the languages. 

 
Please Note :  


This function can be reset back to the default via the RECALL 
subfunction under SOUND MODE. 


This function is not always available.  It is based upon the 
support of your local TV broadcasting station’s signal.  If the TV 
station does not support MTS/SAP, you will not be able to 
receive any alternative audio language. Please check with your 
local broadcasting stations for more information. 


All manuals and user guides at all-guides.com

Summary of Contents for X42

Page 1: ...trast We hope you enjoy your new SCEPTRE X42 High Definition LCD Television For technical assistance please call 1800 788 2878 and select option 3 or email our tech support group at monitor ts sceptre...

Page 2: ...SCEPTRE X42 HDTV User Manual 2 www SCEPTRE com IMPORTANT INFORMATION All manuals and user guides at all guides com...

Page 3: ...mmended by the manufacturer or sold with the X42 LCD TV Any heat source should maintain a distance of at least 5 feet away from the X42 LCD TV i e radiator heater oven amplifier etc Do not install the...

Page 4: ...uct if any abnormality occurs If any smoke or odor becomes apparent unplug the power cord and contact your dealer immediately Do not try to repair the product yourself Avoid using dropped or damaged a...

Page 5: ...rounding of the mast and supporting structure grounding of the lead in wire to an antenna discharge unit size of the grounding conductors location of antenna discharge unit connection to grounding ele...

Page 6: ...t on a surface with the glass facing downwards unless it is on protective padding When opening the carton check that the product is in good condition and that all standard accessories and items are in...

Page 7: ...ou would like to mount the TV onto the wall please see page 7 8 and 14 for additional information Avoid installing the product in the kitchen bathroom or other places with high humidity dust or smoke...

Page 8: ...hould be 5 screws on the neck and 2 screws on the side Remove the 5 screws on the neck and the base will slide off 3 Once you have taken off the base please save it along with the 5 screws in a safe p...

Page 9: ...n 19 Bottom Section 20 Installing Batteries to the Remote 21 Which Port Should I Use 22 Knowing Your Cables 24 Switching Sources for Ports 26 Connecting Your Antenna or Cable to TV 27 If You Have Digi...

Page 10: ...play Controls 43 Via Remote Control 43 Via TV Side Panel Buttons 44 OSD On Screen Display Options 45 Channel Main Option 46 Picture Main Option 52 Function Main Option 70 Detailed Explanations 93 Info...

Page 11: ...iew INDICATOR LIGHT The light is red when power is plugged in but the TV is not turned on The light turns blue when the TV is turned on REMOTE SENSOR The remote sensor receives all the commands from t...

Page 12: ...ted with AV3 s video Please connect the video portion with either the yellow connector or the S Video connector Do NOT connect both video connectors Use the SOURCE button to select AV2 on your MAIN SO...

Page 13: ...hen the OSD is active this button acts as the enter button and confirms the menu selection MENU This button activates the On Screen Display OSD If a sub menu is active pressing this button will return...

Page 14: ...X42 HDTV User Manual 14 www SCEPTRE com RearView Mounting Pattern Mounting Specification 400mm x 200mm using screw size M6 Length of screw should not exceed 12mm All manuals and user guides at all gui...

Page 15: ...cable This port also can accept a HDCP video device for video or PC for monitor display usage Use the SOURCE button to select HDMI2 on your MAIN SOURCE to view this connection Please note when using...

Page 16: ...audio Use the SOURCE button to select YPbPr1 to view this connection 8 COMPONENT 2 lower These connection ports are for DVD players or satellite cable set top boxes that use component cables From lef...

Page 17: ...SCEPTRE X42 HDTV User Manual 17 www SCEPTRE com SCEPTRE X42 Remote Control This remote control follows SONY s universal remote code All manuals and user guides at all guides com...

Page 18: ...programming SRS This button enables the SRS surround sound making the TV speakers audio sound like they are surrounding you DNR This button enables the digital noise reduction on the TV making the pic...

Page 19: ...changes the TV between different display modes GUIDE This button turns on the electronic program guide that is received from over the airwave antenna MENU This button turns on the on screen display me...

Page 20: ...picture window ON OFF This button turns on and off the picture in picture window and the picture on picture window SOURCE This button changes the input source of the picture in picture window and the...

Page 21: ...es This may result in cracking or leakage that may pose a fire risk or lead to personal injury Inserting the batteries incorrectly may also result in cracking or leakage that may pose a fire risk or l...

Page 22: ...720p 480p 480i Antenna or Digital Cable with out the cable box Best VGA HD Capable VGA 1920x1080 scaled 1360x768 or lower PC or MAC with VGA connection Better YPBPR 1 2 HD Capable Component 1080p 1080...

Page 23: ...REO INPUT Audio 3 5mm mini jack HDCP devices PC MAC Best LINE OUT Digital Audio Optical SPDIF Receiver with Digital Surround Sound Decoding Not Available Service Port This port is for Sceptre technici...

Page 24: ...SCEPTRE X42 HDTV User Manual 24 www SCEPTRE com KnowingYour Cables Cable Name Cable Picture HDMI Coaxial RF VGA Component S Video All manuals and user guides at all guides com...

Page 25: ...TRE X42 HDTV User Manual 25 www SCEPTRE com Knowing Your Cables continued Cable Name Cable Picture Composite 3 5 mm Mini jack RCA Audio AC Power Optical SPDIF All manuals and user guides at all guides...

Page 26: ...t below will help you understand which source you switch to for each of the ports Port Picture Cable Used Source Name to Switch to HDMI or HDMI DVI HDMI 1 or HDMI 2 COAXIAL RF TV CABLE AIR VGA VGA COM...

Page 27: ...nna or TV Cable for digital cable from either your remote control s source button or source button on the right side of the TV 5 Use the On Screen Display to scan for channels Please Note Not all broa...

Page 28: ...remote control s source button or source button on the right side of the TV 6 Use the On Screen Display to scan for channels Please Note Some VCRs require you to turn it on before its output will have...

Page 29: ...either your remote control s source button or source button on the right side of the TV 5 Use the On Screen Display to scan for channels Please Note Not all broadcasts are in High Definition HD Pleas...

Page 30: ...TV and your DVD player 4 Use the remote control s source button or the source button on the right side of the TV to switch to HDMI 1 Please Note Please reference the DVD player s manual as well to mak...

Page 31: ...r connector to both your DVD player and Component 1 s white connector port off the back of your X42 LCD HDTV to the right side of your green blue red component connection 6 Connect the red color conne...

Page 32: ...white connector port off the back of your X42 LCD HDTV 4 Connect the red color connector to both your DVD player and Composite 1 s red connector port off the back of your X42 LCD HDTV 5 Turn on the X...

Page 33: ...s source button or the source button on the right side of the TV to switch to HDMI 1 Please Note Please reference the set top box s manual to make sure the set top box is configured to output correct...

Page 34: ...1 s white connector port off the back of your X42 LCD HDTV to the right side of your green blue red component connection 6 Connect the red color connector to both your set top box and Component 1 s re...

Page 35: ...t the red color connector to both your set top box and Composite 1 s red connector port off the back of your X42 LCD HDTV 5 Turn on the X42 LCD HDTV and your set top box 6 Use the remote control s sou...

Page 36: ...rt off the back of the X42 LCD HDTV 3 Turn on the X42 LCD HDTV and your receiver Please Note If you want pure digital stream for your receiver to decode you must also configure the TV s OSD Sound Digi...

Page 37: ...CA Audio cable connect it to your receiver s RCA audio analog input and the RCA Audio connection on the LINE OUT port off the back of the X42 LCD HDTV 3 Turn on the X42 LCD HDTV and your receiver Plea...

Page 38: ...ote control s source button or the source button on the right side of the TV to switch to VGA Please Note For the best picture please set your PC resolution to 1360x768 at 60 Hz Please refer to the PC...

Page 39: ...n the right side of the TV to switch to HDMI 1 Please Note Please reference the Playstation 3 s manual to make sure the PS3 is configured to output correctly to the TV PS3 by default outputs to compos...

Page 40: ...ction 6 Connect the red color connector to Component 1 s red connector port off the back of your X42 LCD HDTV to the right side of your green blue red component connection 7 Connect the gray head to y...

Page 41: ...according to the Connecting pages IfYou ve Connected Antenna or Cable to the TV If an antenna or cable is connected to your TV s ATSC NTSC port you will need to use the source button on the remote con...

Page 42: ...option and press to confirm the selection 7 Once you have made the selection the OSD will return you back to CHANNEL main options Press the button to highlight the AUTO SCAN function and press twice t...

Page 43: ...tion in the OSD This button functions as down direction in the OSD This button functions as left direction in the OSD This button functions as right direction in the OSD This button changes the channe...

Page 44: ...tton opens the OSD CH This button changes the channel to a higher number and also functions as up direction in the OSD CH This button changes the channel to a lower number and also functions as down d...

Page 45: ...sharpness and dynamic noise reduction SOUND This main option has functions for changing sound settings for all ports such as digital audio out treble bass etc FUNCTION This main option has functions...

Page 46: ...accepting 1 Press MENU to open the OSD and highlight CHANNEL 2 Press or to move to the functions and highlight TUNER MODE 3 Once in TUNER MODE press again to select either AIR or CABLE 4 Use or to se...

Page 47: ...ess to select AUTO SCAN 4 Press twice to enter and begin scanning for channels Please Note Not all broadcasts are in High Definition HD Please refer to your local broadcasting stations for more inform...

Page 48: ...orites the TV s scanned in channels 1 Press MENU to open the OSD and highlight CHANNEL 2 Press or to move to the functions and highlight TUNER MODE 3 Once in TUNER MODE press repeatedly to select CHAN...

Page 49: ...el until you go back into channel edit and add the back ii Press the MENU button to save and exit b You can add the channel to your favorite list by adding a in the FAV column i Match the channel you...

Page 50: ...highlight CHANNEL 2 Press or to move to the functions and highlight TUNER MODE 3 Once in TUNER MODE press repeatedly to select SIGNAL STRENGTH Please Note This function is only available if you are on...

Page 51: ...open the OSD and highlight CHANNEL 2 Press or to move to the functions and highlight TUNER MODE 3 Once in TUNER MODE press repeatedly to select EXTERNAL INPUT 4 Press to select the function and use o...

Page 52: ...ctions and highlight PICTURE MODE 3 Press or to select PICTURE MODE function 4 Use or to select which picture mode you want 5 Press to confirm your selection Please Note CUSTOM allows you to adjust al...

Page 53: ...to move to the functions and highlight PICTURE MODE 3 Press repeatedly to select BACKLIGHT CONTROL function and press 4 Use or to adjust the backlight level Please Note The backlight level does not a...

Page 54: ...and highlight PICTURE MODE 3 Press to select BRIGHTNESS function and press 4 Use or to adjust the brightness level Please Note This function can be reset back to default via the RECALL subfunction und...

Page 55: ...highlight PICTURE MODE 3 Press repeatedly to select CONTRAST function and press 4 Use or to adjust the contrast level Please Note This function can be reset back to default via the RECALL subfunction...

Page 56: ...ight PICTURE by pressing the button 2 Press or to move to the functions and highlight PICTURE MODE 3 Press repeatedly to select SATURATION function and press 4 Use or to adjust the saturation level Pl...

Page 57: ...ther 1 Press MENU to open the OSD and highlight PICTURE by pressing the button 2 Press or to move to the functions and highlight PICTURE MODE 3 Press repeatedly to select TINT function and press 4 Use...

Page 58: ...tions and highlight PICTURE MODE 3 Press repeatedly to select SHARPNESS function and press 4 Use or to adjust the sharpness level Please Note This function can be reset back to the default via the REC...

Page 59: ...tions and highlight PICTURE MODE 3 Press repeatedly to select COLOR TEMP function and press 4 Use or to adjust the color temperature level 5 Press to finalize your selection Please Note This function...

Page 60: ...4 Use or to turn the DNR digital noise reduction on or off Digital Noise Reduction blends adjacent pixels together so that pictures do not look blocky but because of the blurring the picture would lo...

Page 61: ...CCS Cross Color Supression This subfunction filters and corrects video signals that are corrupted from old VHS DVD analog cable or antennas therefore making the picture s colors and lines more accura...

Page 62: ...ions and highlight SOUND MODE 3 Press or to select SOUND MODE function 4 Use or to select which sound mode you want 5 Press to confirm you selection Please Note This function can be reset back to the...

Page 63: ...highlight SOUND by pressing the button 2 Press or to move to the functions and highlight SOUND MODE 3 Press repeatedly to select TREBLE 4 Press or to select the function 5 Use or to adjust the level P...

Page 64: ...highlight SOUND by pressing the button 2 Press or to move to the functions and highlight SOUND MODE 3 Press repeatedly to select BASS 4 Press or to select the function 5 Use or to adjust the level Ple...

Page 65: ...highlight SOUND by pressing the button 2 Press or to move to the functions and highlight SOUND MODE 3 Press repeatedly to select BALANCE 4 Press or to select the function 5 Use or to adjust the level...

Page 66: ...e OSD and highlight SOUND by pressing the button 2 Press or to move to the functions and highlight SOUND MODE 3 Press repeatedly to select AVL 4 Press or to select the function 5 Use or to enable or d...

Page 67: ...open the OSD and highlight SOUND by pressing the button 2 Press or to move to the functions and highlight SOUND MODE 3 Press repeatedly to select SRS 4 Press or to select the function 5 Use or to on o...

Page 68: ...move to the functions and highlight SOUND MODE 8 Press repeatedly to select AUDIO LANGUAGE 9 Press or to select the function 10 Use or to switch between the languages Please Note This function can be...

Page 69: ...to select the function 5 Use or to select between the two options PCM and BITSTREAM Please Note PCM BIT STREAM are two formats of digital sound If you have a digital home theater system you should us...

Page 70: ...closed captioning support options To use this option you will need to enter in the password first The password is 0000 AUTO LOCK This function helps parents filter TV programming by either locking cha...

Page 71: ...to select the function d Use or to select SET BLOCKING e Enter 0000 as the default password f Press to select the function g Use or to choose the option you want and press to select Please Note Turnin...

Page 72: ...k by using or buttons g Lock or unlock the channel by pressing the button i If a channel is locked it would have the symbol ii If a channel is unlocked it would have the symbol Please Note You can als...

Page 73: ...block movies by selecting the ratings under MPAA and TV shows under TV Parental Guidelines i Use to move to the ratings you want to block ii Press to block or unblock If a rating is locked it would h...

Page 74: ...Press to select the function d Press until you see DTV RATING and use to select it e Press again to begin scanning for DTV ratings Please Note This type of ratings for children watching TV will not a...

Page 75: ...the functions and highlight AUTO LOCK c Press to select the function d Press until you see SETUP CODE and use to select it e Input 0000 as your password and input your new password Please Note There i...

Page 76: ...apply to TV captioning inside US 7 TT refers to text boxes that display the TV channel s extra information Please Note Analog and digital closed captioning will automatically switch for you when you...

Page 77: ...ress until you see CAPTION OPTION and use to select it 4 Use or to select the option you want 5 DEFAULTS locks up the functions CC BACKGROUND and CAPTION TEXT 6 OPTIONS unlocks the functions CC BACKGR...

Page 78: ...Use to select the option you want 5 The normal closed captioning defaults to a solid black background with white color text 6 COLOR adjusts the background color 7 OPACITY adjusts how transparent or s...

Page 79: ...font style of the text 8 TEXT COLOR changes the font color of the text 9 TEXT OPACITY changes the caption text from transparent to solid 10 EDGE STYLE enhances a caption text s visibility by adding a...

Page 80: ...r current digital channel s programming and the entire day s program list 1 Press MENU to open the OSD and highlight FUNCTION by pressing the button 2 Press or to select the functions and highlight AU...

Page 81: ...ill now be reserved for viewing When the time comes the TV will prompt you 30 seconds ahead for switching to that channel If you choose YES the TV will switch to the channel for you if you choose NO t...

Page 82: ...highlight FUNCTION by pressing the button 2 Press or to select the functions and highlight AUTO LOCK 3 Press until you see RESERV LIST and use twice to select it Please Note The reserve list only wor...

Page 83: ...ct the functions and highlight DATE TIME 3 Press to select the function 4 Press to select SETTING 5 Use to select the options 6 MANUAL allows you to choose your own time and date 7 AUTO makes the TV r...

Page 84: ...and press 4 Use to select the options 5 You choose the time date and channel 6 After you have finished setting up the time date and channel please choose if you want this option to turn on the TV dail...

Page 85: ...ing the button 2 Press or to select the functions and highlight DATE TIME 3 Press repeatedly until you select POWER OFF TIME and press 4 Use to select the options 5 You choose the time and date 6 Afte...

Page 86: ...highlight SETUP by pressing the button 2 Press or to select the functions and highlight DATE TIME 3 Press repeatedly until you select SLEEP and press 4 Use or to select how many minutes you want the...

Page 87: ...highlight SETUP by pressing the button 2 Press or to select the functions and highlight DATE TIME 3 Press repeatedly until you select MENU LANGUAGE and press 4 Use or to select language you want the T...

Page 88: ...olid 1 Press MENU to open the OSD and highlight SETUP by pressing the button 2 Press or to select the functions and highlight DATE TIME 3 Press repeatedly until you select MENU OPACITY and press 4 Use...

Page 89: ...ress or to select the functions and highlight DATE TIME 3 Press repeatedly until you select EMERGENCY ALERT and press 4 Use to select if you want to display medium or low emergency alerts in your loca...

Page 90: ...ect the subfunction you want and press 5 AUTO ADJUST is a typical LCD monitor s auto adjust function It syncs to the signal of the VGA card and auto adjusts the clock and phase of the signal so your p...

Page 91: ...LCD HDTV s best PC resolution is 1360x768 at 60hz Always try to use AUTO ADJUST over manual adjustments The VGA port of the TV features a power saving mode which will automatically turn off the TV if...

Page 92: ...Press MENU to open the OSD and highlight SETUP by pressing the button 2 Press or to select the functions and highlight DATE TIME 3 Press repeatedly until you select MENU TIMEOUT and press 4 Use or to...

Page 93: ...shows TV programming info on the top portion of your TV This function is only available when you use the ATSC NTSC tuner port The info banner s left side shows you typical programming information such...

Page 94: ...gular TV mode stereo sound closed captioning and digital surround sound HD or SD If highlighted this symbol shows you whether the channel you are watching is in HD High Definition or Standard Definiti...

Page 95: ...TS button on the remote control Please Note This function is always active under analog stations whether the station supports this function or not CC If highlighted this symbol tells you that this cha...

Page 96: ...ect Ratio Explained The TV will display the TV channel s signal format automatically There are mainly two types of signal format 16 9 and 4 3 1 16 9 This mode will stretch the picture to a widescreen...

Page 97: ...ded to the left and right of the display image This aspect keeps that aspect ratio and shows you the black bars on the side 3 Zoom 1 When watching a 4 3 aspect ratio TV or movie this mode zooms in to...

Page 98: ...s by using 16 9 aspect but the entire picture will be distorted horizontally This mode will only distort the two sides of the TV where the black bars used to be but in the center the picture will stil...

Page 99: ...box such as a satellite set top box or cable box With the external box plugged into the TV and also an antenna plugged into the TV tuner you can get your local stations via the source TV and your cabl...

Page 100: ...E Press this button to switch the size of the PIP window AUDIO SWAP yellow Press this button to interchange the audio between the PIP PBP and the main picture VIDEO SWAP yellow Press this button to re...

Page 101: ...els Favorite Channels is a TV Cable Air feature where you can use the remote to add your most browsed channels into a list and then browse just that list of channels with the FAVORITE buttons Browses...

Page 102: ...also at the election of the service provider It is a more flexible system than the original Closed Caption system because it allows a variety of caption sizes and font styles Not all programs and VHS...

Page 103: ...mes and elements in this program may include mild fantasy violence or comedic violence or may frighten children under the age of 7 Therefore parents may want to consider the suitability of this progra...

Page 104: ...erefore may be unsuitable for children under 17 This program contains one or more of the following graphic violence V explicit sexual activity S or crude indecent language L TV program description FV...

Page 105: ...1080 interlaced lines 1080i and digital surround sound HDTV provides 900 000 2 1 million pixels Interlace Scan A way to scan vertical lines onto a TV picture by scanning all the odd lines first then f...

Page 106: ...tion strengthens human skin color in a picture Blue Stretch This function strengthens anything blue in a picture Ie The sky will be bluer the water will be bluer How do I clean the TV IMPORTANT 1 The...

Page 107: ...the display with a dry micro fiber cloth or 100 cotton cloth afterwards Trouble Shooting The following table contains the common problems and the solutions to these problems Please check this list be...

Page 108: ...bout signal strength of your local cable Please adjust your picture setup and make sure the saturation and the RGB are not turned all the way down NO COLOR The TV s tuner signal must not be lower than...

Page 109: ...or a TV digital channel make sure you use the ASPECT button to switch to 16 9 WIDE format If you are using VGA use the AUTO ADJUST function to adjust to the screen Please Note If you are using 1360x76...

Page 110: ...D HDTV has the capability of expanding this content so the entire screen is filled at the expense of the image proportion To use this function press the aspect button on the remote control and cycle a...

Page 111: ...riod please contact our support department at the number below For technical help contact our Sceptre Technical Support Group via email or phone Please have your Sceptre p n number serial number and d...

Page 112: ...Time 6ms gray to gray Viewing Angle Typical 178 Degree Horizontal Vertical Lamp Life of Backlight 50 000hrs TV DISPLAY Dimension 40 W x25 H x4 D inch w o Base 40 W x x27 5 16 H x9 D inch with Base Wei...

Page 113: ...ch Recall Auto Volume Level AVL Yes Tone Bass Treble Balance Loudness Yes Surround SRS TrueSurround XT SPDIF Out Yes optical Speakers 10 watt per channel 3 General Hybrid TV Tuner NTSC ATSC QAM Digita...

Page 114: ...uner NTSC ATSC AV1 AV2 AV3 S Video Audio Shared with AV2 YPbPr1 YPbPr2 HDMI1 HDCP optional HDMI2 HDCP optional VGA Stereo In Video Out Audio Out SPDIF out The product s specifications may change witho...

Page 115: ...our Customer Support at 800 788 2878 The determination of service will be made by SCEPTRE Customer Support PLEASE DO NOT RETURN YOUR UNIT TO SCEPTRE WITHOUT PRIOR AUTHORIZATION Parts New or remanufact...

Page 116: ...AN IMPLIED WARRANTY LASTS OR THE EXCLUSION OR LIMITATION OF INCIDENTAL OR CONSEQUENTIAL DAMAGES SO THE ABOVE LIMITATIONS OR EXCLUSIONS MAY NOT APPLY TO YOU This warranty gives you specific legal right...

Page 117: ...you ask for warranty service read your User Manual You might avoid a service call Warranty conditions are subject to change for latest Warranty Terms and Conditions and additional information regardi...

Page 118: ...CDi Cinema is a trademark or registered trademark of Faroudja Laboratories Inc SCEPTRE is a trademark or registered trademark of Sceptre Group Disclaimer Copyright Information Sceptre Inc shall not be...

Page 119: ...icular installation If this equipment does cause harmful interference to radio or television reception which can be determined by turning the equipment off and on the user is encouraged to try to corr...

Reviews: