background image

3

S1200 QUICK ST

S1200 QUICK ST

S1200 QUICK ST

S1200 QUICK ST

S1200 QUICK START

ART

ART

ART

ART

Start Scanning:

Start Scanning:

Start Scanning:

Start Scanning:

Start Scanning:

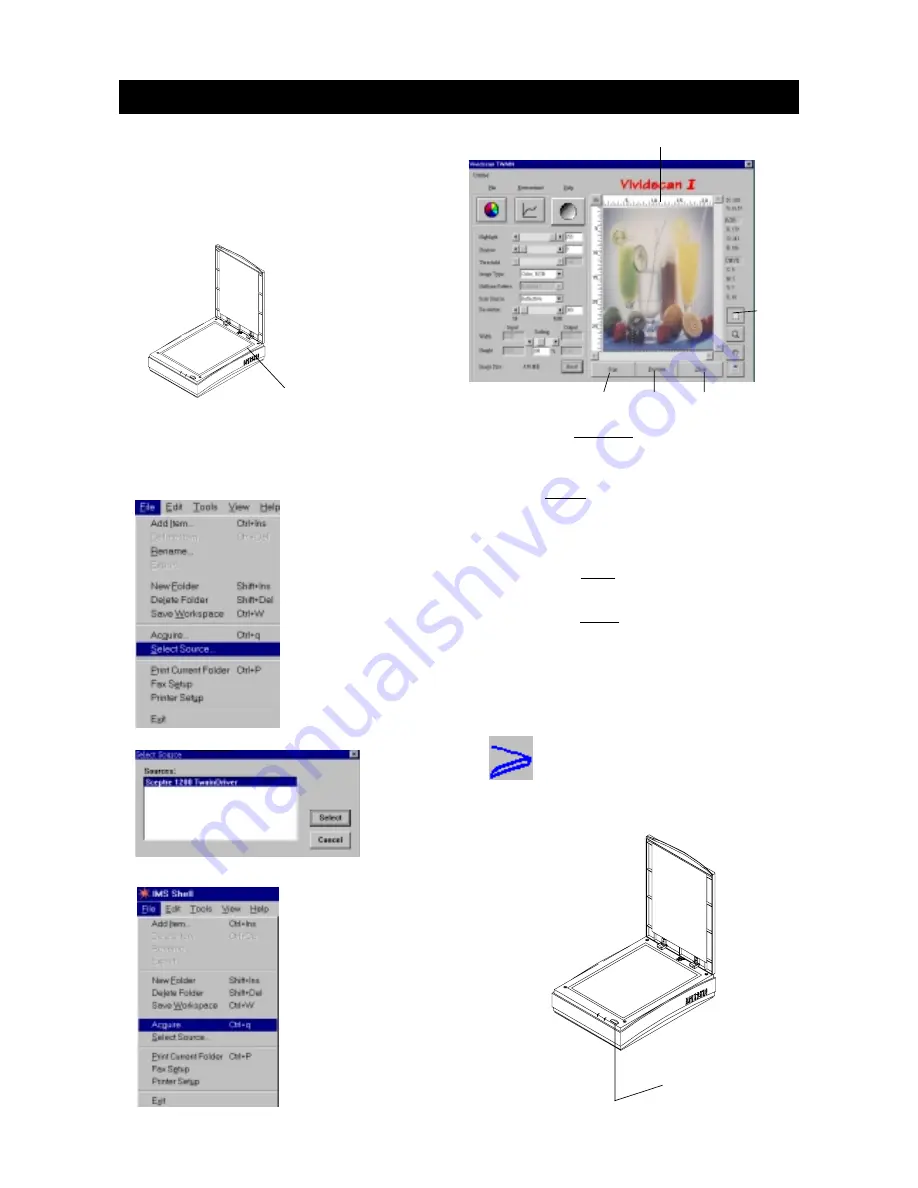
1. Turn on your scanner.

2. Turn on your PC.

3. Place the original face down on the scanner.

Center the original along the zero mark.

4. Close the Upper Cover.

5. Launch IMS Shell Application.

6. Select Source.

7. Acquire the Vividscan TWAIN control panel.

8. Click on the Preview 

Preview 

Preview 

Preview 

Preview button.

 A low-resolution

image will appear in the Preview Window.

9. Click on Select

Select

Select

Select

Select and move the cursor to the Pre-

view Window. Make a selection by holding down

the left mouse key and drag.

10. Click on the Scan

Scan

Scan

Scan

Scan button .

11. Click on the Close

Close

Close

Close

Close button.

"Start" button:

"Start" button:

"Start" button:

"Start" button:

"Start" button:

Click on Select

Select

Select

Select

Select to confirm.

Zero Mark

Preview

Scan

Close

Preview Window

Select

"Start" button

This icon on the Taskbar indicates the
scanner is working properly.

This is the One-Touch-Button that allows you to

open the IMS Shell application and Vividscan

simultaneously.

Summary of Contents for S1200

Page 1: ...tallation IMS Shell Installation IMS Shell Installation Insert the IMS Shell CD and follow the on screen Instructions to completely install IMS Shell 1 I n s e r t t h e I n s t a l l a t i o n D i s k e t t e i n A 2 Run A install and follow the on scree i n s t r u c t i o n s Color Scanner SCSI card SCSI cable Power cable IMS Shell CD Installation diskette EZ Installation Guide User Guide Scann...

Page 2: ...T 1 Login as Adminstrator 2 Insert Vividscan Installation Disk in A 3 Click on Start Setting Control Panel SCSI Adapters 4 Click on Drivers Add Have Disk A winnt40 5 Click on OK OK Yes to restart the NT system 4 Click on Have Disk A OK 5 Click Next Next Finish 3 Select SCSI controllers then click on Next to continue 1 Clcik on Start Settings Control Panel 2 Click on Add New Hardware Next No I want...

Page 3: ... low resolution image will appear in the Preview Window 9 Click on Select Select Select Select Select and move the cursor to the Pre view Window Make a selection by holding down the left mouse key and drag 10 Click on the Scan Scan Scan Scan Scan b u t t o n 11 Click on the Close Close Close Close Close button Start button Start button Start button Start button Start button Click on Select Select ...

Page 4: ...canner If you get a Scanner Not Found message If you get a Scanner Not Found message If you get a Scanner Not Found message If you get a Scanner Not Found message If you get a Scanner Not Found message 1 Check the Sequence First turn on the scan ner then turn on your PC 2 Check the SCSI Card Make sure the SCSI card is installed correctly in Device Manager 3 Check the SCSI Cable Reconnect the cable...

Reviews: