background image

11

 - 

www.SCEPTRE.com 

SCEPTRE E230BD-FHD HDTV User Manual 


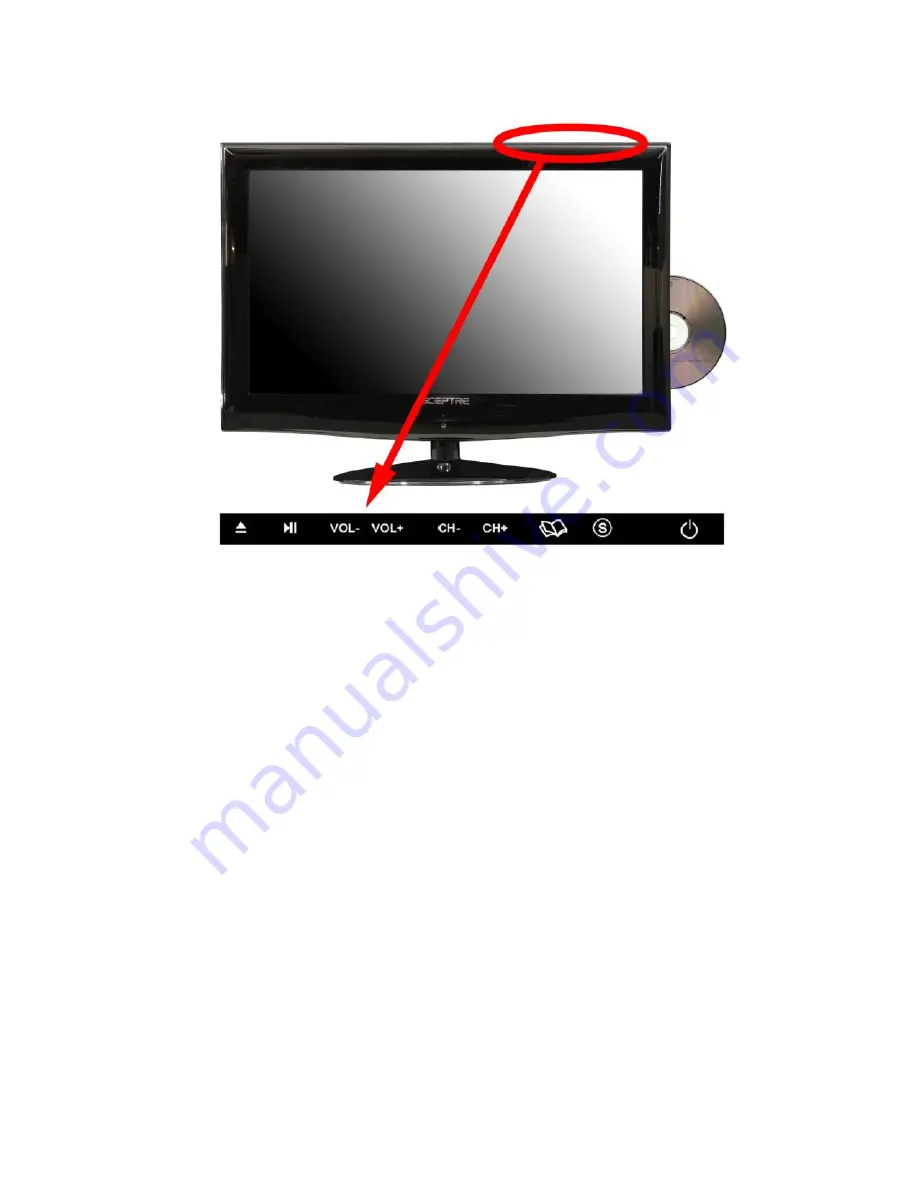
Top side Control Buttons 


The following are button descriptions from right to left.


1. 

POWER


– Turn on the TV by pressing the button once.  Press the button again to 

turn off the TV. 

2. 

SOURCE


– This button switches between all the different sources of the TV.  

When the OSD is active, this button acts as the enter button and confirms the 
menu selection. 

3. 

MENU


– This button activates the On Screen Display (OSD).  If a sub-menu is 

active, pressing this button will exit the OSD. 

4. 

CH(+)


– This button changes the TV channel up.  If the OSD is active, this button 

functions as up for the menu. 

5. 

CH(-)


– This button changes the TV channel down.  If the OSD is active, this 

button functions as down for the menu. 

6. 

VOL(+)


– This button increases the TV’s volume.  If a sub-menu is active, pressing 

this button will move the select right. 

7. 

VOL(-)


– This button decreases the TV’s volume.  If a sub-menu is active, pressing 

this button will move the selection left. 

8. 

PLAY/PAUSE 

– Press this button to play or pause the DVD program you’re 

watching. 

9. 

EJECT


– Press this button to open or close the DVD player. 


Please Note: 


For the EJECT and PLAY/PAUSE button to work you must be under the 
source DVD.  The buttons will not work under other sources.

Summary of Contents for E230BD-FHD

Page 1: ...ou enjoy your new SCEPTRE HDTV For technical assistance please call 1800 788 2878 and select option 3 or email our tech support group at monitor ts sceptre com For all other inquiries please call 1800...

Page 2: ...2 www SCEPTRE com SCEPTRE E230BD FHD HDTV User Manual IMPORTANT INFORMATION...

Page 3: ...at 9 Do not defeat the safety purpose of the polarized or grounding type plug A polarized plug has two blades with one wider than the other A grounding type plug has two blades and a third grounding p...

Page 4: ...d maintain a distance of at least 5 feet away from the TV i e radiator heater oven amplifier etc Do not install the product too close to anything that produces smoke or moisture Operating the product...

Page 5: ...y smoke or odor becomes apparent unplug the power cord and contact your dealer immediately Do not try to repair the product yourself Avoid using dropped or damaged appliances If the product is dropped...

Page 6: ...ation with regard to proper grounding of the mast and supporting structure grounding of the lead in wire to an antenna discharge unit size of the grounding conductors location of antenna discharge uni...

Page 7: ...apter x 1 Warranty x 1 TV Remote Control AAA Batteries included x 1 Installation Please read the user manual carefully before performing the installation The power consumption of the display is approx...

Page 8: ...Removing the Stand 1 To attach the base align the base and the TV Place the TV s neck on the base shown below Lock the screws as the picture shown Afterwards the TV is ready for use 2 To remove the st...

Page 9: ...ii with Composite 18 Connecting Cable or Satellite boxes with HDMI 19 Connecting to a PC with VGA and 3 5 mm minijack 20 Connecting a Digital Audio Receiver with Coax SPDIF 21 Switching Sources 22 Rea...

Page 10: ...ght take 10 12 seconds to power on REMOTE SENSOR The remote sensor receives all the commands from the remote control Rear View Mounting Pattern Mounting Specification 100mm x 100mm using screw size M4...

Page 11: ...H This button changes the TV channel up If the OSD is active this button functions as up for the menu 5 CH This button changes the TV channel down If the OSD is active this button functions as down fo...

Page 12: ...your audio cable to the VGA Stereo input if you want sound out of VGA video source 6 Audio In This connection port is for people who want to provide audio to the TV when using a PC or a DVI video dev...

Page 13: ...a power saving function which will turn off the TV automatically after 5 minutes of idling on a connection with no signal This feature is present on all connection Installing Batteries to the Remote C...

Page 14: ...14 www SCEPTRE com SCEPTRE E230BD FHD HDTV User Manual SCEPTRE TV Remote Control...

Page 15: ...TV menu on the screen 14 VOL VOL Press the VOL buttons to increase or decrease the sound level 15 ASPECT Selects different viewing modes of the TV 16 FREEZE Press this button to freeze the picture on...

Page 16: ...l cable to the TV port on the back of your HDTV 3 Turn on the HDTV 4 Follow the first time on screen instructions Please Note Not all broadcasts are in High Definition HD Please refer to your local br...

Page 17: ...r connector to both your Blu ray DVD player and YPbPr s white connector port on the back of your HDTV 6 Connect the red color connector to both your Blu ray DVD player and YPbPr s red connector port o...

Page 18: ...ctor to both your Wii and AV s white connector port on the back side of your HDTV 4 Connect the red color connector to both your Wii and AV s red connector port on the back side of your HDTV 5 Turn on...

Page 19: ...the other end to the HDMI port on the back of your HDTV 3 Turn on the HDTV and your set top box 4 Use the remote control s source button or the source button on the TV to switch to HDMI Please Note P...

Page 20: ...or the source button on the TV to switch to VGA 6 Change your PC resolution to 1920x1080 at 60hz refresh rate 7 Press MENU to use the OSD s SETUP option 8 Under the SETUP option select PC function 9 U...

Page 21: ...Note If you want pure digital stream for your receiver to decode you must also configure the TV s OSD Sound Digital Audio Out function Make sure the option is on 5 1CH If your receiver is making stati...

Page 22: ...al Switching Sources 1 Press the S button on side of the HDTV or the SOURCE button on the remote control and you will see the picture above 2 Use buttons to select the source you want to switch to and...

Page 23: ...also your AV devices Make sure they are all connected securely 3 Turn on your HDTV and other AV devices if necessary 4 Select the correct source according to the Connecting pages If You ve Connected...

Page 24: ...and press ENTER to scan for channels 5 Once the scanning finishes you can begin to watch HDTV Please Note Not all broadcasts are in High Definition HD Please refer to your local broadcasting stations...

Page 25: ...as left direction in the OSD This button functions as right direction in the OSD ENTER This button changes the channel in conjunction with the number pad and also functions as ENTER for selecting opti...

Page 26: ...ing channels specific range scans audio language tuner mode etc PARENTAL This main option has functions for only composite and TV port The purpose of this option is to block TV inappropriate for child...

Page 27: ...INGS i PICTURE MODE This feature changes various color modes for the TV ii BRIGHTNESS This feature changes the picture s detail in dark colors iii CONTRAST This feature changes the difference between...

Page 28: ...ly from the computer This feature can only be used when a computer with HDMI cord is connected to the TV III PC SETTINGS i AUTO ADJUST This feature automatically adjusts the picture syncing in with th...

Page 29: ...ing ii FILM MODE This feature is 24p that syncs with DVD movies and should be enabled when viewing DVD video to allow smoother frame rate iii NOISE REDUCTION This feature reduces general pixilation by...

Page 30: ...or to select SOUND and press ENTER 3 Use or to select the one you want to adjust and or or ENTER to adjust them I SOUND SETTINGS i SOUND MODE This feature switches between preset settings presets incl...

Page 31: ...log channels IV DIGITAL SOUND This feature adjusts the digital second audio programming in digital channels V OTHER SETTINGS i AVL This feature adjusts the auto volume leveler enabling volume protecti...

Page 32: ...ons 1 Press MENU to open the OSD 2 Press or to select CHANNEL and press ENTER 3 Use or to select the one you want to adjust and or or ENTER to adjust them I CHANNEL LIST This feature gives you the lis...

Page 33: ...ame of the channel iv FAVORITE CHANNEL This feature tells you if you have the current channel in your favorite list IV SIGNAL TYPE This feature allows you to switch between air such as using antenna a...

Page 34: ...ocks shows based on TV ratings ii CANADA V CHIP a ENGLISH RATING This blocks English TV shows in Canada b FRENCH RATING This blocks French TV shows in Canada iii BLOCK UNRATED SHOW This blocks TV show...

Page 35: ...AY This turns on or off the closed captioning ii ANALOG CAPTION TYPE This chooses the subchannel that supplies the closed captioning For United States usually the setting is CC1 TEXT1 4 displays adver...

Page 36: ...k You must have antenna to use this feature iii SETUP TIME This feature manually lets you adjust the time and date iv DAY OF THE WEEK This feature tells you the day of the week Please Note Closed capt...

Page 37: ...ust and or or ENTER to adjust them I BLUE BACK This feature gives the TV a blue default background when there is no signal II NO SIGNAL POWER OFF This feature turns the TV off if there is no signal gi...

Page 38: ...ures or play MP3 files To use this feature connect a USB flash drive to the USB port of the TV and press the USB button to start browsing for music and pictures Browsing In the USB function for browsi...

Page 39: ...the remote control to control the MP3 playing options Technical Limitation 1 The USB port does not support USB hubs 2 The USB flash drive supports FAT32 and FAT16 file system only 3 The biggest file s...

Page 40: ...e g weather or news These services are also superimposed over the program currently being viewed Closed Captioning for this TV only works under sources TV and VIDEO Rating Explained General Operation...

Page 41: ...to exercise greater care in monitoring this program and are cautioned against letting children under the age of 14 watches unattended This program contains one or more of the following intense violen...

Page 42: ...he multiple modes 1 FULL This mode will stretch the picture to a widescreen ratio If you have a perfect 16 9 ratio picture you will not see any black bars If you are watching a widescreen movie in 1 8...

Page 43: ...watching a 4 3 aspect ratio TV or movie there will be black bars on the side you can remove this by using 16 9 aspect but the entire picture will be distorted horizontally This mode will only distort...

Page 44: ...d in channels that you always want to watch TO ADD DELETE TO THE FAVORITE LIST 1 Go to the channel you want to add or delete 2 Press the ADD DEL button to add or delete the channel from the list BROWS...

Page 45: ...heat and never leave it in a parked car exposed to direct sunlight Cleaning Discs Fingerprints and dust on the disc can cause poor picture quality and sound distortion Before playing clean the disc wi...

Page 46: ...ou must be under the DVD source Otherwise the DVD drive will not work To be under source DVD either press the DVD button or press the SOURCE button then select DVD 2 With the TV turned on and the DVD...

Page 47: ...47 www SCEPTRE com SCEPTRE E230BD FHD HDTV User Manual 3 The DVD control buttons are show in the picture below...

Page 48: ...sets parental rating lock on DVD discs 6 POWER RESUME This option lets users resume their movies from where they last left off 7 DEFAULT This option restores settings to default options 2 Language Se...

Page 49: ...3 Audio Setup Menu a Press the D SETUP button and then press the to display the audio setup menu page when you are in DVD mode b Press the button to select options in the menu c Press the button to en...

Page 50: ...enu c Press the button to enter menus or options and use the button to select suboptions d Press the ENTER button to confirm e Press the D SETUP to exit the DVD setup menu 1 DYNAMIC RANGE This is an o...

Page 51: ...it will cause malfunction and possible permanent damage to the panel which will not be covered under the warranty with clean water and wipe again Wipe the display with a dry micro fiber cloth or 100 c...

Page 52: ...e buttons and the power button randomly for a good 2 seconds and then reinstall the batteries Try the remote to see if it works For battery removal instructions refer to page 13 The TV s remote sensor...

Page 53: ...liances cars motorcycles or fluorescent lights If the TV is close to the wall try moving the TV to another room in your house to see if the problem still occurs PICTURE DOES NOT COVER THE ENTIRE SCREE...

Page 54: ...on To use this function press the aspect button on the remote control and cycle among the available options I CANNOT FIND THE VOLUME AND CHANNEL CHANGING BUTTONS The buttons are represented by the but...

Page 55: ...rranty services or repairs after the warranty period please contact our support department at the number below For technical help contact our Sceptre Technical Support Group via email or phone Please...

Page 56: ...o gray ViewingAngle Typical 170 160 Degree Horizontal Vertical LampLifeofBacklight 20 000hrs TV DISPLAY Dimension 23 1 x 9 84 x 17 2 with stand 23 1 x 1 89 x 15 27 without stand Weight 9 92 lbs Power...

Page 57: ...annel V chip Closed caption CC1 CC4 Text 1 Text 4 ATSC Sound Mono Stereo SAP Favorite Channel V chip Video input format 1080i 720p 480p 480i Analog closed caption CC1 CC4 Text 1 Text 4 Digital closed...

Page 58: ...parts will be used for repairs by SCEPTRE at its designated Service Center for one 1 year or ninety 90 days for commercial use from the effective warranty date Such replacement parts are warranted for...

Page 59: ...e no one is authorized to extend or modify it or to grant any other warranty SCEPTRE retains the right to assess all warranty claims and to determine if damages are covered by the warranty In case of...

Page 60: ...k or trademark of Nintendo of America Inc in the United States and other countries SCEPTRE is a trademark or registered trademark of Sceptre Inc Sceptre Inc shall not be liable for technical or editor...

Page 61: ...ce will not occur in a particular installation If this equipment does cause harmful interference to radio or television reception which can be determined by turning the equipment off and on the user i...

Reviews: