background image

Chapter 2 

— 8 — 

The On-Screen Display (OSD) 

The monitor features an intuitive, on-screen display (OSD), making changes to the 
display settings convenient and simple.  You can access the OSD any time your PC 
is powered 

On

.  If the PC is in 

Standby

 mode, or is powered 

Off

, the OSD cannot 

be accessed.  

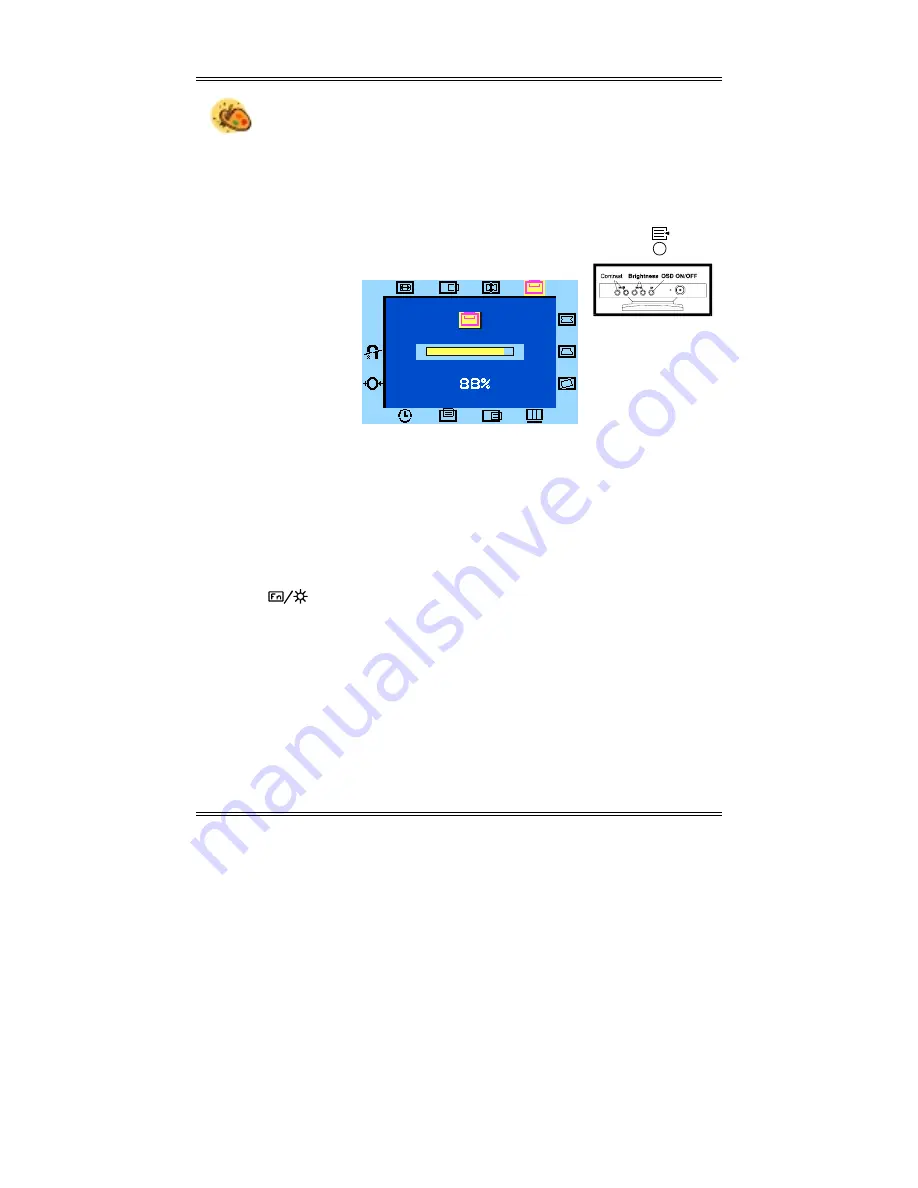
To access the OSD Main Menu, push theOSD ON/OFF control button (    ) 
The following screen will appear: 


This screen shows the 

V-Center

 window allowing you to make adjustments to the 

display’s vertical position.  Notice the 

V-Center 

icon in the window border is high-

lighted. 

Changing Display Settings 

Call up the 

OSD 

as described above.  Now press the 

Brightness Control 

button to 

scroll through the icons in the window border. You can press the OSD function or 
control(         ) button in the window border by rotating the control in the respective 
direction. 

Once you have selected an icon, use the 

Contrast Control

 to adjust the option 

value. Press the right button to increase the value; press the left button to decrease 
the value 

When making changes to the following settings, a screen similar to the above 

V-

Center

 window will appear on your monitor screen. 


Summary of Contents for D73P

Page 1: ...marks on the device must be followed 12 If the device will not be used for a long period of time you should disconnect it from the main supply to avoid overvoltage damage 13 Any objects or liquid should never enter the device via its openings for air circulation This could cause a fire or an electric shock 14 Do not open the device ever For electrical safety the device shall be opened by authorize...

Page 2: ...e or more of the following measures Reorient or relocate the receiving antenna Increase the separation between the equipment and receiver Connect the equipment into an outlet on a circuit different from that to which the receiver is connected Consult the dealer or an experienced radio TV technician for help Any changes or modifications not expressly approved by the manufacturers may void the user ...

Page 3: ... 4 Monitor Adjustments __________________________________ 5 Chapter 2_________________________________________6 Adjusting the Brightness and Contrast_____________________ 7 The On Screen Display OSD ___________________________ 8 Color Temperature Setup______________________________ 10 OSD Window Status _________________________________ 12 Reset and Degauss ___________________________________ 13 Se...

Page 4: ......

Page 5: ...ual needs User display settings will be automatically saved to memory In addition at the touch of a button the user can at any time return to the factory default display settings Other ergonomic features include a non glare screen tilt and swivel and just two multi function display controls that allow you to make all monitor display adjust ments Unpacking Please make sure the following items are i...

Page 6: ... tabs into the slots 3 Push back of swivel ball with angle 45 slowly You will hear the spring lock click into place Removing the Monitor and Stand If you need to remove the stand push the spring lock and slide the stand away from the monitor Figure 1 Monitor and Stand Connection NOTE Special protection on control knobs and LED indicator needs to be taken care while you place the CRT side of side o...

Page 7: ...nce at the rear of the monitor to allow for sufficient airflow Position the Monitor a little above eye level to reduce neck strain Do not place near a window Exposing the Monitor to direct sunlight for extended periods may damage the unit You may want to use a desk lamp to adjust the ambient lighting for your viewing comfort A viewing filter is recommended to reduce eye stress and fatigue Figure 2...

Page 8: ...he Signal Cable Connection Make sure that the monitor is powered Off When powered off the Power LED see Figure 2 will not be lit Locate the VGA port on the rear of the PC The signal cable has a standard 15 pin mini D sub VGA connector If you are having trouble locating the VGA port please refer to the documentation which came with your PC Connect the Signal cable to the PC s VGA port Figure 4 Conn...

Page 9: ...gure 5 Tilt Adjustment With the tilt feature the monitor is capable of vertical adjustments of 15 to 5 The swivel feature allows for horizontal monitor adjustments of 45 to 45 Figure 6 Swivel Adjustment This concludes Chapter 1 The next chapter covers the on screen display OSD features 15 5 45 ...

Page 10: ...trol to adjust the dis play brightness level When the OSD Main Menu is engaged Press the control to rotate through the Function options OSD ON OFF Control When this switch is OFF the other four controls can be used to adjust the monitor s Brightness and contrast When this switch is ON the OSD Menu appears and OSD Function control can be used Power LED The Power LED informs you of the monitor s cur...

Page 11: ...level is adjusted from 0 to 100 Contrast Press the Contrast Control right button to increase the contrast Press the left button to decrease the contrast The contrast level is adjusted from 0 to 100 H Frequency This field displays the current Horizontal Scan Frequency Display only field V Frequency This field displays the current Vertical Refresh Rate Display only field Resolution This field shows ...

Page 12: ...isplay s vertical position Notice the V Center icon in the window border is high lighted Changing Display Settings Call up the OSD as described above Now press the Brightness Control button to scroll through the icons in the window border You can press the OSD function or control button in the window border by rotating the control in the respective direction Once you have selected an icon use the ...

Page 13: ...e V Size icon Press the button to adjust the vertical size of the display V Center Scroll to the V Center icon Press the button to position the display along the vertical axis of the screen Pincushion Scroll to the Pincushion icon Press the button to adjust pincushion or barrel distortion Trapezoid Scroll to the Trapezoid icon Press the button to adjust trapezoid distortion Tilt Scroll to the Tilt...

Page 14: ...d option The available options are 9300 6500 5000 Press the Brightness function Control The following RGB Gain window will appear From this window you can make changes to the display s Red Green and Blue gain Press the Brightness Control to scroll through the options change values using the button after making changes Press the will enter your changes and move to the next icon Values for the Red G...

Page 15: ...to the Green Gain icon Press the Contrast Control to adjust the green gain for your display Blue Gain Scroll to the Blue Gain icon Press the Contrast Control to adjust the blue gain for your display Reset Scroll to the Reset icon Press the Contrast Control to reset all three gain values to the default settings The OSD window will close ...

Page 16: ...ontal position of the OSD on the screen OSD Vertical Position Scroll to the OSD Vertical Position icon Press the Contrast Control to adjust the vertical position of the OSD on the screen OSD Display Close Time Scroll to the OSD Display Close Time icon Press the Contrast Control to set the amount of time that elapses before the OSD closes Countdown can be set from 5 to 60 seconds Don t be rushed wh...

Page 17: ... Press the Contrast Control to degauss the CRT If you do not wish to degauss the CRT press the OSD ON OFF Control to close the OSD window Self Test Screen When the monitor is powered On but there is no video signal the following self test screen will appear This screen indicates the monitor itself is OK If this screen appears it is pos sible that the monitor s VGA cable is not connected properly t...

Page 18: ...adjust trapezoid distortion Tilt Use this option to adjust image tilt Display Color Setting Use this option to adjust the color setup Refer to The Color Setup in the following section for more information CIE coordinate 9300 Color Temperature Select this option to set the monitor for the CIE coordinate 9300 color temperature CIE coordinate 6500 Color Temperature Select this option to set the monit...

Page 19: ...his option to adjust the vertical position of the OSD on the screen OSD Display Close Time Use this option to set the amount of time that elapses before the OSD closes Reset All Use this option to reset all display settings to their default values Degauss The Degauss option removes unwanted magnetism from the monitor s CRT This concludes Chapter 2 The following appendix provides details on your mo...

Page 20: ...ge protector is turned on The LED light is on but there is no display on the monitor s screen Make sure that the computer s switch is in the On position Make sure that the video cable s D shaped connector is properly connected to the video adapter port on the back of the PC Check to make sure that the brightness and contrast control are not turned to their dimmest position The display image is eit...

Reviews: