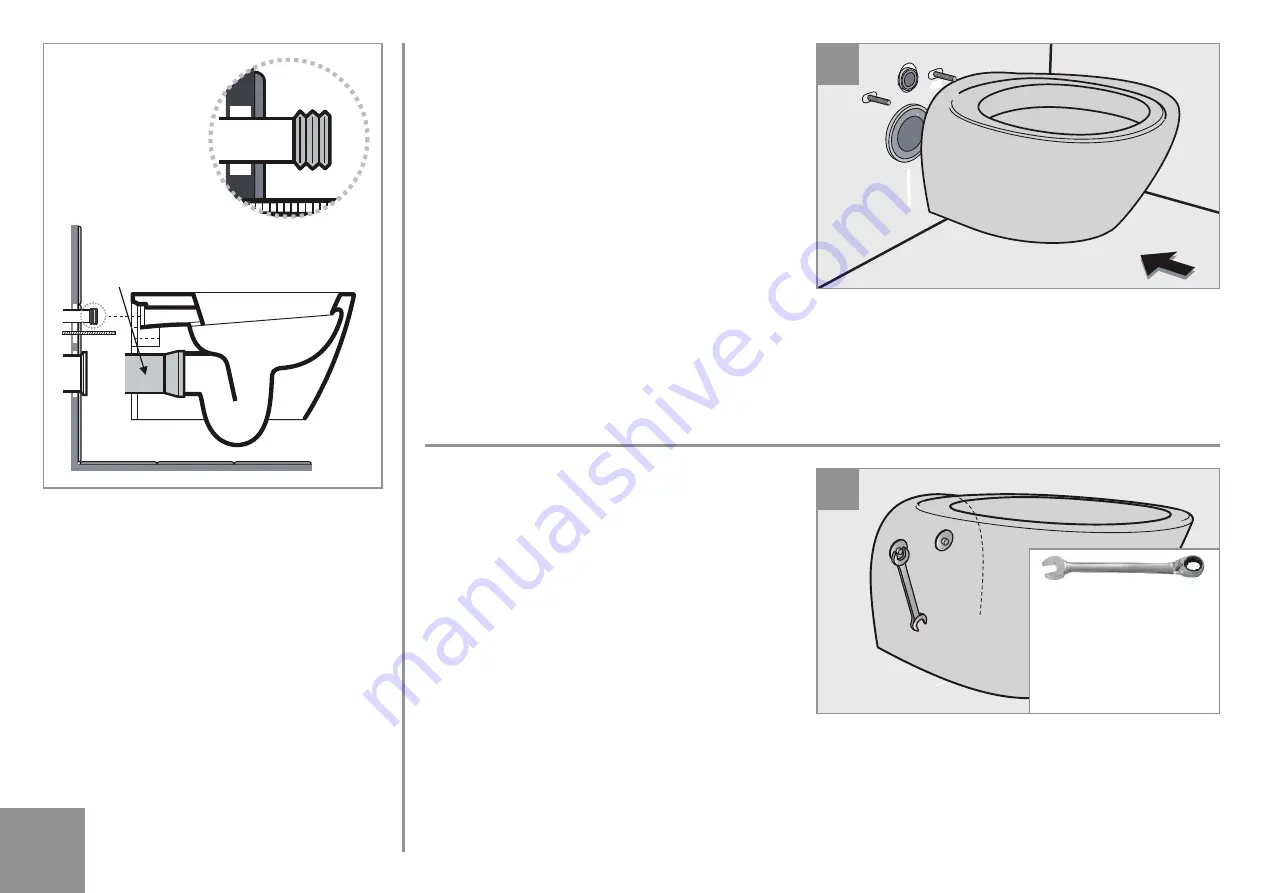
Posizionare il pezzo sui perni in acciaio. Posizionare il pezzo vicino
alla parete, nel caso di bidet collegare i due flessibili del rubinetto.
Spingere fino a parete facendo attenzione che tutti i raccordi si
innestando perfettamente. ATTENZIONE: per agevolare l’innesto dei
raccordi dell’entrata e uscita acqua si consiglia di lubrificare
entrambe le parti.
Place the unit on the steel fixtures. Position the unit close to the wall.
If installing a bidet then connect up the two flexi tap connectors. Slide
the unit up against the wall making sure all connections have been
properly made. PLEASE NOTE: To make the water inlet/drainage
connections easier, lubricate both parts.
Positionner l’appareil sanitaire sur les goujons en acier. Positionner
l’appareil sanitaire près du mur, en cas de bidet raccorder les deux
flexibles du robinet. Pousser jusqu’au mur en veillant à ce que tous
les raccords s’emboîtent parfaitement. ATTENTION: pour simplifier
l’emboîtement des raccords d’arrivée et de sortie de l’eau, il est
conseillé de lubrifier les deux pièces.
Das Teil auf die Stahlbolzen setzen. Das Teil nah an der Wand positionieren, im Fall eines Bidets die beiden Schläuche des Wasserhahns
anschließen. An die Wand schieben und dabei darauf achten, dass alle Leitungen perfekt ineinandergreifen. ACHTUNG: Um das Einschieben der
Wasser- Zu- und Ableitungen zu vereinfachen, empfiehlt es sich, beide Teile einzufetten.
Posicionar la pieza sobre los pernos de acero. Posicionar la pieza cerca de la pared, en el caso del bidet conectar los dos tubos flexibles del
grifo. Empujar hasta la pared teniendo cuidado que todos los acoples se encastren perfectamente. ATENCIÓN: Para facilitar el encastre de los
acoples de entrada y salida del agua se aconseja lubricar ambas partes.
Serrare i dadi di fissaggio forniti nel kit precedentemente installato al
muro avendo I'accortezza di tenere il sanitari ben accostato alla
parete, facendo attenzione che sia a livello. Si consiglia di avvitare i
fissaggi un pò alla volta alternando I'azione su entrambi fino al
completo bloccaggio del pezzo.
Tighten the nuts provided with the installation kit (the installation kit
contains the fixtures that were earlier attached to the wall), keeping
in mind that the toilet/bidet should be firmly attached to the wall and
should be level. The nuts should be tightened a little bit at a time and
alternately until the unit has been completely secured.
Serrer les écrous de fixation, fournis dans le kit précédemment
installé au mur, en veillant à ce que l’appareil sanitaire soit bien placé
contre le mur et vérifier son horizontalité avec un niveau à bulle. Il est
conseillé d’effectuer un serrage progressif des fixations en agissant
alternativement sur les deux jusqu’à ce que l’appareil sanitaire soit
parfaitement bloqué.
Die Befestigungsmuttern des zuvor an der Wand montierten Kits anziehen, dabei darauf achten, dass die Sanitärmöbel bündig mit der
Wand abschließen und waagerecht ausgerichtet ist. Es empfiehlt sich, die Muttern abwechselnd in mehreren Schritten anzuziehen, bis
das Teil ganz fest sitzt.
Ajustar las tuercas de fijación en dotación en el kit, previamente instalado en la pared, teniendo cuidado de mantener el sanitario bien cerca de
la pared y prestando atención para que esté a nivel. Se aconseja enroscar los dispositivos de fijación de a poco alternando la acción en ambos
hasta que la pieza se bloquee completamente.
Connessione scarichi (NON COMPRESE)
Drainage system connections (NOT INCLUDED)
Connexions des évacuations (NON COMPRISES)
Anschluss der Abflüsse (NICHT ENTHALTEN)
Conexiones de las descargas (NO INCLUIDAS)
2-2
1
2
NECESSITA: Chiave a cricchetto reversibile da 19
(NON COMPRESA)
REQUIRED: Size 19 reversible socket wrench
(NOT INCLUDED)
UTILISER : Clé à cliquet réversible 19
(NON COMPRISE)
NOTWENIG: Umschaltbarer Ratschenschlüssel 19
(NICHT ENTHALTEN)
NECESITA: llave de trinquete reversible 19
(NON INCLUIDA)


