background image

10

2.3 Device connection

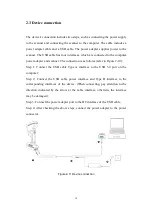
The device's connection includes two steps, such as connecting the power supply
to the scanner and connecting the scanner to the computer. The cable includes a
power adapter cable and a USB cable. The power adapter supplies power to the
scanner. The USB cable has four interfaces, which are connected to the computer,
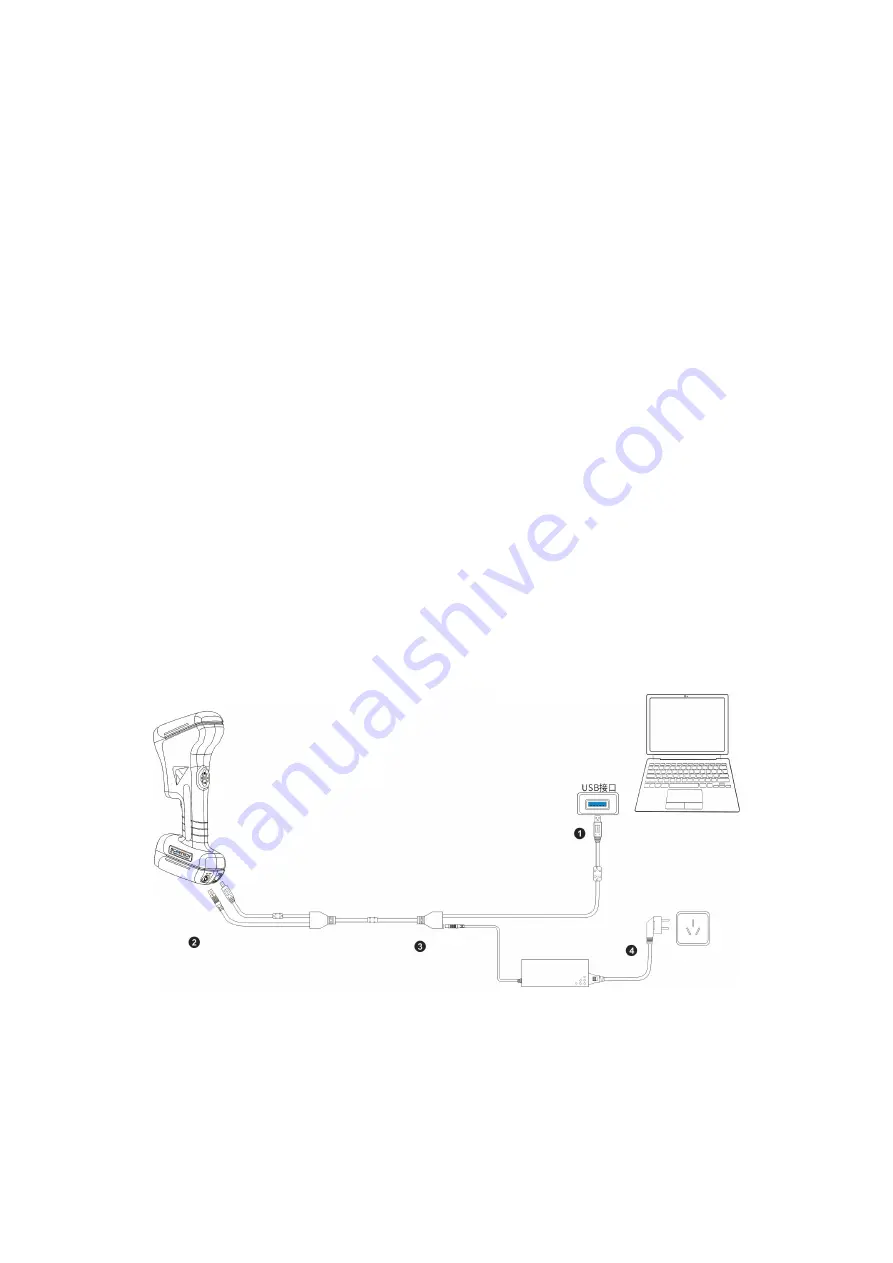
power adapter and scanner. The connection is as follows (refer to Figure 2-10):
Step 1: Connect the USB cable Type A interface to the USB 3.0 port on the
computer;
Step 2: Connect the USB cable power interface and Type B interface to the
corresponding interfaces of the device. (When connecting, pay attention to the
direction indicated by the arrow at the cable interface, otherwise the interface
may be damaged);
Step 3: Connect the power adapter port to the DC interface of the USB cable.
Step 4: After checking the above steps, connect the power adapter to the power
connector.

Figure2- 11 Device connection

Summary of Contents for KSCAN-Magic

Page 1: ...Composite 3D Scanner KSCAN Magic MagicII User Manual V1 020 2021 03 ...

Page 2: ...sion in the contract SCANTECH HANGZHOU CO LTD won t make any representations warranties or implied regarding the contents of this manual SCANTECH HANGZHOU CO LTD will do the best to guarantee the accuracy and completeness of the information in the manual but the express statement does not represent any commitment of SCANTECH HANGZHOU CO LTD There is no responsibility for the errors or omissions of...

Page 3: ... surrounding Safety Announcement During scanning process must obey announcement and use product correctly Please use it correctly To avoid malfunction of the KSCAN series and to ensure proper use please observe the following precautions Normal Announcement Before starting work please confirm the function and performance of this product and the equipment can operate normally If the product malfunct...

Page 4: ...plashes of water oil chemicals static electricity Dirty dirt water or oil stains may affect the use of the product and cause measurement deviations When it is attached to the surface of the product glass blow off the dirt with clean air When the soil is dirty wipe it off with a soft cloth dampened with alcohol When it is attached to the surface of the object please blow off the dirt with clean air...

Page 5: ...or flammable gas Laser Safety The laser wavelengths of the KSCAN Magic Magic II are as follows Type KSCAN Magic Magic II Blue wavelength 450nm Laser Output Pavg 1mW Infrared wavelength 850nm 940nm Laser Output Pavg 1mW Green wavelength 520nm Laser Output Pavg 1mW This product is classified as Class 2M Laser Product according to IEC 60825 1 Complies with 21 CFR 1040 10 and 1040 11 except for confor...

Page 6: ...e especially the eyes Please pay attention to the reflected light path of the laser The laser will be specular and diffuse If there is danger of being reflected by the reflected light please cover the reflected light with a baffle Do not use a concentrator magnifying glass or microscope to observe the laser output within 100mm This product does not have a mechanism to turn off the laser irradiatio...

Page 7: ...VII Identifier Label An ID label is affixed on the product as below Label placement ...

Page 8: ... VII 1 Introduction to Handheld 3D Scanner 1 1 1 Product Overview 1 1 2 Product Series 1 1 3 Working principle 2 2 Precautions before using 4 2 1 Product Configuration 4 2 2 Product Structure 8 2 3 Device connection 10 3 Software installation 11 3 1 Computer configuration requirements 11 3 2 Scanning Software Installation 12 3 2 1 Install 3D Scanner 12 3 3 Software Uninstallation 15 3 4 Software R...

Page 9: ...ammetry Operation Process 21 4 2 1 Targets 21 4 2 2 Ruler placement 23 4 2 3 Shooting process 25 4 3 Scanning process 27 4 3 1 Workpiece pretreatment optional 28 4 3 2 Quick calibration 29 4 3 3 Pre scan points 34 4 3 4 Scanning the laser patch point 35 5 Cautions 37 ...

Page 10: ...ree to use and has great practicality The handheld 3D scanner produced by Hangzhou Sikan Technology uses multiple wire lasers to acquire the 3D point cloud on the surface of the object The operator holds the scanner and adjusts the distance and angle between the scanner and the measured object in real time The system automatically acquires the image Measuring the 3D surface information of the obje...

Page 11: ... from 0 02m to 10m industrial measurement The scanner supports contact measurement which can acquire high precision 3D data of key parts such as hole position plane and boundary The supporting ScanViewer software is equipped with measurement and analysis functions such as tube measurement and deformation detection providing efficient reliable and comprehensive 3D measurement technology support for...

Page 12: ...meras of the scanner The fields of view of the two cameras intersect to form a common field of view and also it s called the reference distance while the common focal range is called the depth of field In general the reference distance and depth of field of the scanner are related to the instrument and the specific values are subject to the actual test data of the equipment And the laser band and ...

Page 13: ...he following standard items are included in the safety enclosure Standard configuration KSCAN 3D Scanner The appearance is shown in Figure 2 1 Figure2 1 Composite 3D scanner Calibration plate mainly used to calibrate camera parameters To ensure good data quality the camera needs to be calibrated before the scanner starts to use or when temperature changes or scan data quality is poor The shape of ...

Page 14: ... in Figure 2 3 Figure2 3 USB cable Power adapter Connect to the device via a USB cable to provide external power The outline of the power adapter is shown in Figure 2 4 Figure2 4 Power Adapter Mark point box There are several circular mark points in the box The mark points are used for pasting on the scanned workpiece for scanner positioning wherein the φ6mm mark point is used in the red light fas...

Page 15: ...ints refers to a set of points with certain alignment rules and coding information In the global photogrammetry mode the coded mark points are randomly placed on the workpiece to be measured and the photogrammetry work is performed with the scale bar Each coded mark point is a black and white point and consists of 7 reflective white circles The software recognizes these coded points and displays t...

Page 16: ...er documents including packing list and product warranty card According to the customer s request a paper user manual can be attached the default is electronic version stored in the USB flash drive The paper file is shown in Figure 2 9 Figure2 9 Paper documents Notice The specific model and quantity of optional accessories are subject to customer orders ...

Page 17: ...ructure of the scanner product is shown in Figure 2 10 Figure2 10 Product structure 1 camera A Indicating laser Laser transmitter Front button camera B Rear button Indicator strip USB Cable power interface USB cable Type B interface ...

Page 18: ...arameters and operate the view After scanning the mark points press the buttom M then mark points will be optimized After this step finished then can do some scanning Under the adjust zoom function zoom in view Under the function of adjusting the laser exposure parameters 0 5ms increase per exposure parameter Under the action view function adjust to the best view Under the adjust zoom function zoo...

Page 19: ...he connection is as follows refer to Figure 2 10 Step 1 Connect the USB cable Type A interface to the USB 3 0 port on the computer Step 2 Connect the USB cable power interface and Type B interface to the corresponding interfaces of the device When connecting pay attention to the direction indicated by the arrow at the cable interface otherwise the interface may be damaged Step 3 Connect the power ...
Page 20: ...entire scanning system Refer to Table 3 1 for the computer parameter configuration requirements for installing the scanning software Table 3 1 Computer parameter configuration requirements Project Recommended configuration CPU Intel Xeon W 10885M 2 40GHz RAM 32G DDR4 3200MHz Memory Nvidia Quadro RTX 3000 Independent 6G Interface mode USB3 0 Operating system Win10 Pro The software installation pack...

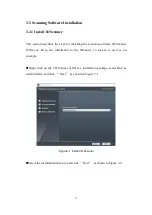
Page 21: ... software 3D Scanner X XX exe Here the installation to the Windows 10 system is used as an example Right click on the 3D Scanner X XX exe installation package select Run as administrator and click Next as shown in Figure 3 1 Figure3 1 Install 3D Scanner Select the installation directory and click Next as shown in Figure 3 2 ...

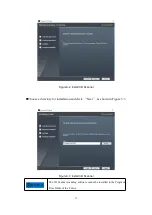
Page 22: ...l 3D Scanner Choose a directory for installation and click Next as shown in Figure 3 3 Figure3 3 Install 3D Scanner Attention The 3D Scanner scanning software cannot be installed in the Program Files folder of the C drive ...

Page 23: ...14 Click Install as shown in Figure 3 4 Figure3 4 Install 3D Scanner The installation process as shown in Figure as shown in Figure 3 5 Figure3 5 Install 3D Scanner ...

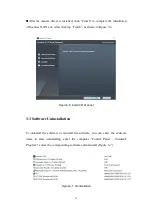
Page 24: ...sh as shown in Figure 3 6 Figure3 6 Install 3D Scanner 3 3 Software Uninstallation To uninstall the software or reinstall the software you can enter the software name to start uninstalling enter the computer Control Panel Uninstall Program select the corresponding software and uninstall Figure 3 7 Figure3 7 Uninstallation ...

Page 25: ...t icon click Properties select the Compatibility tab in the pop up properties window check the Run this program as an administrator option click Change Settings for all users after checking Run this program as an administrator in the pop up dialog box click the OK button As shown in Figure 3 8 Figure3 8 Give administrator permission to run Put into the graphics card to operate take NVIDIA graphics...

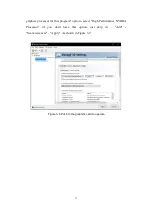
Page 26: ...processor for this program option select High Performance NVIDIA Processor if you don t have this option just skip it Add Scanviewer exe Apply As shown in Figure 3 9 Figure3 9 Put into the graphics card to operate ...

Page 27: ...graphics card to operate At this point the scan software installation settings are all completed Restart the computer and plug in the dongle to start the software The software startup interface Figure 3 11 select SV to enter the laser scanning work and select GL to enter the photogrammetry work Figure3 11 Select work ...

Page 28: ...e the software will pop up a prompt box to replace the valid RGF file by clicking configuration license As shown in Figure 3 12 Figure3 12 Authorization prompt box Replace the authorization folder Open ScanViewer scanning software click Menu Bar Other Device Management Replace Authorization Folder and replace it with Backup LowPartSW SETXXXX Product Model in the U disk provided with the KSCAN scan...

Page 29: ...g Please select the appropriate working mode according to the measured object refer to Table 4 1 Table4 1 Name Mode Object Size Resolution Accuracy Glopho GL Photogrammetry Medium and large workpiece measurement 0 02mm 0 0 25mm m ScanViewer SV Blue light fast scan Medium and large workpiece scanning 0 050mm 0 02mm 0 0 35mm m ScanViewer SV Blue light fine scan Large workpiece with small features 0 ...

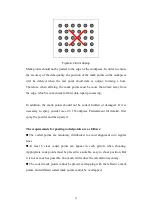
Page 30: ...ce can be appropriately larger and the maximum distance is 250 mm If the workpiece features more curvature changes the distance can be appropriately reduced and the minimum distance is 30 mm As shown in Figure 4 1 Figure4 1 Pasting uncoded markers Note that the mark points should be randomly distributed to avoid regular arrangement Figure 4 2 Because the scanner is relatively positioned by identif...

Page 31: ...led hidden or damaged If it is necessary to spray powder see 4 3 1 Workpiece Pretreatment for details first spray the powder and then paste it The requirements for pasting coded points are as follows The coded points are randomly distributed to avoid alignment into regular lines At least 6 clear coded points can appear in each picture when shooting Appropriate code points must be placed in a suita...

Page 32: ...sides of the standard configuration quick adjustment plate and an optional 1m ruler Short ruler The length of the ruler is short suitable for medium and large workpieces and the accuracy is slightly worse than the long scale Its shape is shown in Figure 4 3 Figure4 3 Short ruler 1m ruler The length of the scale is 1m which is suitable for medium and large workpiece shooting with high precision Its...

Page 33: ...osition where the ruler is placed must be easy to shoot and the placed ruler cannot be deformed The time for placing the ruler should be after pasting the reflective marker point and pasting the coded marker point Example of placement and the placement of 1m ruler is shown in Figure 4 5 Figure4 5 1m ruler An example of coded points placement and standard ruler placement is shown in Figure 4 6 ...

Page 34: ...he scanner See 2 2 Product Structure for details of button position Shooting the color of the coded points will change between red yellow green and the green represents best Attention When shooting large workpieces the scale must be placed around the workpiece Attention The reasons for the deformation of the scale are the ends of the scale are squeezed the weight is placed on the scale rod and onl...

Page 35: ...re4 7 Shooting interface In the 3D display interface right click on the mouse and select Export non coded point and save it as shown in Figure 4 8 At this point you can directly do some scanning with the targets from File Open ScanViewer Software Figure4 8 Operation results ...

Page 36: ... in Figure 4 9 Figure4 9 Export non coding points The above is the basic operation flow of the photogrammetry For the use of photogrammetry software please refer to its user manual The scanning operation flow is described below 4 3 Scanning process The scanning operation process includes pre processing of workpieces see 4 2 1 points for details quick calibration pre scanning points and scanning la...

Page 37: ...he laser line captured by the camera not to be the surface contour of the object thus affecting the accuracy of the scanned data Highly reflective materials for example mirrors metal processed high reflective surfaces etc mirrors and other high reflective materials produce specular reflections on light which causes the camera to be unable to capture its reflected light at certain angles so scannin...

Page 38: ...device needs to be quickly calibrated using the quick calibration plate During operation the label on both sides of the calibration plate is oriented to the user The user pushes slightly in the direction of the red arrow to open the quick dead plates on the left and right sides as shown in Figure 4 10 Figure4 10 Open rule Click Fast Calibration in ScanViewer refer to 5 1 Introduction to Scanning S...

Page 39: ...igure 4 12 Figure4 12 Fast Calibration Control the angle of the scanner adjust the distance between the scanner and the calibration plate so that the shadow circle on the left side coincides in the state that the left shadow circle is basically coincident the angle is not changed and the scanner is moved horizontally to make the right side The trapezoidal shadows coincide and then adjust the dista...

Page 40: ...grees and keep the laser beam between the fourth and fifth line markers to make the shadow Coincident as shown in Figure 4 14 Figure4 14 Fast Calibration After the right side calibration perform the left 45 degree calibration tilt the scanner to the left by about 45 degrees and the laser beam is kept between the fourth line and the fifth line mark point so that the shadows coincide as shown ...

Page 41: ...ard by about 45 degrees and the laser beam is kept between the fourth line and the fifth line mark point so that the shadows coincide as shown in Figure 4 16 Figure4 16 Fast Calibration After the upper side is calibrated the lower side 45 degree calibration is performed and the scanner is tilted downward by about 45 degrees and the laser ...

Page 42: ...bration is completed and the result is shown in Figure 4 18 Figure4 18 Fast Calibration Attention During the rapid calibration process there should be no other mark points near the calibration plate Use the calibration plate to ensure that there are no other highly reflective objects nearby After the calibration is completed keep the calibration plate and ...

Page 43: ...ers is to establish the positional relationship of each face of the workpiece and to collect the positioned mark points so that the subsequent scanning laser patch dot is easier to perform and the transition from face to face is more convenient Pre scan points can use the software s point optimization function to increase the accuracy of the scan Click Mark Point and Start to start to scan the mar...

Page 44: ...laser patch dot you need to set the scan parameters or use the default values of the parameters such as scan resolution exposure parameter settings scan control advanced parameter settings and professional parameter settings When scanning the laser patch dot pay attention to the angle of the scanner and the distance between the scanner and the workpiece move the scanner smoothly and use the laser ...

Page 45: ...n data After the scan is finished you can save it as project file laser point file or click dot wrap to optimize the operation After the optimization is completed you can mesh it As shown in Figure 4 21 Figure4 21 wrap ...

Page 46: ...fter prolonged use it is a normal phenomenon and does not affect the use of the device If the computer is equipped with protection software 360 security guards computer housekeeper Windows Defender etc scanning frame phenomenon may occur Do not remove the dongle during the use of the software SCANTECH HANGZHOU CO LTD Building 12 No 998 Wenyi West Road Yuhang District Hangzhou Zhejiang Province Chi...

Reviews: