background image

RU224 Settings 

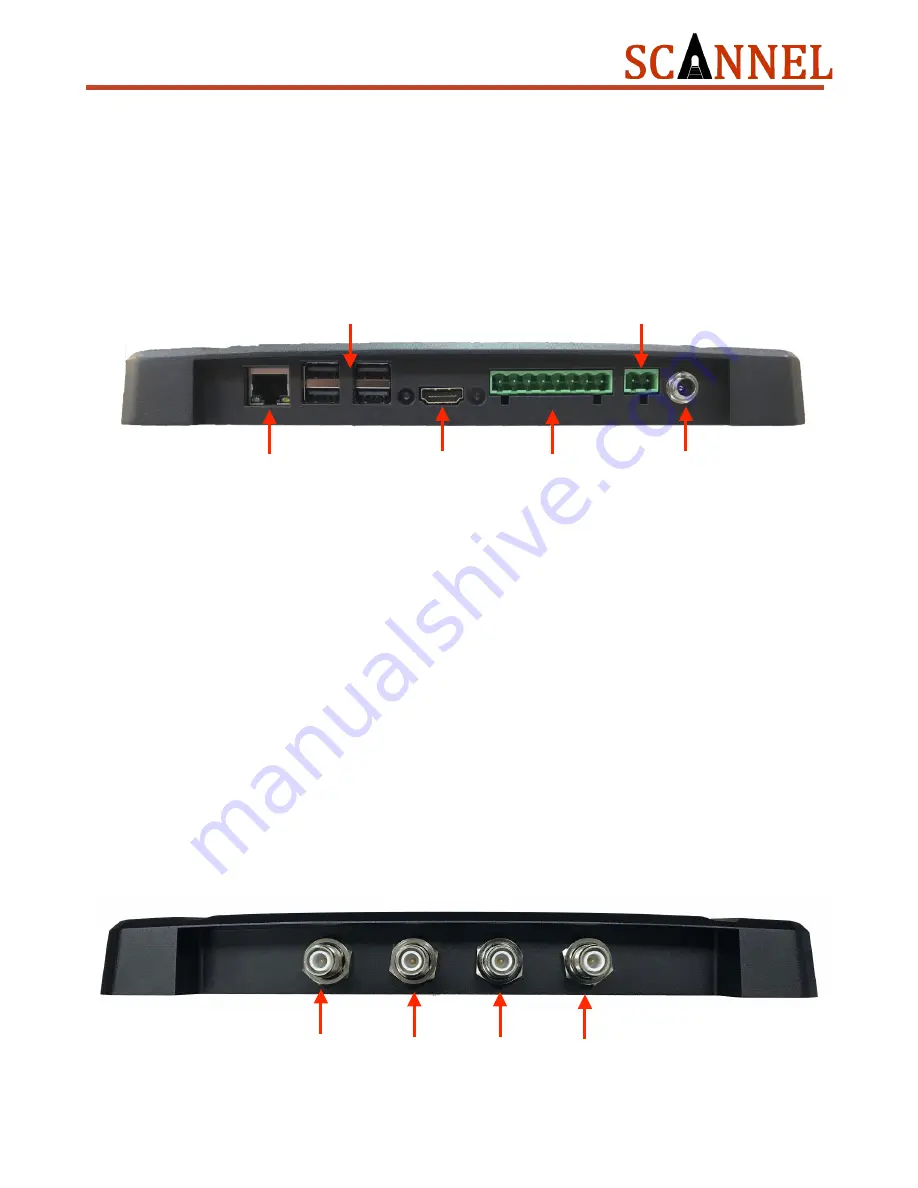
Hardware Configuration 

1.  Connectivity: 

1.1. Ethernet 
1.2. WiFi 
1.3. Bluetooth 

2.  USB 2.0 x 4 

3.  HDMI for Display 

4.  GPIO 

4.1. 4 Input 
4.2. 4 Output 

5.  Output Power - 12V for external devices (E.g. LED Status Light, Sensor, Switch, Etc.) 

6.  Input Power - 12V 

7.  UHF RFID Antenna Ports x4 (RP-TNC-Female) 

!


ANT 1

ANT 2

ANT 3

ANT 4

Page 

!

 of 

!

11

35

Ethernet

HDMI

GPIO

Input Power 

12V

USB 2.0

Output Power 

12v

Summary of Contents for RU224

Page 1: ...RU224 UHF RFID Reader User Guide ...

Page 2: ...rs The publisher and the author make no claim to these trademarks While every precaution has been taken in the preparation of this document the publisher and the author assume no responsibility for errors or omissions or for damages resulting from the use of information contained in this document or from the use of programs and source code that may accompany it In no event shall the publisher and ...

Page 3: ...erTool Software Introduction 10 RU224 Settings 11 Hardware Configuration 11 RU224 Initial Startup 13 Software Initial Startup 14 Connectivity Setup 14 Bluetooth 14 WiFi 16 Ethernet 16 Configuring your RU224 IP Address 17 Browser 19 File Manager 20 Terminal 21 Reboot Logout Shutdown 22 RU224 Software 24 RU224 ReaderTool User Manual 24 RU224 Software Development 34 Customized Software 34 Page of 3 3...

Page 4: ...is prevented when it is at maximum performance It has built in multiple connectivity WiFi BLE and TCP IP and self powered GPIO to simplify installation and deployment in various applications RU224 RFID Reader referred to hereafter as Reader reader is suitable for RFID applications in supply chain management logistics inventory management cargo tracking management warehouse management shop floor ma...

Page 5: ... Max Baud Rate 115200 bps System Specifications CPU 1 2 Ghz Quad Core ARM Cortex A53 RAM 1GB LPDDR2 SDRAM Storage 16GB WiFi Dual Band 802 11ac wireless LAN 2 4Ghz 5Ghz Bluetooth Bluetooth 4 2 Ethernet Gigabit Ethernet over USB2 0 max300Mbps Display HDMI Full Size Type A USB 4 Ports USB2 0 GPIO 12V 4 Input 4 Output Operating System Linux Software Development Python Java General Specifications Power I...

Page 6: ...dently 12V Power Output Provides power to your external device without the need for external power adapters 4 USB Ports 4 USB ports allows you to connect various peripherals such as keyboard mouse USB drives Barcode Scanners etc RTC Built in Real time clock to manage and save current date and time 4 UHF RFID Antenna Ports Offers 4 antenna ports for various applications such as portal readers tunnel...

Page 7: ...Hardware Introduction Page of 7 35 Top View ...

Page 8: ...Page of 8 35 Front View Back View ...

Page 9: ... locally or remotely and transfer these to your Middleware or directly to your ERP MES WMS database A notable feature is the scope of software customization it offers not only for the UHF RFID Software but also for non related RFID software functions You can develop your own software to perform tasks unrelated to the UHF RFID Software such as Control the GPIO of the RU224 Display customized inform...

Page 10: ...lutions team in various RFID projects RU224 ReaderTool main features Read Shows Total Read Quantity EPC in HEX and ASCII Read Count Read Date Time Frequency Antenna Number Configurable Settings RF Output Power Antenna Ports Session Target Region Write Encode UHF RFID Tags in ASCII Format Save Data Save the scanned data on the local storage or to your Database via WiFi or Ethernet GPIO Start and St...

Page 11: ... 2 0 x 4 3 HDMI for Display 4 GPIO 4 1 4 Input 4 2 4 Output 5 Output Power 12V for external devices E g LED Status Light Sensor Switch Etc 6 Input Power 12V 7 UHF RFID Antenna Ports x4 RP TNC Female ANT 1 ANT 2 ANT 3 ANT 4 Page of 11 35 Ethernet HDMI GPIO Input Power 12V USB 2 0 Output Power 12v ...

Page 12: ... using various programming language Please contact Scannel for more information PIN 2 I O Input 2 PIN 3 I O Input 3 PIN 4 I O Input 4 PIN 5 I O Output 1 ReaderTool Demo Software I O Output settings can be configured in the Digital I O Tab Customized I O Control Can be controlled using various programming language Please contact Scannel for more information PIN 6 I O Output 2 PIN 7 I O Output 3 PIN...

Page 13: ...eader there will be a short beep sound which indicates that the reader is on 3 Connect the Antenna s to the Reader 3 1 Connect your Antenna to the Antenna Port Please note that arrangement of the Antennas start from the leftmost as Antenna 1 This will direct you on how to control the Antennas using the Software 3 2 Connect up to 4 Antennas according to your requirements Page of 13 35 ...

Page 14: ...external devices Compatibility may depend on external devices The WiFi and Ethernet allows you to connect to your network and thru customized software perform various tasks such as send and receive data control your GPIO connect to the internet automate tasks related to the RU224 etc Bluetooth On the top right corner of the screen you will see the Bluetooth icon Right click on the Bluetooth icon a...

Page 15: ...n in the same window Note Please make sure that the bluetooth option of your device is enabled Select the name of your device to start pairing and click OK Pairing will start to create a connection and a message will show that pairing is successful Note You must have a working bluetooth software application on the RU224 for your external device in order to successfully use the Bluetooth function P...

Page 16: ...n WiFi is activated the icon will turn blue Right click on the WiFi icon to select which WiFi network you want to join and input the password to join your WiFi network Ethernet For ethernet connection simply plug in your ethernet cable to the RU224 and connection will be automatically be established Page of 16 35 ...

Page 17: ...cation with your RU224 The configuration for the IP Address in Ethernet and WiFi mode are the same You can use both connections simultaneously if necessary Right click on the Wifi or Ethernet icon on the top right corner of the screen and select Wireless Wired Network Settings A pop up window will appear called Network Preferences Page of 17 35 ...

Page 18: ... list beside interface you can select eth0 or wlan0 depending which connection you will be configuring Enter the required fields and click Apply Restart your RU224 to ensure that configurations are saved Page of 18 35 ...

Page 19: ...e when you are connected to the internet You can also use the web browser for your web based applications which can serve as a local monitor when a display is connected via HDMI on the RU224 On the Taskbar click the Web Browser icon to start the program Page of 19 35 ...

Page 20: ... File Manager are the same with most operating systems You can cut copy move create and paste files and folders to different locations within the system Note Certain files and folders are restricted due to set permissions to avoid corrupting the system On the Taskbar click the File Manager icon to start the program Page of 20 35 ...

Page 21: ...ers inside the RU224 get and set your network configuration install and update softwares set permissions etc Note Novice users are strongly advised not to use the Terminal or the Command Line mode Editing or changing certain parameters or programs may cause SYSTEM FAILURE On the Taskbar click the Terminal icon to start the program Page of 21 35 Terminal Interface ...

Page 22: ...n option in the desktop prior to removing the power adapter from the RU224 In case of software updates kindly use the Reboot option in the desktop to restart the RU224 On the top left corner of the screen click the Scannel Icon and click Shutdown A pop up window will appear and you can select among three 3 options Shutdown Reboot Logout Page of 22 35 ...

Page 23: ...Page of 23 35 RU224 UHF RFID Reader connected to a display monitor ...

Page 24: ...ata directly to your middleware or your database on a remote host 3 Write data to your UHF RFID tag in ASCII format instead of the traditional EPC HEX format This allows you to have a readable data 4 Control and send status indications for scanning using our built in GPIO 2 Getting Started 2 1 Installation and Execution Scannel ReaderTool is already installed in the system so no installation is re...

Page 25: ...2 2 Read Tag The default screen of the ReaderTool is the READ tab In this tab you can connect to the reader and perform the inventory or scan function Page of 25 35 ...

Page 26: ... 3 Connect to Reader Simply click the Connect button to connect the software to the UHF RFID Reader If the connection is successful the status light below the Connect button will turn Green Page of 26 35 ...

Page 27: ...s There are four sessions available in the settings The following are the recommended settings in various scenarios 4 Target There are two status for the target A and B Target determines whether a UHF RFID Tag will be read in which state A or B It is advised that Target be set at A unless necessary For more information about Session and Target kindly visit GS1 website https www gs1 org standards e...

Page 28: ...Reader Setting Page of 28 35 ...

Page 29: ...tten using the RU224 ReaderTool ASCII equivalent of the EPC HEX will be displayed 4 Read Count The number of times a Tag is scanned during the inventory period 5 Read Time The Date Time the Tag was last scanned 6 Read Frequency The Frequency when the Tag was last scanned 7 Read Antenna Indicates which Antenna Port the Tag was last scanned You can restart the scanning inventory by clicking the Rese...

Page 30: ...aving into the EPC bank of the UHF Tag Due to the conversion process the data you input on the write field should be an even number E g If you input 1234ABCD it will write 1234ABCD on the EPC of the RFID Tag Otherwise the ReaderTool will automatically add a 0 in the beginning of the string if your input data is an odd number E g If you input ABCD123 it will write 0ABCD123 on the EPC of the RFID Ta...

Page 31: ... the option Save data in disk is selected the data will be saved in the folder Desktop RU224 saveData and grouped by date To save data into your remote database server click Save data into DB and fill the information required to access your database server Currently ReaderTool only supports MySQL and MS SQL Server Other database can be supported through customization Page of 31 35 ...

Page 32: ...ected ReaderTool shall then start stop the scanning inventory based on the input signal Users can also use the GPIO to indicate status of the inventory scanning by selecting the Activate DO output when tag is read and selecting which digital output your external device is connected E g When a tag is scanned by RU224 the external device Example LED Light will be triggered by the digital output to l...

Page 33: ...erTool To exit or close the Scannel ReaderTool just click the close button on the top right corner of the window We recommend you to stop inventory and disconnect from reader before closing the software Page of 33 35 ...

Page 34: ...elopment Customized Software Most reader functions can be operated through the demo But in practical applications user might need to develop their own applications Please contact Scannel for further details Page of 34 35 ...

Page 35: ...Page of 35 35 For more information Scannel RFID info scannel net www scannel net 886 2 26954214 ...

Reviews: