Scaime eNodTouch-ML Quick Start Manual Download Page 13

13 

Quick Start Guide SCAIME: 

NUSG-eNodTouch-ML-FE-196775-D.docx 

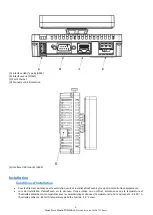
eNodTouch installation 

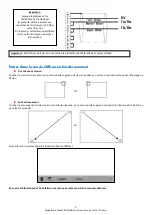
Panel cut dimensions: 

Without Anti-rotation Tee 


With Anti-rotation Tee 


A (mm) 

B (mm) (1) 

B (mm) (2) 

C (mm) 

D (mm) 

22.5 (tolerance -0.30) 

1.5 à 6 

3 à 6 

30 (tol -0.20) 

4 (tol -0.20) 

(A)


Diameter of the cut 

(B)


Thickness of the panel 

(1)   Material of the panel: Steel 

(2)   Material of the panel: Glass fiber reinforced 


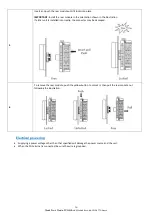
Installation procedure: 

Step 

Action 

Place the unit on a clean and level surface with the display panel facing downward. 

Cut a panel with the specified thickness in function of the material. 

Create the correct sized hole with a diameter of 22.5mm (tol -0.30) on the panel. 


Insert the display module following the illustration: 


Screw the nut with the socket wrench with a torque between 1.2 and 2 N.m. 


Summary of Contents for eNodTouch-ML

Page 1: ...75 D docx SCAIME SAS TechnositeAlt a BP501 74105 ANNEMASSE Cedex T l 33 0 4 50 87 78 64 www scaime com eNodTouch ML Ecran tactile pour multiples contr leurs eNod4 Touch screen for multiple eNod4 contr...

Page 2: ...Installation d eNodTouch 5 Alimentation lectrique 8 Interface RS485 pour la connexion l eNod4 8 Entrer dans le mode Offline en fonctionnement 9 English Presentation 10 Installation 11 Installation re...

Page 3: ...e 85 RH Temp rature de bulbe humide 39 C ou moins sans condensation Poussi re 0 1 mg m ou moins niveaux non conductifs Temp rature de stockage 20 60 C Structure IP65 en face avant si correctement inst...

Page 4: ...installation Pour faciliter la maintenance et la ventilation veillez installer eNodTouch plus de 100 mm d autres quipements Lors de l installation d eNodTouch sur le panneau d une armoire ou un coffr...

Page 5: ...Quick Start Guide SCAIME NUSG eNodTouch ML FE 196775 D docx Le panneau ne doit pas tre inclin de plus de 30 Installation d eNodTouch D coupe du panneau Sans pion anti rotation Avec pion anti rotation...

Page 6: ...apes d installation Etape Action 1 Placer l appareil sur une surface plane et propre avec l cran d affichage tourn vers le bas 2 R aliser la d coupe d un panneau dont l paisseur respecte les dimension...

Page 7: ...le arri re jusqu ce qu il se verrouille ATTENTION Ins rer le module arri re dans l orientation indiqu e sur l illustration afin d viter d endommager le connecteur 6 Pour retirer le module arri re appu...

Page 8: ...st connect e assurez vous que le fil est reli la terre Pour alimenter eNodTouch veuillez vous r f rer au sch ma suivant Interface RS485 pour la connexion l eNod4 La connexion de la RS485 se fait au mo...

Page 9: ...rieur gauche suivi du coin inf rieur droit de l cran dans les 0 5 secondes Quand le menu syst me appara t toucher le bouton Offline Pour plus d informations et de d tails sur les menus veuillez consu...

Page 10: ...ity 85 RH Wet bulb temperature 39 or less no condensation Dust 0 1 mg m or less non conductive levels Storage temperature 20 to 60 C Structure IP65 on the front panel when properly installed in an enc...

Page 11: ...tallation requirements For easier maintenance operation and improved ventilation be sure to install eNodTouch at least 100mm 3 94in away from adjacent structures and other equipment Be sure that the s...

Page 12: ...eNodTouch ML FE 196775 D docx eNodTouch on the panel of a cabinet or enclosure Surrounding air temperature indicates both the panel face and cabinet or enclosure s internal temperature The panel shou...

Page 13: ...anel 1 Material of the panel Steel 2 Material of the panel Glass fiber reinforced Installation procedure Step Action 1 Place the unit on a clean and level surface with the display panel facing downwar...

Page 14: ...the illustration If either unit is installed incorrectly the connector may be damaged 6 To remove the rear module push the yellow button to unlock it then pull the rear module out following the illus...

Page 15: ...6775 D docx RS485 interface for connection to eNod4 RS485 uses a DB9 connector Please follow the below cable recommendation or use a SCAIME Cable ref 632153 Contact your local sales representative for...

Page 16: ...right then bottom left corners or the upper left and bottom right corners of the panel within a 40 pixel area within 0 5 seconds When the system menu is displayed touch the Offline button For more inf...

Reviews: