background image

SBIG ST-402 Operating Manual 


 Page 4 


6.


We’ve finished installing the drivers but now we need to bind them to 
the ST-402.  Quit the 

Driver Checker

 by clicking the 


X  

in the upper-

right hand corner.  If you’re running 

Windows XP

 then continue with 

step 7

 below.  Users of older versions of Windows should now look for 

instructions particular to their version of Windows in the “

Installing 

USB Drivers

” Application Note that can be found on the CD-ROM or 

our web site. 

7.


Now’s the moment you’ve been waiting for.  We’re going to plug the 
camera into the computer, but not so fast! 
     First plug the camera into the power source and note that the 

Fan


comes on but the 

Red LED

 does not.  The ST-402 actually has its 

internal firmware downloaded to it by the PC at startup.  If the 

LED is 

off

 the camera has not been 

booted

.  Please remember that. 

     Now plug the camera into the USB port on the computer with the 
supplied USB cable.  

Remember

 which port you’re using because 

you’ll want to use the 

same port

 again next time or you’ll have to go 

through this process of binding the drivers all over again.  Windows 
will crunch for a while and then present you with the 
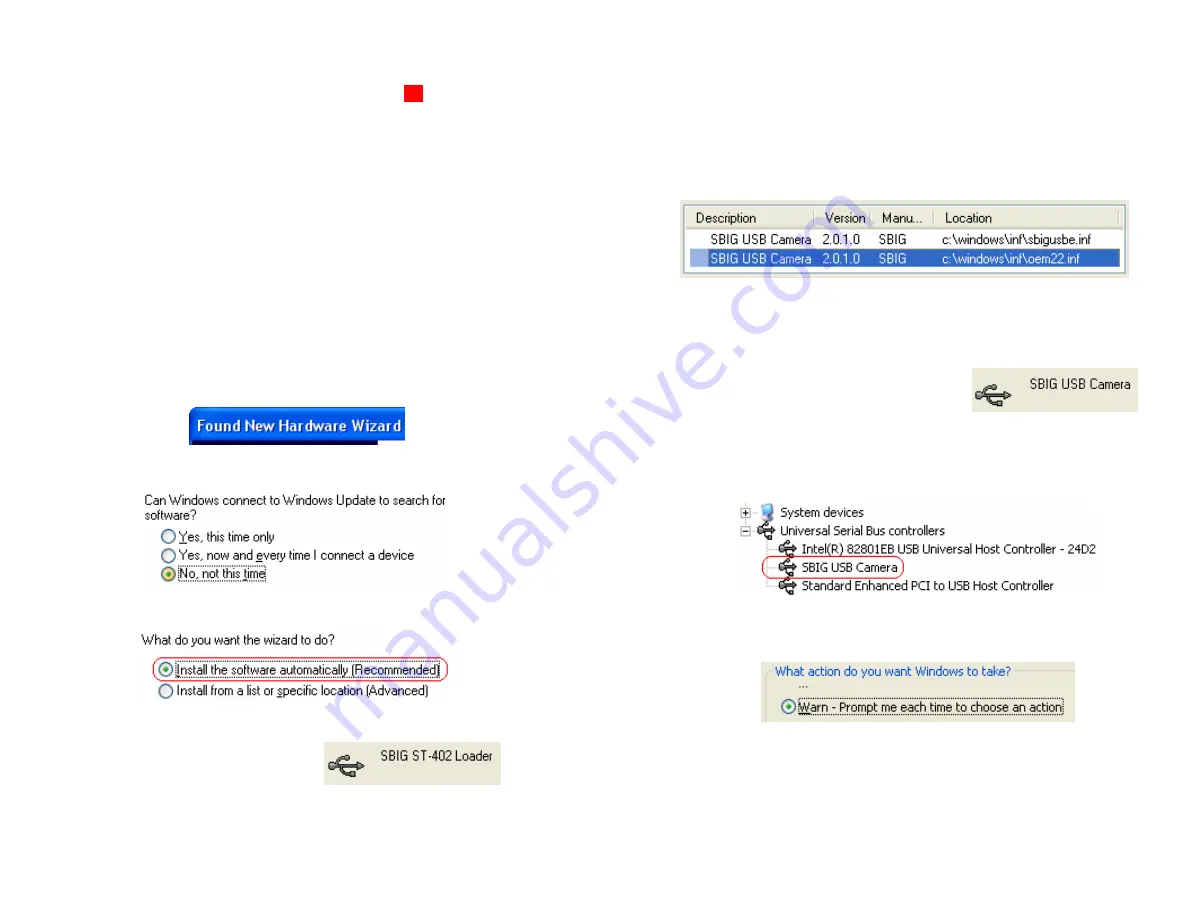
Found New 

Hardware Wizard

 (

Wizard

) dialog. 


8.


If you’re asked if it should connect to 

Windows Update

 to search for 

software click “

No, not this time

”, then click 

Next


9.


Now the 

Wizard

 will ask you if you want to install the software 

automatically.  Select to do so then click 

Next


10.


Windows will grind for a while copying the 

SBIG ST-402 Loader


driver then show you the 

Completing the Found New Hardware 

Wizard

 page. 

     Click 

Finish

.  At this point the 

Red LED

 on the back of the camera 

should be on, and if you had been watching it you would have seen it 

blink

 several times while the PC was 

booting the camera


SBIG ST-402 Operating Manual 


 Page 5 


11.


After booting the camera Windows will bring up another copy of the 

Wizard

.  The ST-402 actually uses 

two drivers

.  One to 

boot

 the camera 

and one to 

talk to it

 after it’s booted.  We now need to walk 

Windows


through installing the second driver. 

12.


Repeat steps 8 and 9, again telling the 

FNHW

 to not check for updates 

and to install automatically.  At this point windows will show you the 

Select the best match

 page: 


13.


Select the 

oem

 file not the 

sbig

 file (the second item above) by clicking 

on it then click the 

Next

 button. 

14.


Windows will grind one last time copying the 

SBIG USB Camera


driver then show you the 

Completing the Found New Hardware 

Wizard

 page. 

     Click the 

Finish

 button and 

pat your 

self on the back

.  You’re done! 

 
If you ever doubt that the camera is actually connected you can open the 

Device Manager

 from the 

Hardware

 tab of the 

System

 control panel and 

expand the 

Universal Serial Bus controllers

 section.  You should see a 

SBIG USB Camera

 listed there: 


While you’ve got the 

System

 Control Panel open, if you want to restore the 

Windows Driver Signing security check, click the 

Hardware

 tab, click the 

Driver Signing

 button and select: 


If Windows can not automatically find the drivers , tell it to Install from a 
Specific Location and then browse to the folder: 

C:\Program Files\SBIG\Driver Checker\SBIG Drivers 

Summary of Contents for ST-402ME

Page 1: ...ion which can be determined by turning the equipment off and on the user is encouraged to try to correct the interference by one or more of the following measures Reorient or relocate the receiving antenna Increase the separation between the receiver and the equipment Connect the equipment into an outlet on a circuit different from that to which the receiver is connected Consult the dealer or an e...

Page 2: ...ith internal shutter allowing exposures down to 40 milliseconds that makes taking dark frames a trivial task USB 2 interface yielding up to 1 2 megapixels per second download rates but full backward compatibility with USB 1 1 computers at 400 kilopixels per second Input power requirements of 10 0 14 5 Volts DC at 1 Amp through the new center positive locking power jack Telescope interface with fou...

Page 3: ...e first time you MUST install the software as described below SBIG ST 402 Operating Manual Page 3 2 Installing the Software Installing USB drivers on a Windows system can be a difficult task if you don t follow the instructions to the letter Please don t plug the camera into the computer until instructed to do so below and please follow the instructions carefully 1 Disable Driver Signing Windows X...

Page 4: ... copying the SBIG ST 402 Loader driver then show you the Completing the Found New Hardware Wizard page Click Finish At this point the Red LED on the back of the camera should be on and if you had been watching it you would have seen it blink several times while the PC was booting the camera SBIG ST 402 Operating Manual Page 5 11 After booting the camera Windows will bring up another copy of the Wi...

Page 5: ...he Exposure Time was 1 0 second Spend some time inspecting the data then click in the dialog to close it Data like this is always attached to saved images and you can show it using the Parameters command in the Display menu After the Image Parameters dialog has gone you ll see the image displayed in its own window and the Contrast dialog will appear The image is shown below SBIG ST 402 Operating M...

Page 6: ...open light frame and another of equal exposure with the shutter closed dark frame You then subtract the dark frame from the light frame and because the hot pixels and the readout glow repeat from one image to another they are removed by the subtraction Let s see how this works Close Image 2 and Open Image 3 which is a 10 second light frame where you can get a hint of the object but the hot SBIG ST...

Page 7: ...mages Clicking Smooth can reduce the noise in underexposed images Clicking Sharpen reveals additional detail in well exposed images Establishing a Link It s time to actually connect up to your camera and take some images If you haven t installed the drivers already go back to Section 2 and do so now If you ve taken a break from the tutorial and the camera isn t powered up and attached to the compu...

Page 8: ... the TE cooler We recommend choosing a temperature that is 20 to 23 degrees below the ambient temperature Choosing a lower temperature won t hurt the camera but you ll notice in the Link Status field bottom of screen that the CCD never attains the temperature and the TE stays at 100 It can take several minutes for the temperature to settle in but if you see the TE stuck at 100 simply increase the ...

Page 9: ...our telescope would drive you crazy taking a single image at a time tweaking the telescope etc Instead we use the Focus command which is like Grab but it takes image after image SBIG ST 402 Operating Manual Page 15 automatically Use the Focus command in the Camera menu and set it up in the Focus Setup dialog as shown below Click OK and the camera will go into Focus mode You ll see image after imag...

Page 10: ...e Setpoint it will jump back and forth by about 0 5 degrees This is normal The ST 402 regulates the CCD temperature by dithering back and forth across the Setpoint At this point we re ready to hook up to the telescope Focusing a CCD camera at the telescope can be a tedious operation so a few hints should be followed Before using the software to focus the camera the first time you should place a di...

Page 11: ...rate If you have difficulty finding an object after obtaining good focus check to be sure that the head is seated at best focus then remove the head and insert a medium or low power eyepiece Being careful not to adjust the focus knob on the telescope slide the eyepiece in or out until the image appears in good focus Then visually find and center the object if it is visible to the eye If not use yo...

Page 12: ...ooming Kodak CCDs like the KAF 0402LE with the antiblooming option can be used to help stop or at least reduce blooming when the brighter parts of the image saturate Astrometry Astrometry is the study of stellar positions with respect to a given coordinate system Autoguider All SBIG CCD cameras have auto guiding or Star Tracker functions This is accomplished by using the telescope drive motors to ...

Page 13: ...ut Noise Readout noise is associated with errors generated by the actual interrogation and readout of each of the CCD pixels at the end of an exposure This is the result of fixed pattern noise in the CCD residual charge in the readout capacitors and to a small extent the noise from the A D converter and preamplifier Resolution Mode The resolution of a CCD camera is determined by pixel size Pixel s...

Page 14: ...les Power Jack The Power Jack is used to supply 10 0 14 5 Volts DC at 1 amp to the camera The jack is locking and center positive The mating plug is the locking model Switchcraft S760K with 0 218 inch outer diameter and 0 080 inch inner diameter 5 5 2 0 mm Telescope Jack The Telescope Jack is used to provide tracking signals to the telescope Viewed from outside the camera looking in it has the fol...

Page 15: ...with a cotton swab or Q tip and a little isopropyl alcohol Use one end of the Q tip to swab it with alcohol and the other to dry it Never re use a Q tip and do not scrub use gentle pressure 7 Replace the front lid 8 If you have a few small dust specs don t worry it is almost impossible to get them all and a flat field will take care of them well 9 Filters are cleaned the same way Replacing the Des...

Page 16: ... Size 9 x 9 microns Full Well Capacity Non ABG CCDs ABG CCDs 100 000 electrons 50 000 electrons Dark Current 1 e pixel sec at 0 C Shutter Electromechanical Exposure 0 04 to 3600 seconds 10ms resolution A D Converter 16 bit with Correlated Double Sampling Read Noise 17e RMS Binning Modes 1x1 2x2 3x3 Full Frame Download USB 2 USB 1 1 Up to 1 200 000 pixels per second Up to 400 000 pixels per second ...

Reviews: