


24 SawStop 10” Contractor Saw
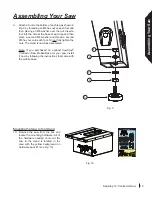
19.
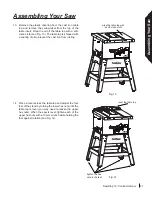
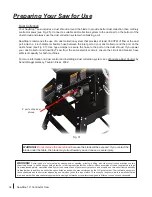
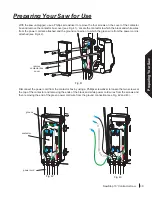
Install the motor belt by first placing the belt over the arbor pulley and then lifting the motor upward and placing
the other end of the belt over the motor pulley (see Fig. 19a). Release the motor when the belt is in place so
that the weight of the motor puts tension on the belt. Rotate the belt by hand to make sure the ribs on the belt
are aligned with the grooves on both pulleys (see Fig. 19b).
Note: The tilt angle of the saw can be increased to provide more access to the arbor pulley.
Connect the short electrical cord extending from the rear of the cabinet to the matching plug extending from
the motor. Make sure the plugs are connected below the motor.
!
WARNING
!
ADVERTENC
IA
!
AVERTISSEMEN
T
Para s
u propi
a seguri
dad, lea
el manu
al
de inst
rucción ant
es de us
ar la si
erra.
1. Use
las gafa
s de se
guridad.
2. Use
el disp
ositivo d
e segu
ridad d
e la cuchill
a y
sep
arador
para cu
alquier
operació
n para l
a cual
peu
da ser
utilizad
a incluy
endo to
das las
oper
acione
s de se
rrar compl
eto o a
través
.
3. Ma
ntenga las
manos
fuera d
e la tray
ectoria d
e
la c
uchilla
de la sie
rra.
4. Util
ice una
vara d
e empu
jar cua
ndo está
nec
esario.
5. Se
pa reduci
r el riesgo
del retr
oceso.
6. No
realice
ningun
a opera
ción a
mano a
lzada.
7. No
ponga
la mano
alrede
dor o d
etrás d
e la
cuc
hilla.
8. Nunc
a trate d
e expe
rimenta
r con e
l sistema
de
fren
os.
9. Nu
nca aju
ste la p
osición
del car
tucho d
el freno
mie
ntras q
ue la c
uchilla e
stá gira
ndo.
10. No
trate d
e desco
nectar e
l sistema
de fren
os.
11. Siempre d
esenchuf
e la sierra a
ntes de c
ambiar
la c
uchilla, e
l cartuch
o del fr
eno, o d
e
ma
ntenerl
a.
12. No co
necte e
l motor
directa
mente
con un
abast
ecimie
nto.
13. Util
ice el int
errupto
r del by
pass s
olamente
cuando e
stá neces
ario.
14. No e
xponga
a la lluvi
a o al u
so en l
ocaliza
ciones
húmedas.
15. No
ponga
las ma
nos dentr
o de ni d
ebajo d
el
gabi
nete m
ientras
la cuch
illa gira
.
Pour
votre pro
pre séc
urité, li
sez le
manuel
d’ins
truction av
ant d’uti
liser la
scie.
1. Po
rtez de
s lunett
es de s
écurité
.
2. Util
isez le
protecte
ur de la
me quel q
ue soit
le
typ
e d'opé
ration.
3. Ga
rdez le
s main
s à l’écart d
e la lam
e lorsqu
’elle
tourne.
4. Util
isez un p
oussoi
r de fin d
e pass
e si
néc
essaire
.
5. Limite
z au ma
ximum
le risqu
e de re
jet.
6. Ne
travaill
ez pas à
la volée
.
7. Ne
passez
pas votre b
ras par-dessu
s ou aut
our
de la la
me.
8. N’essaye
z jamais
d'effec
tuer un e
ssai du c
ircuit
de frein
age.
9. N’aju
stez ja
mais la
position d
e la carto
uche d
e
frein lo
rsque l
a lame
tourne
.
10. N’ess
ayez p
as de n
eutralis
er le ci
rcuit de
frei
nage.
11. Dé
branche
z la scie
avant d
e chan
ger la l
ame, la
cartouche
de frein
, ou d’en fa
ire l’entr
etien.
12. Ne
branchez
pas dir
ecteme
nt le m
oteur à
une
prise d
e coura
nt.
13. N'u
tilisez l
’interrupte
ur de b
y-pass q
u'en cas d
e
nécessi
té.
14. Ne
pas ex
poser a
la plui
e et ne
pas utiliser d
ans
les em
placem
ents hu
mides.
15. Ne
mettez
pas le
s main
s à l’inté
rieur on
au-de
ssous d
e cabine
t lorsqu
e la lam
e tourne.
For your
own s
afety, rea
d the in
structio
n
manua
l before op
erating th
is saw.
1. We
ar eye p
rotection.
2. Use th
e blade
guard a
nd spre
ader fo
r every
opera
tion for
which i
t can b
e used
, includ
ing all
hrough
sawing.
3. Ke
ep hand
s out o
f the lin
e of the
saw bla
de.
4. Us
e a push-s
tick wh
en requ
ired.
5. Kn
ow how
to reduce t
he risk
of kick
back.
6. Do
not per
form an
y opera
tion free
hand.
7. Never r
each a
round o
r over t
he saw b
lade.
8. Never tr
y to tes
t fire th
e brake s
ystem.
9. Ne
ver adju
st the p
osition
of the b
rake ca
rtridge w
hile
the bla
de is s
pinning
.
10. Do
not try
to disa
ble the
brake syste
m.
11. Un
plug th
e saw b
efore c
hangin
g the b
lade,
changing th
e brake c
artridge
or servi
cing.
12. Do
not con
nect th
e moto
r directl
y to a
power
supply.
13. Use
the byp
ass sw
itch on
ly when
neces
sary.
14. Do n
ot expose
to rain
or use in d
amp loca
tions.
15. Do
not pu
t your h
ands ins
ide or u
nderneath
the
cabine
t while
the bla
de is sp
inning.
Made in T
aiwan
SawSto
p, LLC
www.
sawstop
.com
TCP
10¨ Cont
ractor
Saw
SawStop
®
Model No
. CNS 17
5
Serial No. C
0740123
45
Electrical / Electr
icidad / Électr
icité
115/230 V
olts, 60 Hz
15/7.5 Amps
1 Phase
1.75 HP
3500 RPM
®
c
US
175370
lift motor
motor belt
align the ribs
Assembling Your Saw
Fig. 19a
Fig. 19b
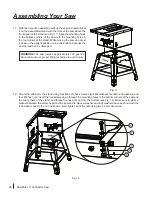
Mounting the Extension Wings
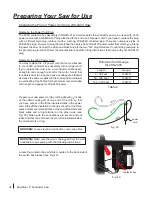
20. The hardware required to mount the extension wings to the cast iron table top is located in the area with the
purple background on hardware pack #2. Position one of the extension wings next to the left side of the cast
iron table and align the holes in the side of the wing with the four threaded holes on the side of the table (see
Fig. 20). It doesn’t matter which direction the SawStop lettering on the top of the extension wing faces. Mount
the left extension wing with four M8 lock washers and four M8 x 16 hex screws, but do not tighten. Repeat the
same procedure to mount the other extension wing to the right side of the table.
Note: Cast iron extension wings are available from SawStop as an upgrade (see page 103).
Fig. 20
13
12
!
WARNING
!
ADVERTENCIA
!
AVERTISSEMENT
Para su propia seguridad, lea el manual de
instrucción antes de usar la sierra.
1. Use las gafas de seguridad.
2. Use el dispositivo de seguridad de la cuchilla y
separador para cualquier operación para la cual
peuda ser utilizada incluyendo todas las
operaciones de serrar completo o a través.
3. Mantenga las manos fuera de la trayectoria de
la cuchilla de la sierra.
4. Utilice una vara de empujar cuando está
necesario.
5. Sepa reducir el riesgo del retroceso.
6. No realice ninguna operación a mano alzada.
7. No ponga la mano alrededor o detrás de la
cuchilla.
8. Nunca trate de experimentar con el sistema de
frenos.
9. Nunca ajuste la posición del cartucho del freno
mientras que la cuchilla está girando.
10. No trate de desconectar el sistema de frenos.
11. Siempre desenchufe la sierra antes de cambiar
la cuchilla, el cartucho del freno, o de
mantenerla.
12. No conecte el motor directamente con un
abastecimiento.
13. Utilice el interruptor del bypass solamente
cuando está necesario.
14. No exponga a la lluvia o al uso en localizaciones
húmedas.
15. No ponga las manos dentro de ni debajo del
gabinete mientras la cuchilla gira.
Pour votre propre sécurité, lisez le manuel
d’instruction avant d’utiliser la scie.
1. Portez des lunettes de sécurité.
2. Utilisez le protecteur de lame quel que soit le
type d'opération.
3. Gardez les mains à l’écart de la lame lorsqu’elle
tourne.
4. Utilisez un poussoir de fin de passe si
nécessaire.
5. Limitez au maximum le risque de rejet.
6. Ne travaillez pas à la volée.
7. Ne passez pas votre bras par-dessus ou autour de la
lame.
8. N’essayez jamais d'effectuer un essai du circuit de
freinage.
9. N’ajustez jamais la position de la cartouche de frein
lorsque la lame tourne.
10. N’essayez pas de neutraliser le circuit de
freinage.
11. Débranchez la scie avant de changer la lame, la
cartouche de frein, ou d’en faire l’entretien.
12. Ne branchez pas directement le moteur à une prise de
courant.
13. N'utilisez l’interrupteur de by-pass qu'en cas de
nécessité.
14. Ne pas exposer a la pluie et ne pas utiliser dans les
emplacements humides.
15. Ne mettez pas les mains à l’intérieur on
au-dessous de cabinet lorsque la lame tourne.
For your own safety, read the instruction
manual before operating this saw.
1. Wear eye protection.
2. Use the blade guard and spreader for every
operation for which it can be used, including all
hrough sawing.
3. Keep hands out of the line of the saw blade.
4. Use a push-stick when required.
5. Know how to reduce the risk of kickback.
6. Do not perform any operation freehand.
7. Never reach around or over the saw blade.
8. Never try to test fire the brake system.
9. Never adjust the position of the brake cartridge
while the blade is spinning.
10. Do not try to disable the brake system.
11. Unplug the saw before changing the blade,
changing the brake cartridge or servicing.
12. Do not connect the motor directly to a power
supply.
13. Use the bypass switch only when necessary.
14. Do not expose to rain or use in damp locations.
15. Do not put your hands inside or underneath the
cabinet while the blade is spinning.
Made in Taiwan
SawStop, LLC
www.sawstop.com
TCP
10¨ Contractor Saw
SawStop
®
Model No. CNS 175
Serial No. C074012345
Electrical / Electricidad / Électricité
115/230 Volts, 60 Hz
15/7.5 Amps
1 Phase
1.75 HP
3500 RPM
®
c
US
175370
Moving b
elts and par
ts
can pinch,
cut or cru
sh.
Do not op
erate with
belt guar
d open.
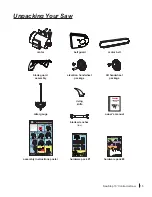
Tools
Hex Key, M3
(1)
Hex Key, M5
(1)
Hex Key, M8
(1)
Mounting the Switch Box
Hardware for Step 22
Switch Box Keys
(2)
Washers,
M6 (2)
14
Hex Screws,
M6 x 20 (2)
15
Installing the Motor and Belt Guard
Hardware for Steps 17-19
Washers, M5 (4)
10
Hex Nuts, M5 (4)
11
Mounting the Extension Wings
Hardware for Steps 20-21
Lock Washers,
M8 (8)
12
Hex Screws,
M8 x 16 (8)
13
Hardware Pack
#
2
Blade Spacing
Adjustment
Gauge
(1)


