Savwinch 1000CS Installation, Operation & Maintenance Manual Download Page 10


10 

INSTALLATION 

TOOLS REQUIRED: 

1.


Electric drill 

2.


Center punch 

3.


Drill bits (8mm for 450, and 880, 10mm for 1000, 1500, and 2000) 

4.


Metric sockets and wrench 

5.


Philips head screwdrivers 

6.


Wire cutters and pliers 

7.


Terminal crimping tool 

8.


Heat gun 

9.


Waterproof thread sealant 

10.


Marine sealant 

UNPACKING 

1.


Check the packing list enclosed with your winch system. Carefully inspect the contents for completeness and 

for any damage that may have occurred during transit. 

2.


Study the boat's layout. 

a.


The winch gearbox and motor can be rotated to different mounting positions. This allows them to be 

re-positioned. Determine the best location for mounting the winch, solenoid or Electronic Fast Fall 

System, circuit breaker and Up/Down switch. If applicable, also consider the location for the guide 

roller or hawse pipe, the bowsprit/bow roller. Ensure that the anchor rode will flow freely from the 

drum to the bowsprit/bow roller in both directions. 

b.


Ensure that the operator (usually the skipper) will have a clear view of the anchor when it is dropped 

and retrieved from the location where the Up/Down switch is to be fitted. It’s possible to run dual 

switches off the Electronic Fast Fall System or solenoid if required. 

c.


Locate the winch in a suitable position on the deck or in the anchor well so that there is no interference 

from other ropes or objects. Ensure that the position of the winch, if crew and/or equipment are 

nearby, will not lead to any safety issues when it is operating. 

d.


Ensure that the rope has a clear lead to the winch. Use a roller if required to direct the rode to the 

drum. Ensure that there is sufficient room to run the electrical cables to the winch without interfering 

with the operation of the winch or with other activities on the foredeck. 

e.


If the deck is angled or curved, a suitably shaped mounting block will be required to spread the load 

evenly over the deck surface and to mount the winch on a level and even footing. Depending on the 

thickness of the mounting, a suitable spacer may be required to mount the winch. 

f.


Check that the mounting points are strong enough for the winch, solenoid or Electronic Fast Fall 

System, circuit breaker, and Up/Down switch, as well as the guide roller or hawse pipe, and the 

bowsprit/bow roller (if applicable). If unsure, refer to your boat maintenance professional or marine 

servicer. 

g.


Electrical cables will be run from the battery to the circuit breaker, solenoid or Electronic Fast Fall 

System and Up/Down switch. Investigate possible paths for the cabling to run. You may need to drill or 

cut penetrations for the cable to pass through bulkheads. Ensure that this does not have a negative 

impact on the integrity of waterproof compartments. 

h.


Select a suitable mounting point for the solenoid or Electronic Fast Fall System (in a dry area of the 

boat, ideally as close as possible to the winch to minimize voltage drops). 

i.


Select a suitable mounting point for the circuit breaker, as close as possible to the positive battery 

terminal to ensure maximum protection for the electrical circuitry. 

j.


Select a suitable mounting point for the battery terminations. If there is a common termination point 

for the negative terminal of the battery, the negative cable for the winch should be terminated at that 

point (not at the battery negative). This is done to minimize ground loops, which can cause electrical 

interference with radio communication and electrical instruments, and to minimise corrosion due to 

Summary of Contents for 1000CS

Page 1: ...1 Installation Operation Maintenance Manual For Savwinch CS SS and SSS Series Drum Winches ...

Page 2: ...SS 1500SSS 3000SSS and 4000SSS The information provided in this manual focuses on recreational boating For commercial boats in survey please discuss your requirements with a Savwinch specialist and or a marine surveyor Before you start Please read these instructions carefully before attempting to install operate or maintain this product Observe all safety information Failure to comply with instruc...

Page 3: ...capacity 4 Do not overload your winch and do not attempt prolonged pulls at heavy loads Overloads can damage the winch and or the rode and create unsafe operating conditions Do not maintain power to the winch if the motor stalls 5 The engine generator should be running during winch operation to minimize battery drain and maximize winch power and speed If considerable winching is performed with the...

Page 4: ...o a cleat or other secure point with the rope off the drum If the anchor breaks free during cruising or trailering it could cause serious damage and or injury Entanglement hazards 1 Keep the winching area clear Do not approach within one meter of the winch when power is applied to it Hands feet hair and clothing if caught in the winch when operating can lead to serious injury or death 2 Disable po...

Page 5: ...bout 3lb 1 5kg per metre of the boat s length Some of the more modern anchor designs quote as little as 2lb 1kg per metre Example A 20ft 6m boat could achieve good results with a 20lb 9kg plow anchor and 20ft 6m of chain A modern design such as a 13lb 6kg escape or delta anchor could provide the same if not better holding power These figures assume a boat with an average displacement and windage H...

Page 6: ...t doesn t stretch it s a good precaution to fit a few metres of three core nylon a top shot before the chain to dampen shock loads that can be uncomfortable and can jerk the anchor out of the sea bed Note One downside of thin UHMWPE is that it can jam easier than larger nylon and polyester ropes This can be minimized by taking extra care when raising your anchor For trouble free operation choose a...

Page 7: ...ch the battery preferably in a dry area Protect the cable joins with adhesive sealed heat shrink to minimize the risk of moisture ingress Use only tinned copper wire and where possible terminate the cables in a dry part of the boat to reduce the risk of corrosion usually below deck One way to prevent the risk of moisture is to mount the solenoid or Electronic Fast Fall System in a dry area such as...

Page 8: ...mum Chain Length 33ft 10m Circuit Breaker 40A Minimum Cable Size 6 B S Included Rope Chain combinations 6mm x 65m Double Braid Rope 6mm x 6m Chain Model 1000 CS 1000 SS and 1000 SSS Unit Weight 37lb 17kg Maximum Anchor Weight 37lb 17kg Maximum Chain Length 46ft 14m Circuit Breaker 60A Minimum Cable Size 4 B S Included Rope Chain combinations 6mm x 95m Double Braid Rope 6mm x 7m Chain Model 1500 CS...

Page 9: ...on 450CS SS 880CS SS Winch For up to 4 5m of cable use 6B S and experience 4 voltage drop For up to 9m of cable use 4B S and experience 5 voltage drop For up to 12m of cable use 3B S and experience 4 voltage drop 1000CS SS SSS 1500CS SS SSS Winch For up to 4 5m of cable use 6B S and experience 6 voltage drop For up to 9m of cable use 4B S and experience 8 voltage drop For up to 12m of cable use 3B...

Page 10: ...to run the electrical cables to the winch without interfering with the operation of the winch or with other activities on the foredeck e If the deck is angled or curved a suitably shaped mounting block will be required to spread the load evenly over the deck surface and to mount the winch on a level and even footing Depending on the thickness of the mounting a suitable spacer may be required to mo...

Page 11: ... corrosion This also applies to the mounting bolts nuts and washers Where the deck construction is light of foam sandwich construction a marine grade plywood stiffener of at least 5 8 should be fitted to the reverse side of the mounting point to spread the load Install and tighten the stainless steel mounting bolts 6 To help the rope to lead onto the drum a minimum spacing of one meter is recommen...

Page 12: ... to the box 12 Critical Step Attach all wires to the Up Down switch circuit breaker and winch as specified in the relevant circuit schematic Failure to connect the terminals correctly will damage internal components and void your warranty If unsure contact your nearest service agent dealer or marine mechanic before proceeding 13 Once installation has been completed it is important to test the dire...

Page 13: ...Ensure the rope feeds correctly onto the drum to the top or bottom of the shaft as appropriate for your setup without touching the decking 8 Fit the anchor into the correct position on the bowsprit Secure it temporarily so it can t fall 9 Pass the rope through the hawsepipe if applicable Attach the thimble which has been secured with an eye splice on the end of the anchor rope to a shackle chain s...

Page 14: ... idle forward while pushing the Up switch periodically to allow the rope to be wound cleanly onto the drum DO NOT use the winch to pull the boat back to anchor Once the rope is directly over the anchor place the boat in neutral then use the winch to retrieve your anchor 1 The anchor winch is simple to operate from an Up Down switch operated from the helm Ensure safe operation No one should be on t...

Page 15: ...component jams then replace it with a more appropriate size Anchor lifts slowly or not at all Anchor and rode too heavy Refer to anchor selection guide 9 Always have a spare rope and anchor in case of a power or winch failure 10 Your winch motor and gearbox conform to the IP68 standard which classifies the degree of protection provided against intrusion dust accidental contact and water ingress of...

Page 16: ... avoid running for periods exceeding five minutes without a break this is only if using the maximum anchor size and maximum chain length see page 6 Winch Repairs CAUTION Only authorized repair centers and marine mechanics are authorized to repair the winch and accessories Do not attempt to disassemble the motor or gearbox This will void your warranty ...

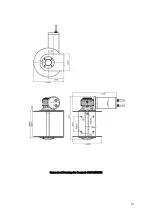
Page 17: ...17 ENGINEERING DRAWINGS Dimensional Drawings for Savwinch 450CS SS ...

Page 18: ...18 Dimensional Drawings for Savwinch 880CS SS ...

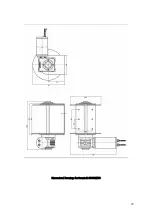
Page 19: ...19 Dimensional Drawings for Savwinch 1000CS SS SSS ...

Page 20: ...20 Dimensional Drawings for Savwinch 1500CS SS SSS ...

Page 21: ...21 Dimensional Drawings for Savwinch 2000SS SSS ...

Page 22: ...22 Dimensional Drawings for Savwinch 3000SS SSS ...

Page 23: ...23 Dimensional Drawings for Savwinch 4000SS SSS ...

Page 24: ...24 ...

Reviews: