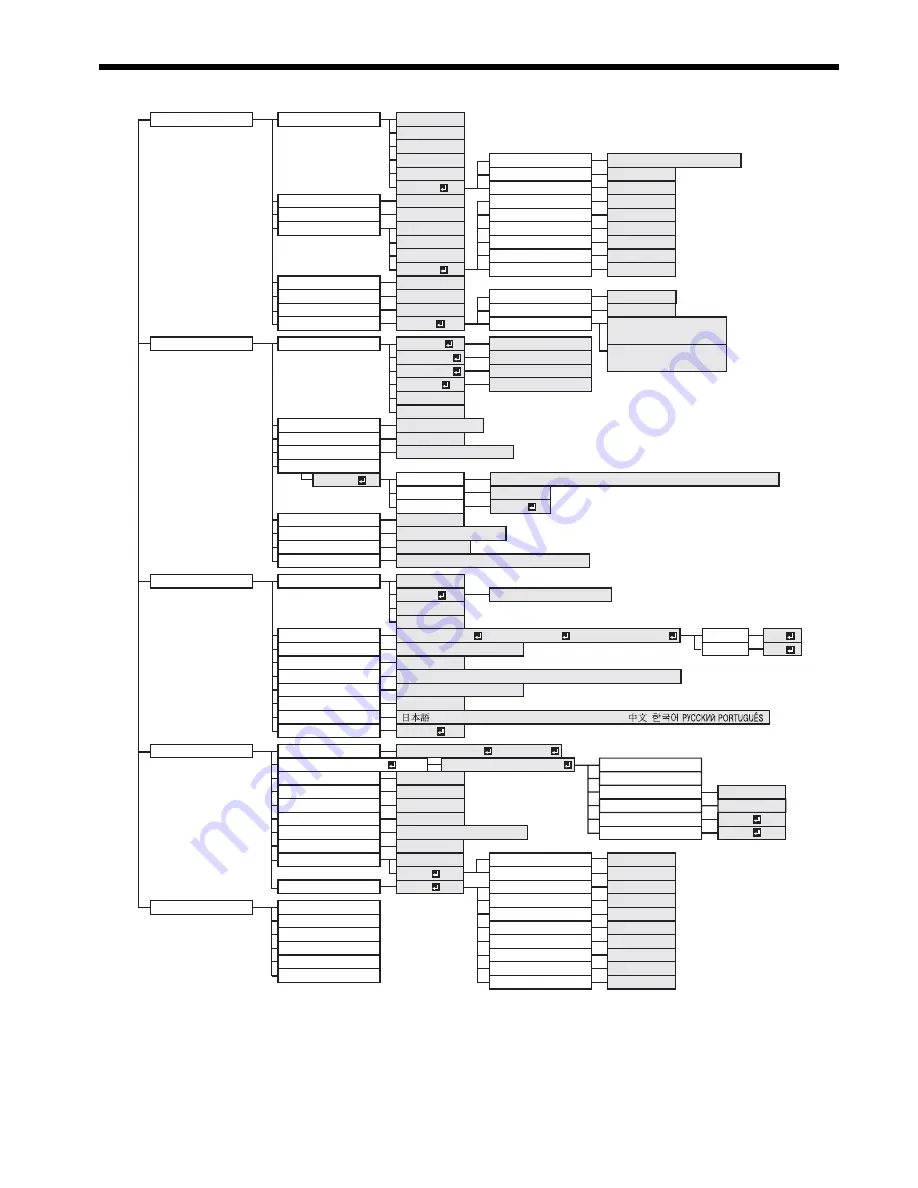
Saville PowerLite PX-3100L User Manual Download Page 22

EN-22

Menu operation

•  Menus are not displayed when no signal is supplied to the projector. 

* 1: Not available when COLOR ENHANCER is set to sRGB.
* 2: Not available with certain signals.
* 3: Not available when the input signal is from the VIDEO IN or S-VIDEO IN terminal.
* 4: Available only when the input signal is TV60, TV50, 480i or 576i.
* 5: Available only when the input signal is from the COMPUTER/COMPONENT VIDEO IN-1 terminal.
* 6: Setting range differs depending on the input signals.
* 7: Available only when the input signal is from the VIDEO IN or S-VIDEO IN terminal.
* 8: Not available when the source is DVI.
* 9: Selectable when WALL SCREEN is set to other than OFF. 

INSTALLATION 

WALL SCREEN

1 - 5

1 - 5

1 - 5

CENTER, UPPER, LOWER

OFF

1 - 5

OFF, MIRROR, INVERT, MIRROR INVERT 

AUTO POWER ON 

ON, OFF

ON, OFF

RESET ALL

OK 

AUTO POWER OFF 

ON , OFF 

FEATURE 

MENU POSITION

1 (Upper left), 2(Lower right)

IMAGE REVERSE 

SPLASH SCREEN 

BLUE, BLACK, IMAGE 

BACK COLOR 

STANDARD, LOW 

BLACK, IMAGE 

MUTE MODE 

LAMP MODE 

AUTO 

16:9 

REAL 

ASPECT 

DISPLAY INPUT

PASSWORD FUNCTION

ON, OFF

SCART INPUT

VIDEO SIGNAL

AUTO, NTSC, PAL, SECAM, 4.43NTSC, PAL-M, PAL-N, PAL-60

LANGUAGE

, English, Español, Deutsch, Français, Italiano,        ,          ,             ,    

SIGNAL

INFORMATION

HORIZ.POSITION

HOLD

SETUP

0 - 999

VERT.POSITION

0 - 999

FINE SYNC.

0 - 31

TRACKING

USER

0 - 9999

CLAMP POSITION

1 - 255

CLAMP WIDTH

1 - 63

LPF

ON, OFF

OVER SCAN

100 - 90%

SHUTTER(L)

0 - 20

SHUTTER(U)

0 - 20

SHUTTER(RS)

0 - 20

SHUTTER(LS)

0 - 20

VERT. SYNC

AUTO, OFF

*6

*3 *8

*2 *3 *8

*8

*8

*3

*2

*2

*2 *3 *8

*3 *8

*5

AUTO, OFF

CINEMA MODE

*3 *8

*3 *8

*3 *8

*6

*6

OFF

BEGIN

0 - 99

END

0 - 99

COMPUTER INPUT

SYNC. TYPE

LAMP TIME (LOW)

INPUT

RESOLUTION

HORIZONTAL FREQUENCY

VERTICAL FREQUENCY

AUTO, RGB, YC

B

C

R

 / YP

B

P

R

AUTO, OFF, 3.75%, 7.5%

*6

OFF,  5,  10,  15,  30,  60 min 

OK 

, MENU ACCESS     , SPLASH ID SCREEN

OK

ON

UNLOCK

OK 

LOCK

*4

*7

IMAGE 

CONTRAST ±30 

BRIGHTNESS ±30 

STANDARD 

LOW 

HIGH 

COLOR ENHANCER 

AUTO 

PRESENTATION 

STANDARD 

THEATER 

sRGB 

USER     

COLOR  

±10 

TINT  

±10 

SHARPNESS  

±5 

CONTRAST B 

 ±30 

BRIGHTNESS R 

 ±30 

BRIGHTNESS G 

 ±30 

CONTRAST R 

 ±30 

CONTRAST G 

 ±30 

GAMMA MODE 

DYNAMIC, NATURAL, DETAIL 

RGB-COLOR  

±10 

RGB-TINT  

±10 

BRIGHTNESS B 

NOISE REDUCTION 

 ±30 

CTI 

INPUT LEVEL 

 ±5

(for analog signal input)

 ENHANCED, NORMAL

(for digital signal input)

USER     

*2 

*1 

*1

*2 

*1 

*2 

*2 

*2 

ADVANCED MENU 

OK 

LIGHT BLUE

LIGHT GREEN

PINK

BLACK BOARD

BEIGE

*2 *3 

IMAGE CAPTURE 

SETUP 

x1, x2, FULL

GLAY, RED, GREEN, BLUE, BLACK, WHITE, RED 50%, GREEN 50%, BLUE 50% 

CAPTURE 

BACK COLOR 

SIZE 

GO 

ON, OFF

FULL

MEMORY CALL

AUTO, MEMORY 1    , MEMORY 2    

RESOLUTION (MEMORIZE     )

Horizontal Pixels x Vertical Lines

VERTICAL FREQUENCY

HORIZONTAL FREQUENCY

VERT. LINES

350 - 1200

CANCEL

EXECUTE

OK     

HORIZ. PIXELS

 640 - 1920

OK     

*2 *3

*2 *3

*6

*6

COLOR TEMP. *1 *9

Summary of Contents for PowerLite PX-3100L

Page 1: ...LCD PROJECTOR MODEL Saville PowerLite PX 3100L Saville PowerLite PX 4000L User Manual This User Manual is important to you Please read it before using your projector...

Page 2: ...he attached speci ed power supply cord If you use another power supply cord it may cause interference with radio and television reception Use the attached RGB cable and RS 232C cable and the shielded...

Page 3: ...nt at your local community waste collection recycling centre In the European Union there are separate collection systems for used electrical and electronic product Please help us to conserve the envir...

Page 4: ...ds Never push objects of any kind through openings of this projector as they may touch dangerous voltage points or short out parts that could result in a re or electric shock Never spill liquid of any...

Page 5: ...ating Place of installation For safety s sake refrain from setting the projector at any place subjected to high temperature and high humidity Please maintain an operating temperature humidity and alti...

Page 6: ...atteries should be used Dispose of used batteries according to your local regulations Batteries may explode if misused Do not recharge disassemble or dispose of them in re Be sure to handle the batter...

Page 7: ...played or image captur ing is being executed the COMPUTER VIDEO AUTO POSITION and VOLUME buttons function as the W X S and T buttons respectively While the menu is on the screen the KEYSTONE button fu...

Page 8: ...n addition to the volume control The direction buttons are used for the keystone adjustment and ne adjustment W and X buttons only Pressing the LASER button emits a laser beam Even when you keep holdi...

Page 9: ...unstable When you use the remote control too close to the remote control sensor the remote control may not work correctly Reception angle Vertical directions Vertical directions ceiling mount Front of...

Page 10: ...e adjustment After using the projector 3 Put the adjustment foot for the vertical position back into the projector Adjustment of the horizontal position of the projector Adjust the horizontal position...

Page 11: ...ojector at least 50 cm or 20 inches away from the wall to prevent the air inlet grille and the air outlet grilles that emit hot air from being blocked Do not use the projector in the following locatio...

Page 12: ...05 214 5 4 274 6 9 9 0 23 200 508 120 305 160 406 285 7 3 366 9 3 12 0 31 250 635 150 381 200 508 357 9 1 15 0 38 300 762 180 457 240 610 429 10 9 18 0 46 Center of the lens Height of the projected im...

Page 13: ...IDEO DVI D HDCP To monitor port RGB cable DVI cable option To DVI AUDIO OUT AUDIO IN 1 IN 2 Computer PC audio cable option To PC audio output MONITOR OUT Monitor Use of a long cable may decrease the q...

Page 14: ...t damage to the power cord If the power cord should be damaged contact your dealer for replacement because it may cause re or electric shock Do not modify or alter the power cord If the power cord is...

Page 15: ...D HDCP button on the remote control that is corresponding to the terminal in use The input source is switched from COMPUTER1 to COMPUTER2 to DVI at every press of the COMPUTER button on the projector...

Page 16: ...th the lens cap to protect it from dust If necessary disconnect the cables from the computer after unplugging the power cord AV mute The video and audio signals are temporarily muted when the MUTE but...

Page 17: ...at are not being received enabled When the video equipment is equipped with the S video output terminal make the connection as follows 1 Connect one end of a commercially available S video cable to th...

Page 18: ...ovided with a function to switch the methods to output DVI digital signals When your DVD player is provided with such function set it as follows EXPAND or ENHANCED NORMAL See the users guide of your D...

Page 19: ...ton on the projector or the VIDEO or S VIDEO button on the remote control that is corresponding to the terminal in use The input source is switched between VIDEO and S VIDEO at every press of the VIDE...

Page 20: ...If the power cord should be unplugged accidentally while either the air inlet fan or the air outlet fans are oper ating or the lamp is on allow the projector to cool down for 10 minutes with the powe...

Page 21: ...tton Press the S or button Important You can correct the vertical and horizontal keystones at the same time However their adjustment ranges are limited in such correction When the keystone adjustment...

Page 22: ...Z POSITION HOLD SETUP 0 999 VERT POSITION 0 999 FINE SYNC 0 31 TRACKING USER 0 9999 CLAMP POSITION 1 255 CLAMP WIDTH 1 63 LPF ON OFF OVER SCAN 100 90 SHUTTER L 0 20 SHUTTER U 0 20 SHUTTER RS 0 20 SHUT...

Page 23: ...is available only when the NTSC signal is input SHARPNESS 5 Use to adjust the sharpness of the projected image See page 28 ADVANCED MENU NOISE REDUCTION ON OFF Use to reduce noise and roughness in the...

Page 24: ...E BLACK and IMAGE which will be displayed when there is no signal input from the source When IMAGE is selected the splash screen will be displayed MUTE MODE BLACK IMAGE Use to choose the background ei...

Page 25: ...nput signal If the image isn t displayed correctly select the desired video format manually SETUP AUTO Select to change the SETUP mode automatically OFF Select to make black lighter 3 75 7 5 Select to...

Page 26: ...ing is automatically selected RGB Select this option when connecting the projector to high de nition video equipment having R G and B output terminals YCBCR YPBPR Select this option when connecting th...

Page 27: ...amp operation time exceeds the time elapsed until the lamp shutdown warning is issued the bar turns to red See page 38 INPUT Indicates the name of the terminal to which the currently projected video s...

Page 28: ...or menu setting 1 Display the IMAGE menu 2 Select COLOR or TINT by pressing the S or T button COLOR or TINT is unavailable when COMPUTER1 COMPUTER2 or DVI is selected as the input source TINT is avail...

Page 29: ...erature Decrease the CONTRAST B blue and increase the CONTRAST R red If you set all of CONTRAST R G and B to negative values the original brightness of the image can t be obtained even when you maximi...

Page 30: ...the Settings tab to display the screen resolution setting The screen resolution setting of your computer is different from the setting of RESOLUTION MEMORIZE in the SIGNAL menu of the projector Select...

Page 31: ...the right or left half of the image Adjust SHUTTER LS or SHUTTER RS in the SIGNAL USER menu Noise appears on the top or bottom part of the image Adjust SHUTTER U or SHUTTER L in the SIGNAL USER menu...

Page 32: ...t Press the MENU button to cancel the procedure When the image capture completes the cap tured image will be displayed for three seconds Important You can t change the new startup screen back to the o...

Page 33: ...NU ACCESS and SPLASH ID SCREEN When the password has already been set the mode won t be changed In such cases press the ENTER button to cancel the password func tion and try again 4 Press the ENTER bu...

Page 34: ...appear Important In the EXPAND mode you can t adjust the volume Picture in Picture PinP One of the special features of this projector is the picture in picture PinP mode The PinP mode allows you to vi...

Page 35: ...rolled by the remote control correctly To extend the cable length you are recommended to use a repeater COMPUTER VIDEO S VIDEO DVI D HDCP HOME PageUP END PageDOWN AUTO POSITION KEYSTONE 1 2 MENU ENTER...

Page 36: ...function the PJLink application software is required For the specifications of PJLink access to the Web site of Japan Business Machine and Information System Industries Association JBMIA http pjlink...

Page 37: ...e lamp operation time exceeds the time elapsed until the lamp shutdown notice while the power is on See page 38 The lamp operation time exceeds the time elapsed until the lamp shutdown notice while th...

Page 38: ...lamp operation time exceeds the time elapsed until the lamp shutdown 1 the projector automatically shuts off and can t be used until the lamp is replaced and the lamp operation time is reset PowerLit...

Page 39: ...doesn t turn on if the lamp cover isn t attached securely Be sure to reset the lamp operation time whenever you replace the lamp Do not reset the lamp operation time unless you replace the lamp When r...

Page 40: ...w lter Use water or diluted mild detergent to clean the lter Rinse the lter thoroughly and let it dry completely 4 Attach the air lter 5 Attach the lter cover to the projector Make sure that the air l...

Page 41: ...l outlet and contact your dealer No image appears on the screen Cancel the AV mute by pressing the MUTE button Check that the lens cap is removed It may take about 1 minute for the lamp to light up Th...

Page 42: ...Adjust the projector and the screen so that they are perpendicular to each other See page 10 Afterimages persist on the screen This phenomenon is improved by keeping projecting an evenly bright image...

Page 43: ...t temperature This indication appears when the air inlet or outlet grille is blocked When they are kept blocked the lamp goes out J Remove the objects blocking the air inlet or outlet grille The mark...

Page 44: ...L R 1 e n i L e p y t l a n i m r e T e p y t l a n g i S t u p t u o r o t i n o M Analog RGB Mini D SUB 15 pin 1 e n i L e p y t l a n i m r e T e p y t l a n g i S t u p t u o o i d u A RGB Video...

Page 45: ...960 x 768 1024 x 768 4 SUN76 1280 x 1024 81 13 76 11 960 x 768 1024 x 768 4 SGI72 1280 x 1024 76 92 72 30 960 x 768 1024 x 768 4 SGI76 1280 x 1024 82 01 76 00 960 x 768 1024 x 768 4 UXGA60 1600 x 1200...

Page 46: ...Pin No Spec DVI D HDCP DVI D 24 pin PIN No Spec PIN No Spec 1 TMDS DATA 2 13 2 TMDS DATA 2 14 5V Power 3 TMDS DATA 2 Shield 15 Ground for 5V 4 16 Hot Plug Detect 5 17 TMDS DATA 0 6 DDC Clock 18 TMDS D...

Reviews: