
IP Audio Studio with Integrated Host QRG | 009-1835-05
2 of 2
45 Perseverance Way, Hyannis, MA 02601
Copyright © 2022 Savant Systems, Inc. | 220829
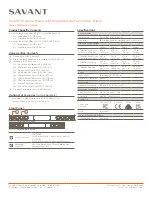
Rear Panel
Ether
net
R
eset
St
at
us
Digital A
udio
In
IR
RS232
GND
T
X
RX
GND
T
X
RX
2
1
-
1
+
-
2
+
-
3
+
100-2
40 V~
50-60 HZ 2.2A
IP A
udio Soundbar
G
F
E
D
C
B
A
A
IR
(3) IR Ports
Uses 6-pin IR Connectors to send IR signals
to control devices with an IR input or IR
receiver via an IR flasher (5V tolerant
only). See the
Savant® IP Audio Products
with Integrated Host Deployment Guide
for important precautions regarding IR
functionality before making any connections.
B
RS-232
(2) RS-232 Ports
Uses 6-pin Screw down plug-in connection.
Transmits and receives serial data to and
from serial controllable devices. For pin-
out information, refer to the RS-232 Wiring
section below.
C
Ethernet
8-pin RJ-45 port
10/100 Base-T auto-negotiating port.
Supports Audio Video Bridging (AVB).
D
Power
100/240V AC (50/60 Hz)
E
Status LED
Green Blinking
: Embedded system is ready,
but no communication has been established
with the host.
Green
: Host has established communications
with the embedded system.
Red Blinking
: Embedded firmware is running,
but has not received a DHCP IP Address.
Red
: Host has determined the firmware
needs to be updated, but a problem
occurred during the process that will initiate
a reset.
Amber Blinking
: Embedded system has a
valid link local IP Address and is connecting
to the host.
Amber
: Host is updating the embedded
firmware.
Off
: Embedded processor is resetting, or is
powered up, and is booting the embedded
firmware.
Hardware Failure
: If a hardware failure
occurs, the status LED indication will be
interrupted every three seconds with a
solid red indication. For example, if the LED
is blinking green when a hardware failure
occurs, the LED will alternate between
blinking green and solid red at three-second
intervals.
F
Reset
Resets the network settings to DHCP.
Hold Reset Button for 5 seconds while
Powered On to clear static IP address. Status
LED will turn off and then Amber while the
unit reboots with default network settings.
G
Digital Audio In
Digital optical audio inputs (TOSLINK).
Supports up to 192kHz/24-bit digital audio
in; PCM stereo format only.
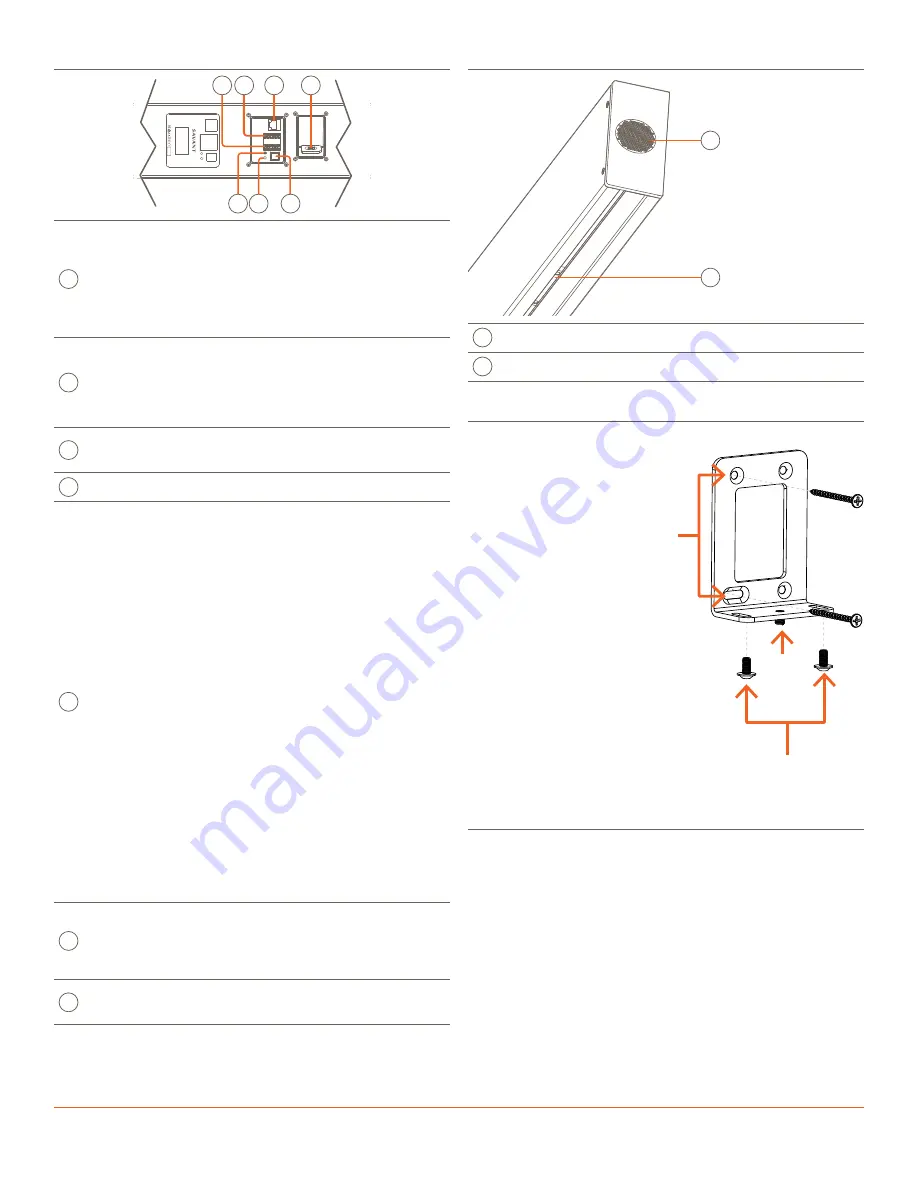
Side and Bottom Panel
A
B
A
Stage Tweeters
(2) 19mm Silk Tweeters
B
Mounting Slide
(2) Captive M5 threaded bracket
Wall Mount
NOTE:
Make all wiring connections to soundbar before mounting to
brackets.
1. Using the four included drywall
screws, affix wall mounting
brackets to the wall, allowing
sufficient space between
brackets to ensure stability.
NOTE
: The quantity of studs
affects the proper screw position.
2. Make all wiring connections to
soundbar before mounting to
brackets.
3. Using the included allen key, align
the threaded screw holes of the
captive slider with the openings
on base of the wall mount
bracket. Repeat this step for the
second wall bracket
4. Make any minor height
adjustments using the 6 mm
set screw on the bottom of the
bracket.
5. Attach the soundbar by threading
M5x10mm screws through wall brackets and into the soundbar’s
captive mounting slide brackets.
Plastic Feet
1. Align the captive M5 threaded brackets in the soundbar mounting
slide beneath the center speakers of right and left side channels.
2. Secure plastic feet to the captive brackets using M5x190mm
screws.
3. Remove wax paper from the adhesive backing on included rubber
pads and attach one to each of the plastic feet.
For more information on installing this SoundBar see the
Savant IP
Audio Studio with Integrated Host Deployment Guide
on the Savant
Customer Community.


