Sauder Harvey Park 420869 Manual Download Page 9

 å

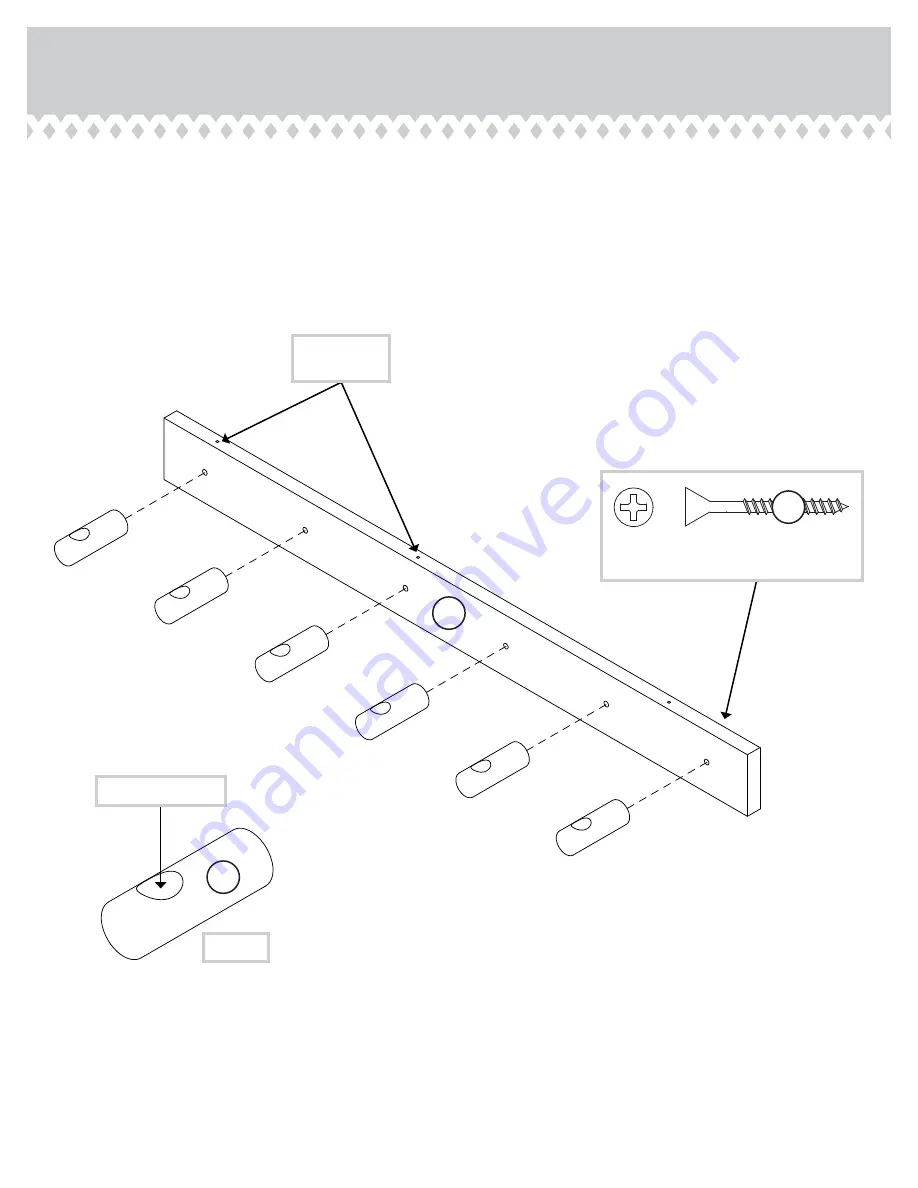
Fasten six PEG HOOKS (N) to the LOWER BACK (D). 
Use six BROWN 1-1/2" FLAT HEAD SCREWS (14S).

Step 5

420869

www.sauder.com/services

Page 9

N

D

Indention facing up

These holes 
must be here.

(6 used)

BROWN 1-1/2" FLAT HEAD SCREW

(6 used in this step)

14S

Summary of Contents for Harvey Park 420869

Page 1: ...OTE THIS INSTRUCTION BOOKLET CONTAINS IMPORTANT SAFETY INFORMATION PLEASE READ AND KEEP FOR FUTURE REFERENCE English pg 1 15 Fran ais pg 16 18 Espa ol pg 19 21 Lot 398397 03 09 17 Purchased __________...

Page 2: ...are Identi cation Assembly Steps Fran ais Espa ol Safety Warranty Hammer Not actual size No 2 Phillips Screwdriver Tip Shown Actual Size 3 4 5 15 16 18 19 21 22 23 420869 www sauder com services Page...

Page 3: ...each other Use this part identi cation to help identify similar parts Now you know our ABCs A RIGHT END 1 B TOP 1 C SHELF 1 D LOWER BACK 1 E BACK 1 F UPRIGHT 1 G CHALKBOARD 1 H TALL DIVIDER 1 I MIDDL...

Page 4: ...a hardware with your unit 420869 www sauder com services Page 4 DOOR STOP 1 4R SILVER 1 1 8 FLAT HEAD SCREW 8 10S BLACK 1 7 8 FLAT HEAD SCREW 17 2S WOOD DOWEL 2 26F BROWN 1 1 2 FLAT HEAD SCREW 6 14S 1...

Page 5: ...e SHELF C Use two BLACK 1 7 8 FLAT HEAD SCREWS 2S Fasten the BACK E to the SHELF C Use two BLACK 1 7 8 FLAT HEAD SCREWS 2S 420869 www sauder com services Page 5 C A E Finished edge Long nished edge Gr...

Page 6: ...SCREWS 2S Fasten the CHALKBOARD G to the SHELF C Use two BLACK 1 7 8 FLAT HEAD SCREWS 2S NOTE Be sure the textured surface is facing up Step 2 420869 www sauder com services Page 6 C BLACK 1 7 8 FLAT...

Page 7: ...rvices Page 7 H I M C SILVER 1 1 8 FLAT HEAD SCREW 6 used in this step 10S Fasten the DIVIDERS H I and M to the SHELF C Use six SILVER 1 1 8 FLAT HEAD SCREWS 10S Outer edge The hole in each DIVIDER mu...

Page 8: ...E UPRIGHT F and CHALKBOARD G Use six BLACK 1 7 8 FLAT HEAD SCREWS 2S NOTE Be sure the WOOD DOWELS insert into the holes in the TOP B Using your hammer gently tap the DOOR STOP 4R into the SHELF C Step...

Page 9: ...KS N to the LOWER BACK D Use six BROWN 1 1 2 FLAT HEAD SCREWS 14S Step 5 420869 www sauder com services Page 9 N D Indention facing up These holes must be here 6 used BROWN 1 1 2 FLAT HEAD SCREW 6 use...

Page 10: ...com services Page 10 Carefully turn your unit onto its front edges Fasten the LOWER BACK D to the SHELF C Use three BLACK 1 7 8 FLAT HEAD SCREWS 2S D C PEG HOOKS facing down BLACK 1 7 8 FLAT HEAD SCRE...

Page 11: ...1 1 8 FLAT HEAD SCREWS 10S Peel APPLIQUES from the APPLIQUE CARD 76P and stick them onto the screw heads in the TOP B Step 7 420869 www sauder com services Page 11 L E Finished edge SILVER 1 1 8 FLAT...

Page 12: ...ACK 2 3 4 FLAT HEAD SCREWS 100S Go to Step 9 now NOTE If the WALL MOUNT K holes do not line up over a wall stud you will need to use the WALL ANCHORS 55M through those holes To use a WALL ANCHOR 55M r...

Page 13: ...efully set the Wall Organizer onto the WALL MOUNT K NOTE The angled edge of the WALL CLEAT L will rest on the angled edge of the WALL MOUNT K Step 9 420869 www sauder com services Page 13 K K L SIDE V...

Page 14: ...SLIDING DOOR J insert the top edge of the SLIDING DOOR into the groove in the TOP B then insert the bottom edge of the SLIDING DOOR into the groove in the SHELF C Step 10 420869 www sauder com servic...

Page 15: ...15 NOTE Please read the back pages of the instruction booklet for important safety information This completes assembly Clean with a damp cloth Wipe dry And to celebrate why not share your success stor...

Page 16: ...dans les 48 heures Sauf week ends et jours f ri s Utilisez les instructions d assemblage en fran ais avec les sch mas tape par tape du manuel d instruction en anglais Chaque tape en fran ais correspon...

Page 17: ...TABLETTE C Utiliser deux VIS T TE PLATE 48 mm NOIRES 2S TAPE 6 Avec pr caution retourner l l ment sur ses chants avant Fixer l ARRI RE INF RIEUR D la TABLETTE C Utiliser trois VIS T TE PLATE 48 mm NOI...

Page 18: ...r totale de l unit REMARQUE Utiliser le niveau pour s assurer que la FIXATION MURALE K est de niveau sur le mur Marquer les deux trous pour la FIXATION MURALE K sur le mur Si les deux trous pour la FI...

Page 19: ...guras paso a paso provistas en el folleto ingl s Cada paso en espa ol corresponde al mismo paso en ingl s Se destacan las guras de cada paso con una tonalidad oscura para mostrar precisamente cual par...

Page 20: ...OS PLATEADOS DE CABEZA PERDIDA de 28 mm 10S PASO 6 Cuidadosamente voltee la unidad para que repose sobre los bordes delanteros Fije el DORSO INFERIOR D al ESTANTE C Utilice tres TORNILLOS NEGROS DE CA...

Page 21: ...lice el nivel para asegurarse que el SOPORTE DE PARED K est a nivel en la pared Marque las dos ubicaciones de los agujeros del SOPORTE DE PARED K en la pared Si los dos agujeros del SOPORTE DE PARED K...

Page 22: ...nger ventuel Solution Monter correctement le meuble au mur Si ne monte pas correctement le meuble risque de basculer et risque de provoquer des blessures et dommage Suivre avec pr caution les instruct...

Page 23: ...t Les pi ces de rechange seront garanties uniquement pendant la p riode restante de la garantie originale SAUDER NE SERA EN AUCUN CAS RESPONSABLE de TOUT DOMMAGE ACCESSOIRE OU CONS CUTIF DE TOUTE SORT...

Page 24: ...true to his core values of innovation integrity servanthood and stewardship Sauder products are made with environmentally responsible materials and world class manufacturing processes Our 2 000 dedic...

Reviews: