å
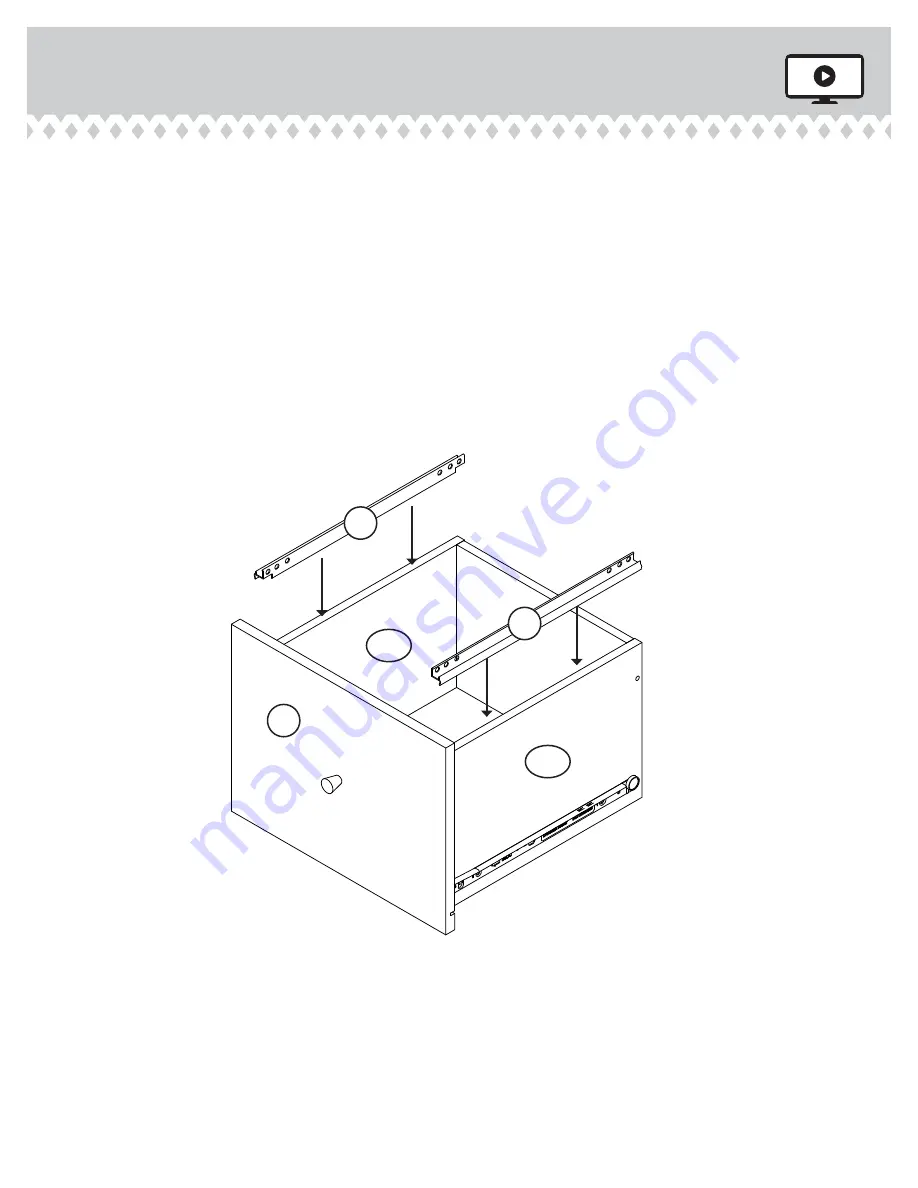
Push two FILE GLIDES (4B) onto the top edges of the LARGE DRAWER SIDES (D48 and D49).
Step 9
410637
www.sauder.com/services
Page 13
D49
D48
F
4B
Page 1: ...17 Espa ol pg 18 20 Lot 361948 05 08 14 Purchased __________________ Be sure to give us a ring before making any returns 1 800 523 3987 File Cart 410637 Need help Visit Sauder com to view video assem...
Page 2: ...15 17 18 20 21 22 23 Part Identi cation Hardware Identi cation Assembly Steps Fran ais Espa ol Safety Warranty Hammer Not actual size No 2 Phillips Screwdriver Tip Shown Actual Size Skip the power tr...
Page 3: ...help identify similar parts A RIGHT END 1 B LEFT END 1 C TOP 1 D BOTTOM 1 E BACK 1 F LARGE DRAWER FRONT 1 J DRAWER FRONT 1 D44 RIGHT DRAWER SIDE 1 D45 LEFT DRAWER SIDE 1 D48 LARGE RIGHT DRAWER SIDE 1...
Page 4: ...LEFT 2 35DC DRAWER RIGHT 2 35DD DRAWER LEFT 2 HIDDEN CAM 4 R2 CAM DOWEL 4 S2 NON SWIVEL CASTER 2 U SWIVEL CASTER 2 T DRAWER FRONT BRACKET 1 V SMALL DRAWER FRONT BRACKET 2 W KNOB 2 X BLACK 1 7 8 FLAT H...
Page 5: ...on the empty carton to avoid scratching your unit or the oor Push four HIDDEN CAMS R2 into the ENDS A and B Then insert the metal end of a CAM DOWEL S2 into each HIDDEN CAM 410637 www sauder com servi...
Page 6: ...BB through holes 1 and 3 410637 www sauder com services Page 6 35DA 35DA 35DB 35DB Roller end 1 3 2 1 3 2 Roller end Finished edge Finished edge S u r f a c e w i t h H I D D E N C A M S S u r f a c e...
Page 7: ...e or injury HIDDEN CAMS must be completely tightened HIDDEN CAMS that are not completely tightened may loosen and parts may separate To completely tighten Arrow Maximum 210 degrees A B C Surface with...
Page 8: ...SCREWS Y NOTE Two of the BLACK 1 7 8 FLAT HEAD SCREWS will go through the SWIVEL CASTERS T and into the ENDS 410637 www sauder com services Page 8 BLACK 9 16 LARGE HEAD SCREW 14 used for the CASTERS A...
Page 9: ...rners of your unit if needed to make it square Fasten the BACK E to your unit using the NAILS CC The NAILS should be 5 1 2 apart 1 1 2 from the corners and 1 4 in from the edges Step 5 410637 www saud...
Page 10: ...SCREWS 30S Slide one of the DRAWER BOTTOMS D716 into the grooves in the LARGE DRAWER SIDES and LARGE DRAWER BACK Repeat this step for the other drawer 410637 www sauder com services Page 10 D48 D78 D...
Page 11: ...16 LARGE HEAD SCREWS AA Pull the DRAWER FRONT BRACKETS V apart and slide them into the grooves in the DRAWER SIDES D44 and D45 Fasten the DRAWER FRONT J to the DRAWER FRONT BRACKETS Use four BLACK 9...
Page 12: ...hrough holes 1 and 3 Fasten a KNOB X to the LARGE DRAWER FRONT F Use a BLACK 7 8 MACHINE SCREW Z Repeat this step for the other drawer 410637 www sauder com services Page 12 1 3 2 1 3 2 D49 D48 F 35DD...
Page 13: ...Push two FILE GLIDES 4B onto the top edges of the LARGE DRAWER SIDES D48 and D49 Step 9 410637 www sauder com services Page 13 D49 D48 F 4B 4B...
Page 14: ...ments to the drawers loosen the SCREWS in the DRAWER FRONT BRACKETS make needed adjustments and tighten the SCREWS NOTE Please read the back pages of the instruction booklet for important safety infor...
Page 15: ...en anglais Chaque tape en fran ais correspond la m me tape en anglais La pi ce devant tre attach e l l ment est repr sent e en gris sur les sch mas de chaque tape pour plus de pr cision Comparer la Li...
Page 16: ...nts avant D plier l ARRI RE E et le placer sur l l ment Veiller avoir des marges gales le long des quatre chants de l ARRI RE E Si besoin est enfoncer sur les coins oppos s de l l ment pour s assurer...
Page 17: ...iliser une VIS NOIRE M TAUX 22 mm Z R p ter cette tape pour l autre tiroir TAPE 10 Relever avec pr caution l l ment dans sa position verticale Pour ins rer les tiroirs dans l l ment abaisser le devant...
Page 18: ...ara mostrar precisamente cual parte se debe montar a la unidad Compare la Lista de Part abajo con la Part Identi cation en el folleto en ingl s para familiarizarse con Las partes de ensamblaje NOTA ES...
Page 19: ...re los bordes delanteros Desdoble el DORSO E y col quelo sobre la unidad Fije el DORSO E de manera que los m rgenes son iguales a lo largo de los cuatro bordes Empuje sobre las esquinas opuestas de la...
Page 20: ...a la CARA DE CAJ N GRANDE F Utilice un TORNILLO NEGRO PARA METAL de 22 mm Z Repita este paso para el otro caj n PASO 10 Cuidadosamente ponga la unidad en posici n vertical Para insertar los cajones d...
Page 21: ...on peut tre l origine de risques d accident ou peut endommager le mobilier et les articles m nagers Lire attentivement le tableau suivant surveiller Danger ventuel Solution Tablettes et tiroir surchar...
Page 22: ...ossobrelosstantesinferiores Mover el carrito inapropiadamente Riesgo de lesiones o da o al equipo El carrito puede inclinar si no se mueve con cuidado sobre los obst culos o sobre una superficie de pi...
Page 23: ...de rechange seront garanties uniquement pendant la p riode restante de la garantie originale SAUDER NE SERA EN AUCUN CAS RESPONSABLE de TOUT DOMMAGE ACCESSOIRE OU CONS CUTIF DE TOUTE SORTE et lesdits...
Page 24: ...d true to his core values of innovation integrity servanthood and stewardship Sauder products are made with environmentally responsible materials and world class manufacturing processes Our 2 000 dedi...