background image


20


2


Get started 

This chapter provides information about how to work 

with your terminal and make connection to computer. 


2.1


Set up your terminal 

1.


Choose one to power on your terminal 


Open the battery cover and Install two AA 

batteries. 


Connect your terminal to your computer using 

USB or RS-232 cable with adapter. 

2.


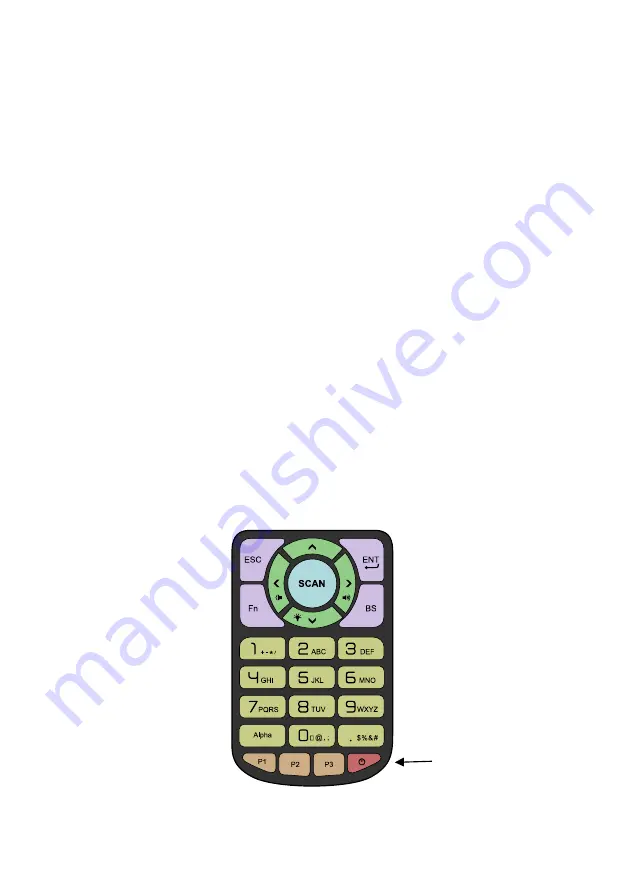
Press the Power key to turn on your terminal. 


Power key 

Summary of Contents for Argox AP Series

Page 1: ...User s Manua Data Collector PI XXXX AP XXXX SP XXXX PE XX X 0 9 A Z a z dash or blank...

Page 2: ...ns may cause harmful interference to radio communications However there is no guarantee that interference will not occur in a particular installation If this equipment does cause harmful interference...

Page 3: ...mits set forth for an uncontrolled environment The equipment must not be co located or operating in conjunction with any other antenna or transmitter This device complies with Part 15 of the FCC Rules...

Page 4: ...under the Display Grant section of www fcc gov eot ea fccid after searching on FCCID NBF PI 1X30 RF Exposure Information SAR This device meets the government s requirements for exposure to radio wave...

Page 5: ...t circuit heat the battery or dispose of in fire Store battery pack in a proper place Do not expose to temperature above 60 140 Use specified charger only Please dispose of the used batteries followin...

Page 6: ...i Release Note Version Date Note V1 0 02 22 2017 Initial release...

Page 7: ...Vibration 8 1 4 Keypad 9 1 5 Power source 14 1 5 1 Inserting or replacing battery 15 1 5 2 Charge the battery 18 2 Get started 20 2 1 Set up your terminal 20 2 2 User interface 21 2 3 Connection 23 2...

Page 8: ...4 Environment 35 3 2 5 Test 36 3 2 6 System info 38 3 3 Supervisor Menu 39 3 3 1 Remote Link 40 3 3 2 Format disk 43 3 3 3 Setting 44 3 3 4 Information 49 4 Applications 50 5 Troubleshooting 51 5 1 H...

Page 9: ...t wear off between uses Battery cover open detection When the switch of the battery cover is up the system automatically saves your files and shut down Large flash memory PI series offers more flash m...

Page 10: ...2 1 1 Unpacking Make sure all of the following items are included in your package PI series Quick Start Guide USB Cable or RS 232 Cable with USB power cord Holder Option Hand Strap...

Page 11: ...nd inspect for shipping damage If you discover any damage contact the shipping company and file a claim Argox is not responsible for any damage incurred during shipping Save all package materials for...

Page 12: ...ttom 1 LED Three LEDs 2 LCD Display A mono LCD 3 Keypad A 25 key keypad 4 Battery Cover The battery cover 5 Battery Cover Switch Open and close the battery cover 6 Reading Window The bar code reading...

Page 13: ...5 8 Connector A port to connect computer 1 2 2 Holder Option The holder is used to hold your terminal in its standing position In the bottom of holder make sure cable wire is installed as below...

Page 14: ...current status 1 3 1 LED Your terminal has three LEDs on the upper left corner They have different behavior The table below gives information about the status they indicate LED Color Scan LED Green Re...

Page 15: ...e SDK Flashing orange User defined Use SDK Off No data transmission or user defined Use SDK BT Wi Fi LED Solid blue Your terminal is connected through Bluetooth or Wi Fi Flashing blue Your terminal is...

Page 16: ...can define the status the vibration indicates using the SDK Sound Status 1 Short Beep A key is pressed A good scan An error occurred 2 Short Beep The battery is low 4 Short Beep Battery is too low to...

Page 17: ...a bar code Cursor keys Up Move the highlight bar up Fn Up Open Message Menu Down Move the highlight bar down Fn Down Adjust the backlight brightness The brightness repeats the sequence 0 1 2 3 Left M...

Page 18: ...klight brightness The function of F0 F9 Fn 0 9 can be defined using an SDK ENT The Enter key 1 Enter a menu 2 Select an option BS The Backspace key 1 Delete a character to the left of the cursor Numer...

Page 19: ...M N O 7 1 Enter the number seven 2 Enter the letters P Q R S 8 1 Enter the number eight 2 Enter the letters T U V 9 1 Enter the number nine 2 Enter the letters W X Y Z 0 1 Enter the number zero 2 Ente...

Page 20: ...ination key You can use the key combinations to enter different menus or modes Press and hold the combination of keys until your terminal responds 3 9 Power System Menu 1 3 0 Power Supervisor Menu 1 3...

Page 21: ...n t be resolved in any other way BIOS reset it is the same as BIOS default see Supervisor Menu It resets all your terminal settings including the password of Supervisor Menu Warm reset It restarts you...

Page 22: ...pply with the USB or RS 232 cable Cable Type Charge your batteries Supply power without batteries Need to use with a power supply USB Yes Yes No RS 232 No No Yes Warn Do not collect data while plug th...

Page 23: ...a after work or keep two AA batteries in case Caution Do not mix old batteries and new batteries or standard carbon zinc with alkaline batteries Remove batteries if product is not to be used with for...

Page 24: ...16 2 Inserting two batteries as indicated inside battery compartment 3 Close the battery cover as follow...

Page 25: ...17 4 Make sure cover is closed and slide two latch back...

Page 26: ...nnecting the USB cable to your terminal and use a power supply When your batteries are fully charged the Charger LED turns to solid red Important To protect power source PI series can not be powered o...

Page 27: ...19 Note The triangle mark should be face up when you want to plug connecter in to PI series...

Page 28: ...al and make connection to computer 2 1 Set up your terminal 1 Choose one to power on your terminal Open the battery cover and Install two AA batteries Connect your terminal to your computer using USB...

Page 29: ...Options Items in the menu Status bar It displays the information about your terminal Input method The way you enter data You can enter numbers lowercase or uppercase characters Time The current time M...

Page 30: ...or Wi Fi function it displays an icon without waves If connection is successful the icon will show waves Power source If your terminal is connected to a direct power supply USB or RS 232 it displays a...

Page 31: ...t is a unique protocol from Argox development Visit Argox website below to download application http www argox com content2011 php sno 0000033 Linking port Transmit raw data 1 Byte a time Developer ca...

Page 32: ...essage menu to send message when the connection successful Use Remote link to connect PC with USB Step 1 After link USB cable between PI series and PC press Power key to open PI series Step 2 Move cur...

Page 33: ...25 Step 4 Choose Connect Step 5 In PhoenixVoler or Everlink Click Comm setup will show the model number Successfully connected to PC...

Page 34: ...ou receive Read Msg It shows the message you sent Send Msg To Everlink Send to is 9000 To ControlCenter Send to is 9001 To otherPI series device Send to default depends on SN last four number To chang...

Page 35: ...your terminal between uses Attach the hand strap is a useful way to resolve these issues You can wrap the strap around your hand to secure it to your hand or hang it on your hand to have both hands fr...

Page 36: ...2 Thread the big loop into the small loop and pull the big loop to tie a knot Important Use hand strap when you collect barcode in case drop accident PI series might shut down to protect data after dr...

Page 37: ...and Supervisor Menu is for system administrators or engineers Besides press Fn can enter Message Menu This chapter provides information about these menus 3 1 User Menu User Menu includes three frequen...

Page 38: ...ram it will tell you No program file For more information about how to connect to a computer and download programs from it see PhoenixVoler or Everlink User guide 3 1 2 Remote Link It is for you to co...

Page 39: ...e If you want to connect via Bluetooth or WI FI you need to enter Supervisor Menu and set up Bluetooth connection or WI FI connection first After completing the setting you can connect your terminal f...

Page 40: ...function barcode default 3 1 4 Information It displays your terminal s information IPL The IPL version BOOT The boot version Kernal The kernel version Scanner The scanner s firmware version SN The se...

Page 41: ...you can change system settings to meet your need and run some tests to see if your terminal is working properly Press key 3 9 Power to enter system menu 3 2 1 Remote Link See the description in Remot...

Page 42: ...lt your terminal has two disks C and D 3 2 3 Timer setting Set date time You can set date and time here Set time format You can set the time format here It provides the 12 hour or 24 hour clock and on...

Page 43: ...st the darker the screen 1 10 Backlight timer It determines how long the backlight stays on after you press a key 1 65535 Set 0 will always on Auto off timer It turns off your terminal after a certain...

Page 44: ...ll turn it off 3 2 5 Test It provides various tests for you to check your terminal system Memory test It checks if the memory can be written and read properly Note that this test removes all data stor...

Page 45: ...run this test For more information about the port setting see the description in Setting in Supervisor Menu After you set a port do this 1 Select the port you want to test and press ENT 2 Your termin...

Page 46: ...38 3 2 6 System info See the description in Information in User Menu...

Page 47: ...enu 1 3 0 PWR Supervisor Menu provides advanced settings for you to configure To protect the settings from being changed easily you need to enter a password to access the menu By default the password...

Page 48: ...Everlink or PhoenixVoler to computer Connect It connects your terminal to computer after you select an interface Remote I F Select It provides interfaces including COM port Bluetooth and WI FI Remote...

Page 49: ...other devices to enter a PIN code when they try to connect to your terminal b Encryption It encrypts the connection to prevent data theft 4 Inquiry timeout It determines how long your terminal stops...

Page 50: ...s WI FI It has three options 1 Setting 1 WI FI SSID a Set by search Search WI FI signal in the neighborhood b Set by keyin Type New SSID to connect the WI FI you prefer 2 Network It is the same as com...

Page 51: ...he process need to wait about 3 15 seconds PI series will show the connect success of fail on the screen 3 Information It displays WI FI information 1 Remote port show the page is under remote port 2...

Page 52: ...3 3 Setting It offers a variety of settings that you can change to meet your need Equipment ID Your terminal s ID The default ID is four zeros 0000 You can replace it with a new ID The ID needs to be...

Page 53: ...u visited in User Menu every time you turn on your terminal 2 Reset The system displays the default screen in User Menu every time you turn on your terminal Status bar You can choose if you want to di...

Page 54: ...Image When you turn on this feature you can scan both regular and inverted bar codes Preamble Add a character or characters before a bar code Postamble Add a character or characters after a bar code B...

Page 55: ...u can change the language for the system to display items in the user interface It has two options English TC Traditional Chinese and SC Simple Chinese Linking port You can decide which port you want...

Page 56: ...rface choose None Port IF setup It provides the settings of COM Bluetooth and WI FI For more information about the settings see Remote Link in Supervisor Menu Port info It displays the port informatio...

Page 57: ...nformation IPL The IPL version BOOT The boot version Kernal The kernel version Scanner The scanner s firmware version SN The serial number HW Ver The PCBA Printed Circuit Board Assembly version HW Int...

Page 58: ...PI series with files transmission message sending and history data function Control center Remote end of manage program can link multiple Everlink and provide Cloud operation Development application...

Page 59: ...e Test to check keypad The system might be crush Use Scan Power key to warm reset or cold reset hold 5 seconds My terminal keeps turning itself off or can not open If you re using batteries check them...

Page 60: ...and unplug the USB and try again Receive or transmit problem on RS 232 Check RS 232 connector is plugged correctly Check Remote Link set is COM port and select the same port on computer Restart PI se...

Page 61: ...angle between the bar code and the terminal Change the distance between the bar code and the terminal Clean the scanning window slightly of the terminal make sure without scratch Enabled the bar code...

Page 62: ...M 20 60 MB Flash Display White gray mono STN LCD 160 160 Indicator LED Blue Green and Red Beeper Vibration Motor Keypad 25 Alpha Numeric keys Including 10 function keys 3 programmable hot keys Accesso...

Page 63: ...13 mil PCS 90 254 mm 13 mil 390 mm 13 mil Scanning rate 200 scan sec 100 scan sec Decode capability 1D barcode Code 11 Code 39 Code 93 Code 128 EAN 8 EAN 13 UPC A UPC E Industrial 25 Interleaved 25 S...

Page 64: ...USB 2 0 RS 232 USB 2 0 RS 232 USB 2 0 RS 232 Expansion Storage Micro SD up to 16 GB Developing Tools Software Software Development Kit SDK Skywalker Proprietary application software generator Programm...

Page 65: ...age Temperature 20 70 4F 158F Humidity 1 Operating Non condensed 10 90 2 Storage Non condensed 5 95 Impact Resistance 1 Terminal 1 5M 5ft Holder 0 9M 4 drops per 6 sides 2 IP54 Electrostatic Discharge...

Page 66: ...on Disable Enable Transmission Preamble transmission Disable Enable Postamble transmission Disable Enable Code ID position Before code data After code data Code ID transmission Disable Proprietary ID...

Page 67: ...image scan Disable Enable String setting Prefix characters setting 0 0x00 0xff ASCII code 12 characters Suffix characters setting 0 0x00 0xff ASCII code 12 characters Preamble characters settings 0 0x...

Page 68: ...gits Enable One digit Enable Two digits Max code length 0 64 0 Min code length 0 64 0 Truncate leading 0 15 0 Truncate ending 0 15 0 Code ID setting O 0x00 0xff ASCII code 1 or 2 bytes Code 39 Read Di...

Page 69: ...15 0 Code ID setting 0x00 0xff ASCII code 1 or 2 bytes Format Standard Full ASCII Start stop transmission Disable Enable Code 93 Read Disable Enable Check sum transmit verify Disable Disable Disable E...

Page 70: ...or 2 bytes Code 128 Read Disable Enable Check sum transmit verify Disable Disable Disable Enable Enable Enable Max code length 0 64 0 Min code length 0 64 1 Truncate leading 0 15 0 Truncate ending 0...

Page 71: ...ytes Codabar Read Disable Enable Check sum transmit verify Disable Disable Disable Enable Enable Enable Max code length 0 64 0 Min code length 0 64 0 Truncate leading 0 15 0 Truncate ending 0 15 0 Cod...

Page 72: ...um transmission Disable Enable Truncate leading 0 15 0 Truncate ending 0 15 0 Code ID setting FF 0x00 0xff ASCII code 1 or 2 bytes Supplement digits None 2 digits 5 digits 2 5 digits UCC EAN 128 2 UCC...

Page 73: ...e Check sum transmission Disable Enable Truncate leading 0 15 0 Truncate ending 0 15 0 Code ID setting F 0x00 0xff ASCII code 1 or 2 bytes Supplement digits None 2 digits 5 digits 2 5 digits UCC EAN 1...

Page 74: ...0 Truncate leading 0 15 0 Truncate ending 0 15 0 Code ID setting i 0x00 0xff ASCII code 1 or 2 bytes Interleaved 2 of 5 Read Disable Enable Check sum transmit verify Disable Disable Disable Enable Ena...

Page 75: ...Enable Check sum transmit verify Disable Disable Disable Enable Enable Enable Max code length 0 64 0 Min code length 0 64 0 Truncate leading 0 15 0 Truncate ending 0 15 0 Code ID setting i 0x00 0xff...

Page 76: ...e length 0 64 0 Min code length 0 64 0 Truncate leading 0 15 0 Truncate ending 0 15 0 Code ID setting 0x00 0xff ASCII code 1 or 2 bytes UK Plessey Read Disable Enable Check sum transmit verify Disable...

Page 77: ...x00 0xff ASCII code 1 or 2 bytes Telepen Read Disable Enable Check sum transmit verify Disable Disable Disable Enable Enable Enable Max code length 0 64 0 Min code length 0 64 0 Truncate leading 0 15...

Page 78: ...e Enable Truncate leading 0 15 0 Truncate ending 0 15 0 Code ID setting A 0x00 0xff ASCII code 1 or 2 bytes Supplement digits None 2 digits 5 digtis 2 5 digits UCC EAN 128 2 UCC EAN 128 5 UCC EAN 128...

Page 79: ...5 0 Code ID setting E 0x00 0xff ASCII code 1 or 2 bytes Supplement digits None 2 digits 5 digits 2 5 digits UCC EAN 128 2 UCC EAN 128 5 UCC EAN 128 All Truncate expansion None Truncate leading zero Ex...

Page 80: ...able Enable Enable Enable Max code length 0 64 0 Min code length 0 64 0 Truncate leading 0 15 0 Truncate ending 0 15 0 Code ID setting B 0x00 0xff ASCII code 1 or 2 bytes China post Read Disable Enabl...

Page 81: ...able Enable Truncate leading 0 15 0 Truncate ending 0 15 0 Code ID setting R4 0x00 0xff ASCII code 1 or 2 bytes UCC EAN 128 emulation Disable Enable RSS Limited Read Disable Enable Truncate leading 0...

Page 82: ...0 99 99 Min code length 0 99 1 Truncate leading 0 15 0 Truncate ending 0 15 0 Code ID setting RX 0x00 0xff ASCII code 1 or 2 bytes UCC EAN 128 emulation Disable Enable Italian Pharmacode 39 Read Disab...

Page 83: ...75 Truncate ending 0 15 0 Code ID setting p 0x00 0xff ASCII code 1 or 2 bytes Leading A Disable Enable...

Reviews: