background image

6

S-Link Sensor Wiring

1.

Review the Precautions section.

2.

Connect unscreened cable to terminals 

39

 and 

78

. Polarity makes 

no difference.

See the MN-Sx data sheet (DS 10.000A) for sensor connection 
details.

Universal Input (UI) Wiring

UI Configuration

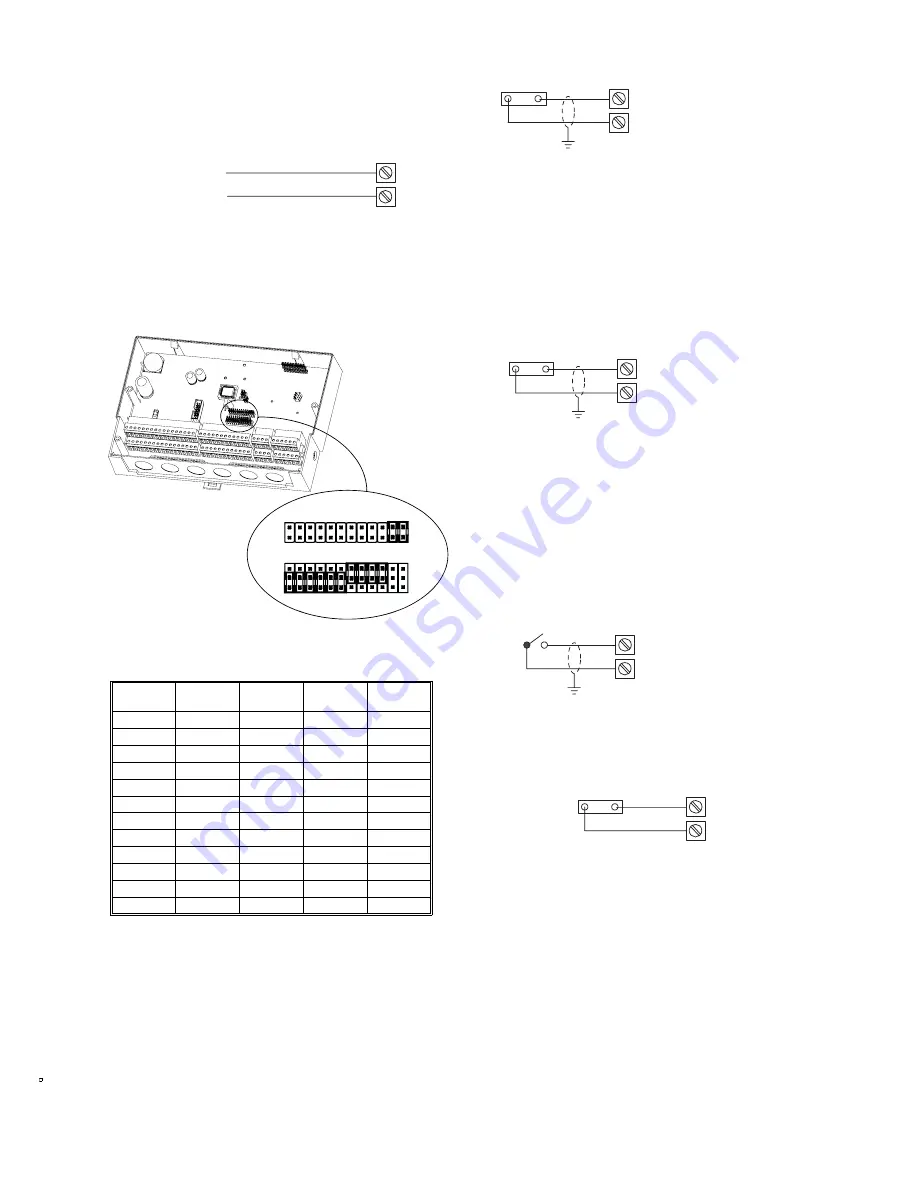
Each UI must be configured as either a Voltage (0 to 10Vdc), 
Resistive/Temperature (0-10k

Ω

), or Digital Input. This must match the 

usage of the UI in the controller application. Configuration is achieved 
by placing the shorting block (jumper) onto the appropriate pins:

Refer to the controller’s 'Controller Definition Drawing' in VisiSat for a 
picture of the required UI jumper settings for the controller. Factory 
default configuration is shown in the following table. If an input is not 
used, leave jumper in the default position.

Note: Each device connected to a UI must use a separate signal and 
return conductor. If screened cable is used, connect the screen to 
ground at one end only.

Voltage UIs

Note: An externally powered 0 to 10Vdc sensor is required. The input 
impedance of a voltage input is 430k

Ω

.

1.

Review the Precautions section.

2.

Connect positive signal wire from 0 to 10Vdc device to desired 
input terminal (18, 19, 20, 21, 22, 23, 24, 25, 26, 27, 28 or 29).

3.

Connect negative signal wire to one UI common (COM ) terminal 
(57, 58, 59, 60, 61, 62, 63, 64, 65, 66, 67, 68).

4.

Make certain jumper is in Voltage position. 

Resistive (Temperature) UIs

1.

Review the Precautions section.

2.

Connect one wire from the resistive device to desired input 
terminal (18, 19, 20, 21, 22, 23, 24, 25, 26, 27, 28 or 29). Polarity 
is not important. 

3.

Connect other wire to UI common (COM ) terminal (57, 58, 59, 60, 
61, 62, 63, 64, 65, 66, 67, 68). 

4.

Make certain input configuration jumper is in Resistive position. 

Digital UIs

Note: Only dry (voltage free) contacts can be monitored. Maximum 
count frequency is once every two seconds.

1.

Review the Precautions section.

2.

Connect one wire from field contact to desired input terminal (18, 
19, 20, 21, 22, 23, 24, 25, 26, 27, 28 or 29). Polarity is not 
important. 

3.

Connect other wire to one UI common (COM) terminal (57, 58, 59, 
60, 61, 62, 63, 64, 65, 66, 67, 68). 

4.

Make certain input configuration jumper is in Digital position.

Wiring for 15Vdc Source

The 15Vdc terminal can provide a 25mA source for use with a DUSF 
sensor.Connect load to terminal 38 and 77.

Terminal 

Number

Input 

Number

Resistive

A

Digital

B

Voltage

C

18

1

Link 1A

19

2

Link 2A

20

3

Link 3A

21

4

Link 4A

22

5

Link 5A

23

6

Link 6A

24

7

Link 7B

25

8

Link 8B

26

9

Link 9B

27

10

Link 10B

28

11

Link 11C

29

12

Link 12C

{

S-Link Sensor

39

78

1     2     3    4     5    6    7

     8    9   10   11  12  13  14   15   16  17

18   19  20  21  22   23   24  25  26  2

7  28  29

30  31  32  33

34  35  36  37 38  39

40  41   42   43  44  45   46   47  

48  49  50  51  52  53   54   55  

56

57  58  59   60  61  62   63  64   65  6

6  67  68

69   70  71   72

73  74  75  76  77  78

B = Digital

C = Voltage

A = Resistive

1   2   3  4   5  6  7   8  9 10 11 12

1   2   3  4   5  6  7   8  9 10 11 12

LK19

LK7

A

B

C

- +

Configure input as Voltage UI

18, 19, 20, 21, 22, 23, 24, 25, 26, 27, 28 
or 29

57, 58, 59, 60, 61, 62, 63, 64, 65, 66, 67 
or 68

Refer to the Wiring Routing Rules section.

18, 19, 20, 21, 22, 23, 24, 25, 26, 27, 28 
or 29

57, 58, 59, 60, 61, 62, 63, 64, 65, 66, 67 
or 68

Configure input as Resistive UI:

Refer to the Wiring Routing Rules section.

Configure input as Digital UI:

18, 19, 20, 21, 22, 23, 24, 25, 26, 27, 28 
or 29

57, 58, 59, 60, 61, 62, 63, 64, 65, 66, 67
or 68

Refer to the Wiring Routing Rules section.

15Vdc load

38

77

Summary of Contents for MN650 Series

Page 1: ...ownload and modify applications An optional Real Time Clock card can be fitted which maintains controller time during a power failure The RTC card contains a 3V 125mAh Lithium cell which has a life of at least 5 years Networked controllers receive time updates automatically from a MicroNet Manager Interface or Touch Screen time master A Satchwell MicroNet Touch Screen or LCD can be mounted onto th...

Page 2: ... EEC and Electromagnetic Compatibility 89 336 EEC Federal Communications Commission FCC This equipment has been tested and found to comply with the limits for a Class A digital device pursuant to Part 15 of the FCC Rules These limits are designed to provide reasonable protection against harmful interference when the equipment is operated in a commercial environment This equipment generates uses an...

Page 3: ...3 Do the following to mount controller on a DIN rail a While pulling down on DIN rail locking bracket snap controller base on a 35mm DIN mounting rail b Release DIN rail locking bracket Location The controllers are suitable for indoor use only When selecting a mounting location make certain the following conditions are met Do not install where excessive moisture corrosive fumes vibration or explos...

Page 4: ...nded cable for NCP networks is Belden 9502 dual twisted pair screened cable for full opto isolation in areas of high electrical noise However Belden 8762 single twisted pair cable can be used providing that the wiring precautions shown in the MicroNet System Engineering Guide are followed The terminals to use for network connections depend on whether or not a Touch Screen is mounted on the control...

Page 5: ... must be biased and terminated by fitting jumpers to A B and C of LK4 If the controller is not at one end leave the links unset A local MN50 LCD can be connected to the controller at pins 32 33 and 71 or 72 LAN B 1 2 3 4 5 6 7 8 9 10 11 12 13 14 15 16 17 18 19 20 21 22 23 24 25 26 27 28 29 30 31 32 33 34 35 36 37 38 39 40 41 42 43 44 45 46 47 48 49 50 51 52 53 54 55 56 57 58 59 60 61 62 63 64 65 6...

Page 6: ...her wire to UI common COM terminal 57 58 59 60 61 62 63 64 65 66 67 68 4 Make certain input configuration jumper is in Resistive position Digital UIs Note Only dry voltage free contacts can be monitored Maximum count frequency is once every two seconds 1 Review the Precautions section 2 Connect one wire from field contact to desired input terminal 18 19 20 21 22 23 24 25 26 27 28 or 29 Polarity is...

Page 7: ...ontaining non isolated full wave rectifier power supplies If multiple devices are powered from the same transformer verify that the transformer is properly sized to power all equipment simultaneously and all devices contain the same type of rectifier power supplies or internal isolation Also verify that correct polarity has been maintained between all connected devices Refer to DS 10 250 EN 206 Gu...

Page 8: ...ts OFF until an application is downloaded The cold start is performed using the controller s switch S1 To perform a cold start 1 Verify all devices connected to controller are in a manually controlled safe state 2 Energize controller and verify the following Green Heartbeat LED LD5 is steady on for a short period After steady on period the green LED adopts a normal heartbeat flash rate 3 Place bit...

Page 9: ...t rate see note Null Outputs Short pulse at Flasher object rate see note Unprogrammed Very fast strobe Uncalibrated Note The pulse rate is determined by the Flash rate set up in the System Flasher object in bubbleland default 1 flash per second LD5 Green Heartbeat LED ARCNET only Pulsing more on than off indicates a duplicate ARCNET node ID Pulsing more off than on indicates that ARCNET is initial...

Page 10: ...o be removed during the installation of this equipment ensure that they are refitted after installation to comply with UL and CE safety requirements Do not exceed the maximum ambient temperature Interference with parts under sealed covers invalidates guarantee Do not charge short circuit or solder the MN RTC battery Do not allow contact with water nor heat disassemble or dispose of in fire Do not ...

Page 11: ...11 ...

Page 12: ...12 ...

Reviews: