


69
Receiver installation and electrical wiring
For reference, use the front of the receiver's start instructions.
.
The installation should be performed by qualified personnel. Before installation, be sure to read all the
operating instructions and safety notes in these instructions and the instructions of other devices that are
connected to the electrical system or the network. Also, turn off the main power supply.
Receiver installation
Open the receivers housing by unscrewing the screw on the top of the case. Now carefully open the housing from the
front side. Install the housing on a wall with included screws. Now, do preform complete the
electrical wiring. After
you’ve connected all the wires, close the housing and put the top screw back in its place.
Tip:
Do not mount the receiver on a metal surface, very close to metal objects and other electrical devices, as there
can be interference in wireless communication between the receiver and the thermostat. Also, the RF
100m range is defined as theoretical nature, and in practice this is influenced by a huge number of factors
(from type of house, other wireless devices, electrical appliances, …) so be careful to mount the receiver
in a posit
ion where it can normally communicate with the thermostat. The devices uses top quality
electrical elements but yet, we cannot influence on all factors.
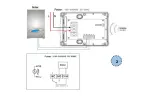
Electrical wiring
Make the connection as instructed by the device
(stove, pump, heater, …)
to be connec
ted to the receiver or switch
unit. Power
and voltfree
contact is available. An example scheme is shown at the beginning of the receiver's
instructions
.


